Lab: Configuration as Code
Learn how to manage your entire Ansible Automation Platform configuration as code using Ansible playbooks. This includes configuring organizations, teams, users, credentials, projects, inventories, job templates, and execution environments through automated, version-controlled processes.
Learning Objectives
After completing this module, you will be able to:
-
Understand the principles of infrastructure and configuration as code
-
Configure AAP organizations, teams, and users programmatically
-
Manage credentials, projects, and inventories through code
-
Create and configure job templates via automation
-
Implement execution environment management
-
Deploy complete AAP configurations using CI/CD pipelines
1: Introduction
In this module, we will explore how to manage Ansible Automation Platform (AAP) configurations declaratively as code using Ansible playbooks and the infra.aap_configuration collection instead of manually configuring settings through the AAP user interface. This approach allows for automated, repeatable, and version-controlled management of AAP settings, ensuring consistency across environments.
| In prior labs, we provided many of the values that were required to simplify the experience. However, in this lab, you will be required to specify the majority of the values based on your environment. This approach will enable you to better understand how the values apply to Configuration as Code. |
2. Lab Setup: Configuring Your Environment
First, let’s build a new EE with all our required collections including the infra.aap_configuration collection.
2.1: Local Environment Preparation
Create a new directory called config_as_code for the resources that will be created within this lab and change into the newly created directory.
mkdir  /projects/devspaces-example/config_as_code
cd /projects/devspaces-example/config_as_code
2.2: Build a new EE
Create a new execution-environment.yml file within the config_as_code directory with the following content:
---
version: 3

images:
  base_image:
    name: aap-aap.{openshift_cluster_ingress_domain}/ansible-automation-platform-25/ee-minimal-rhel9:latest

dependencies:
  system:
    - gcc [platform:rpm]
    - systemd-devel [platform:rpm]
    - python3.11-devel [platform:rpm]
  galaxy:
    collections:
      - name: ansible.platform
      - name: ansible.controller
      - name: ansible.hub
      - name: ansible.eda
      - name: infra.aap_configuration
options:
  package_manager_path: /usr/bin/microdnf

additional_build_steps:
  prepend_galaxy:
    - ARG TOKEN
    - ENV ANSIBLE_GALAXY_SERVER_LIST='published,certified,validated,community'
    - ENV ANSIBLE_GALAXY_SERVER_CERTIFIED_URL='{aap_controller_web_url}/pulp_ansible/galaxy/rh-certified/'
    - ENV ANSIBLE_GALAXY_SERVER_CERTIFIED_TOKEN=$TOKEN
    - ENV ANSIBLE_GALAXY_SERVER_VALIDATED_URL='{aap_controller_web_url}/pulp_ansible/galaxy/validated/'
    - ENV ANSIBLE_GALAXY_SERVER_VALIDATED_TOKEN=$TOKEN
    - ENV ANSIBLE_GALAXY_SERVER_COMMUNITY_URL='{aap_controller_web_url}/pulp_ansible/galaxy/community/'
    - ENV ANSIBLE_GALAXY_SERVER_COMMUNITY_TOKEN=$TOKEN
    - ENV ANSIBLE_GALAXY_SERVER_PUBLISHED_URL='{aap_controller_web_url}/pulp_ansible/galaxy/published/'
    - ENV ANSIBLE_GALAXY_SERVER_PUBLISHED_TOKEN=$TOKEN
2.3: Build and Publish the Execution Environment
Build and push a new execution environment (EE) to your Private Automation Hub (PAH) registry that will enable the use of Config as Code.
Ensure that the PAH_API_TOKEN environment variable is set within your terminal session so that the build process can retrieve the required set of dependencies.
|
# Log in to your PAH container registry
podman login aap-aap.{openshift_cluster_ingress_domain}

# Build the EE. It will pull the base from PAH, then add our content.
ansible-builder build --tag config_as_code_ee:1.0 --build-arg TOKEN=$PAH_API_TOKEN

# Tag and push the image to your PAH registry
podman tag localhost/config_as_code_ee:1.0 aap-aap.{openshift_cluster_ingress_domain}/config_as_code_ee:1.0
podman push aap-aap.{openshift_cluster_ingress_domain}/config_as_code_ee:1.0
2.4: Creating Variable Files
Config as Code leverages Ansible variables files containing properties that will be used to drive the configuration of AAP. These variables include hosts, usernames, and other items that are reused in each role contained within the Config as Code collection.
Create a new directory config/dev containing variables for a dev AAP instance
mkdir -p config/devCreate the file config/dev/auth.yml with the following content.
aap_hostname: <AAP_HOST>
aap_username: "{{ student_account }}"
aap_password: "{{ aap_password }}"
aap_validate_certs: false
aap_request_timeout: 60

ee_pull_collections_from_hub: true
aap_service_account_username: aap_service_account

ee_registry_username: "{{ aap_username }} "
ee_registry_password: "{{ aap_password }}"
ee_registry_dest: "{{ aap_hostname }}/config"

ee_base_registry: "{{ aap_hostname }}"
ee_base_registry_username: "{{ aap_username }}"
ee_base_registry_password: "{{ aap_password }}"
ee_validate_certs: false
Update the value of <AAP_HOST> to match the location of your AAP instance (aap-aap.{openshift_cluster_ingress_domain}).
|
2.5: Define Secrets with Ansible Vault
Certain configurations of AAP contain sensitive information such as passwords and tokens. To securely manage these secrets, we will use Ansible Vault to encrypt them.
Create a file config/dev/vault.yml to store sensitive information.
---
aap_password: ### Insert AAP admin password here
aap_service_account_password: admin123!
console_token: ### Insert Red Hat Automation Hub console token here
hub_token: ### Insert Private Automation Hub (PAH) token here
gitea_pass: ### Insert Gitea password here
student_account: admin
vault_pass: cascLB2193
...| Red Hat Automation Hub Console token can be obtained by going to https://console.redhat.com/ansible/automation-hub/token/ and clicking load token |
| You will need to replace the placeholder values (# Insert … here) with the actual values. |
| For good configuration as code we recommend retrieving passwords from secure systems secret management systems (such as Hashicorp Vault). |
Create a .password file and put a password in it. This is the password vault uses to encrypt secrets. You can use the value provided, or choose a different value entirely.
cascLB2193| We do not recommend using .password files outside of lab environment This process is just to simplify/speed up the lab. |
The ansible.cfg configuration file points to the .password file which instructs Ansible Vault to use this file encrypting and decrypting sensitive values. This has been preopulated, but please review the ansible.cfg` file to see how this lab is connected to hub and uses the password file.
At the root of your project create a ansible.cfg file with the following content:
[defaults]
vault_password_file=.password
Encrypt the contents of the config/dev/vault.yml file using the password in the .password file
ansible-vault encrypt config/dev/vault.ymlAdditional documentation related to these tools can be found in the following resources below:
2.5: Create organizations
Config as Code leverages a standard set of variables that drives the configuration of different AAP resources. The next few sections will define the variables related to configure these reources.
Create a config/all/organizations.yml file to define the organizations to be created on AAP.
---
aap_organizations_all:
  - name: config_as_code
...
Documentation related to this component can be found below:
2.6: Create a Team
Create a config/all/teams.yml file to define the teams to be created on AAP.
---
aap_teams_all:
  - name: config as code team
    description: config as code team
    organization: config_as_code
...
Documentation related to this component can be found below:
2.7: Create a local service account user
Create a config/all/users.yml file to define the users to be created on AAP.
---
aap_user_accounts_all:
  - username: "{{ aap_service_account_username }}"
    password: "{{ aap_service_account_password }}"
    is_superuser: true
    state: "present"
...
Documentation related to this component can be found below:
2.8: Create hosts inventory file
Create a hosts inventory file that defines how the execution of Config as Code will be run:
[dev]
localhost
2.9: Create Collection Repositories and Remotes
Create a config/all/hub_repositories.yml file to create the list of community repositories and their remote counterpart.
---
hub_collection_remotes_all:
  - name: rh-certified
    token: "{{ console_token }}"
    url: https://console.redhat.com/api/automation-hub/content/published/
    auth_url: https://sso.redhat.com/auth/realms/redhat-external/protocol/openid-connect/token
  - name: validated
    token: "{{ console_token }}"
    url: https://console.redhat.com/api/automation-hub/content/validated/
    auth_url: https://sso.redhat.com/auth/realms/redhat-external/protocol/openid-connect/token
  - name: community
    url: https://galaxy.ansible.com/api/
    requirements:
      - containers.podman
      - community.postgresql

hub_collection_repositories:
  - name: rh-certified
    remote: rh-certified
    sync: false
  - name: validated
    remote: validated
    sync: false
  - name: community
    remote: community
    sync: false
hub_configuration_collection_repository_sync_async_delay: 5
hub_configuration_collection_repository_sync_async_retries: 150
...
Documentation related to this component can be found below:
2.10: Create a playbook to apply the configuration
The next step is to create a playbook that can be used to execute Config as Code.
Create a directory called playbooks and within the newly created directory, create an aap_config.yml playbook. This playbook will execute the aap_configuration dispatch role, applying the provided configurations in the necessary order to configure AAP.
---
- name: Playbook to configure ansible controller
  hosts: localhost
  connection: local
  gather_facts: false
  vars:
    dispatch_include_wildcard_vars: true
  tasks:
    - name: Include common vars
      ansible.builtin.include_vars:
        dir: ../config/all
        extensions:
          - 'yml'

    - name: Include env vars
      ansible.builtin.include_vars:
        dir: "../config/{{ env }}"
        extensions:
          - 'yml'

    - name: Call dispatch role
      ansible.builtin.include_role:
        name: infra.aap_configuration.dispatch

...
Documentation related to this component can be found below:
2.11: Check your paths
After creating the files and directories as described in the prior sections, the following directory should be present, Here’s the desired layout for your folders from the root of the repository. Please examine the file organization to confirm that each file resides in its correct location within this structure.
.
├── ansible.cfg
├── config
│   ├── all
│   │   ├── hub_repositories.yml
│   │   ├── organizations.yml
│   │   ├── teams.yml
│   │   └── users.yml
│   └── dev
│       ├── auth.yml
│       └── vault.yml
├── hosts
└── playbooks
    └── aap_config.yml

4 directories, 8 files
3: Publish to Gitea
With the proper configurations in place, we need to save our work to our Gitea instance.
3.1: Create Gitea Repository
Use the following steps to create a new repository on your Gitea instance.
-
Navigate to your Gitea instance and click the Sign In button on the upper right hand corner
-
Enter the username and password using the credentials provided from the Environment Details page and click the Sign In button
-
In the top left corner, click on the + symbol and select New Repository.
-
On the New Repository page, enter 'ansible_bootcamp_config_as_code' in the Repository Name field.
-
Leave everything else as default and click on the button at the bottom, Create Repository.
3.2: Create .gitignore file
Create a file named .gitignore in the root of your repository with the following content to exclude unnecessary files and directories from being tracked by Git.
context/
.password
ansible.cfg
.ansible/
.vscode/
3.3: Push code to repository
After an empty repository is created on your Gitea, we need to push the collection to the repository.
In the section Clone this repository, click the Copy URL icon on the far right to copy Gitea repository URL for the HTTPS protocol option.
Execute the following commands in the root directory of config_as_code directory.
git init
git checkout -b main
git add --all
git commit -m "Uploading config on initial commit"
git remote add origin {gitea_console_url}/{gitea_user}/ansible_bootcamp_config_as_code.git
git push -u origin main
4: Execute your first Configuration as Code Playbook
4.1: Run the Playbook
The next step is to run the playbook that executes Config as Code. This process kicks off the initial setup for everything we’ve just created for the Ansible Automation Platform.
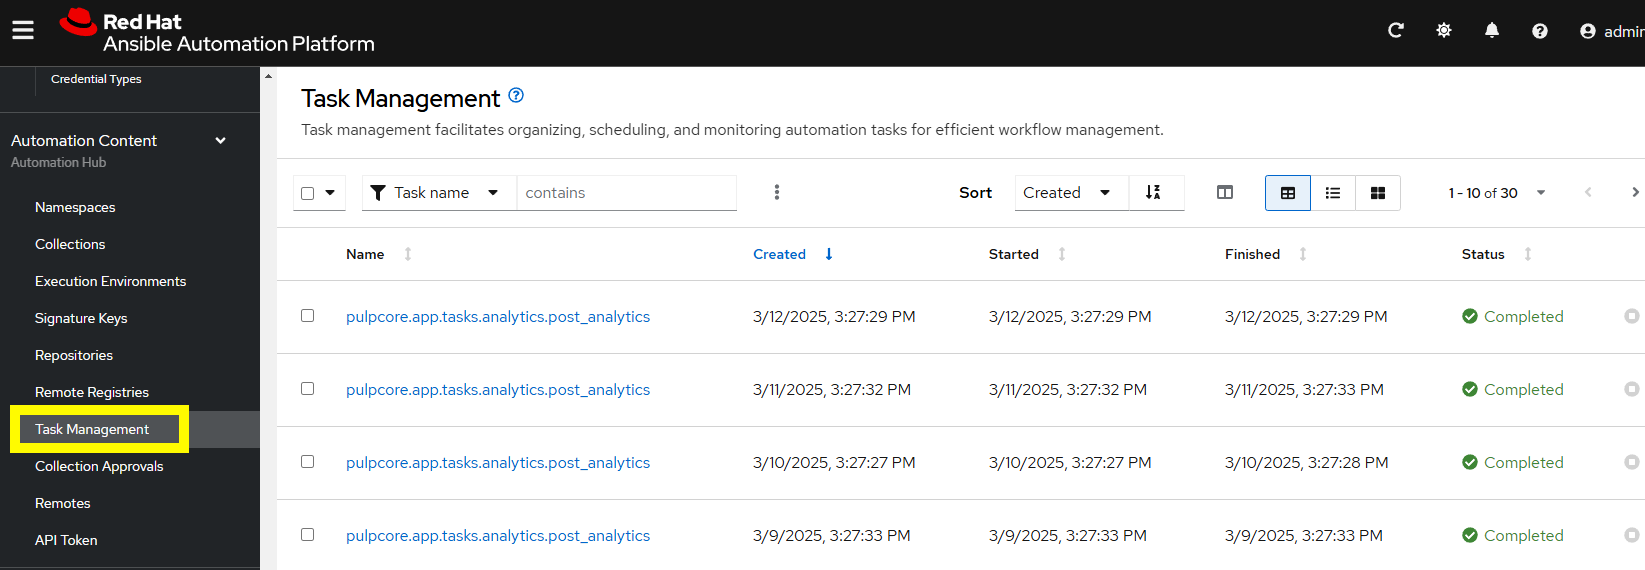
ansible-navigator run --pp=missing --eei=aap-aap.{openshift_cluster_ingress_domain}/config_as_code_ee:1.0 -m stdout playbooks/aap_config.yml -e env=devWhile the playbook is running, you can navigate to Automation Hub and review the progress in the Task Management page within to see the repository syncing process
4.2: Validate the configuration was applied
Now that Config as Code was applied to AAP, navigate to your AAP instance and verify that the configuration was applied correctly.
In particular, confirm that the following objects have been correctly created within your AAP instance and aligns to the definitions specified previously in the variable files.
-
Org
-
Repository
-
User
-
Team
| Org, user, and Team data can be in the AAP GUI under Acess Management tab, Repository information can be found in the Automation Content section. |
5: Additional Configuration as Code Components
In this section, you will only be given a summary of the objects you need to create along with screenshots of a configured controller instance that has been configured with the completed code. You will also be provided the variables sections from the README’s for each of the required roles to help you complete this task.
| Be sure to follow the steps within each section to ensure all of the desired objects are created. |
5.1: Configure settings
Create a config/all/settings.yml file with the following content.
---
controller_settings_all:
  settings:
    GALAXY_IGNORE_CERTS: true
...
Documentation related to this component can be found below:
5.2: Configure Execution Environments
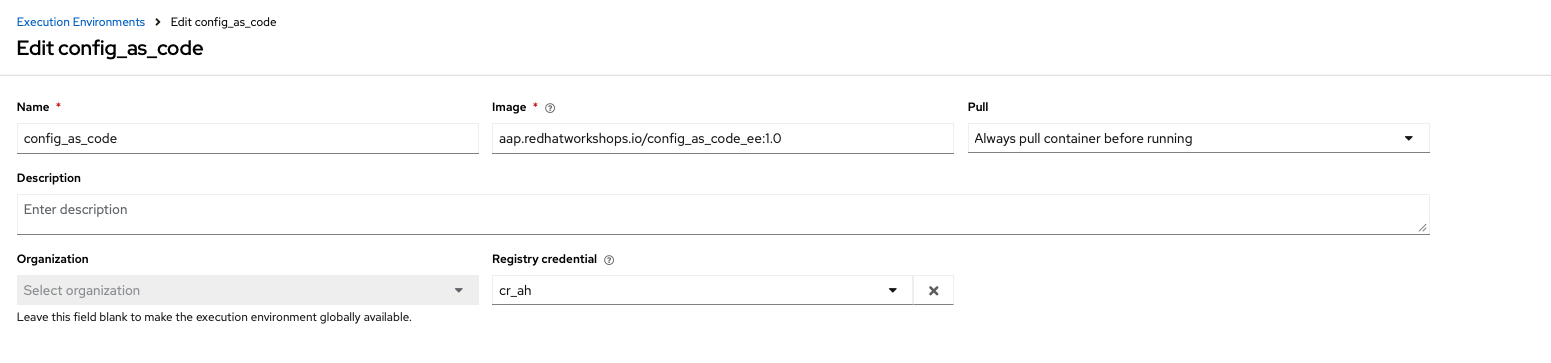
Create a file config/all/execution_environments.yml to define Execution Environment and the following required information under the controller_execution_environments_all property:
-
nameshould be calledconfig_as_code -
imageshould be set to the path of the image you created earlier in the lab:{{ aap_hostname }}/config_as_code_ee:1.0 -
pullshould be set toalways -
credentialshould be set tocr_ah.
---
controller_execution_environments_all:
  - name: supported
    image: registry.redhat.io/ansible-automation-platform-25/ee-supported-rhel9
    pull: always

  - name: minimal
    image: registry.redhat.io/ansible-automation-platform-25/ee-minimal-rhel9
    pull: always

...
Documentation related to this component can be found below:
5.3: Create credential types
Create a config/all/credential_types.yml file to define a set of Custom Credential types as a list under the controller_credential_types property that has 5 variables per item defined below:
-
namedefines the value that the credential type will be called -
descriptiondefines the description of the credential type -
kindis the type of credential type being added. Note that only cloud and net can be used for creating credential types.-
inputsare defined in either JSON or YAML syntax. Refer to the Ansible controller documentation for example syntax. These will be the fields in the AAP user interface that prompt the user for input. -
injectorsare defined in either JSON or YAML syntax. Refer to the Ansible controller documentation for example syntax. These are associated with variables that will then be useable within a job.
-
The role included within Config as Code will iterate through this list and for each item and create a custom credential type within Automation Controller.
---
controller_credential_types_all:
  - name: automation_hub
    description: automation hub
    kind: cloud
    inputs:
      fields:
        - id: verify_ssl
          type: boolean
          label: Verify SSL
        - id: hostname
          type: string
          label: Hostname
        - id: username
          type: string
          label: Username
        - id: password
          type: string
          label: Password
          secret: true
        - id: token
          type: string
          label: Token
          secret: true
      required:
        - hostname
    injectors:
      env:
        AAP_PASSWORD: !unsafe "{{ password }}"
        AAP_USERNAME: !unsafe "{{ username }}"
        AAP_HOSTNAME: !unsafe # Insert appropriate variable from above here
        AAP_TOKEN: !unsafe # Insert appropriate variable from above here
        AAP_VALIDATE_CERTS: !unsafe # Insert appropriate variable from above here
      extra_vars:
        aap_password: !unsafe "{{ password }}"
        aap_username: !unsafe "{{ username }}"
        aap_hostname: !unsafe # Insert appropriate variable from above here
        aap_token: !unsafe # Insert appropriate variable from above here
        aap_validate_certs: !unsafe # Insert appropriate variable from above here

  - name: ssh_priv_file
    kind: cloud
    description: creates temp ssh priv key to use (cannot have passphrase)
    inputs:
      fields:
        - id: priv_key
          type: string
          label: Certificate
          format: ssh_private_key
          multiline: true
          secret: true
    injectors:
      env:
        MY_CERT_FILE_PATH: !unsafe '{{ tower.filename.cert_file }}'
      file:
        template.cert_file: !unsafe '{{ priv_key }}'
...
Documentation related to this component can be found below:
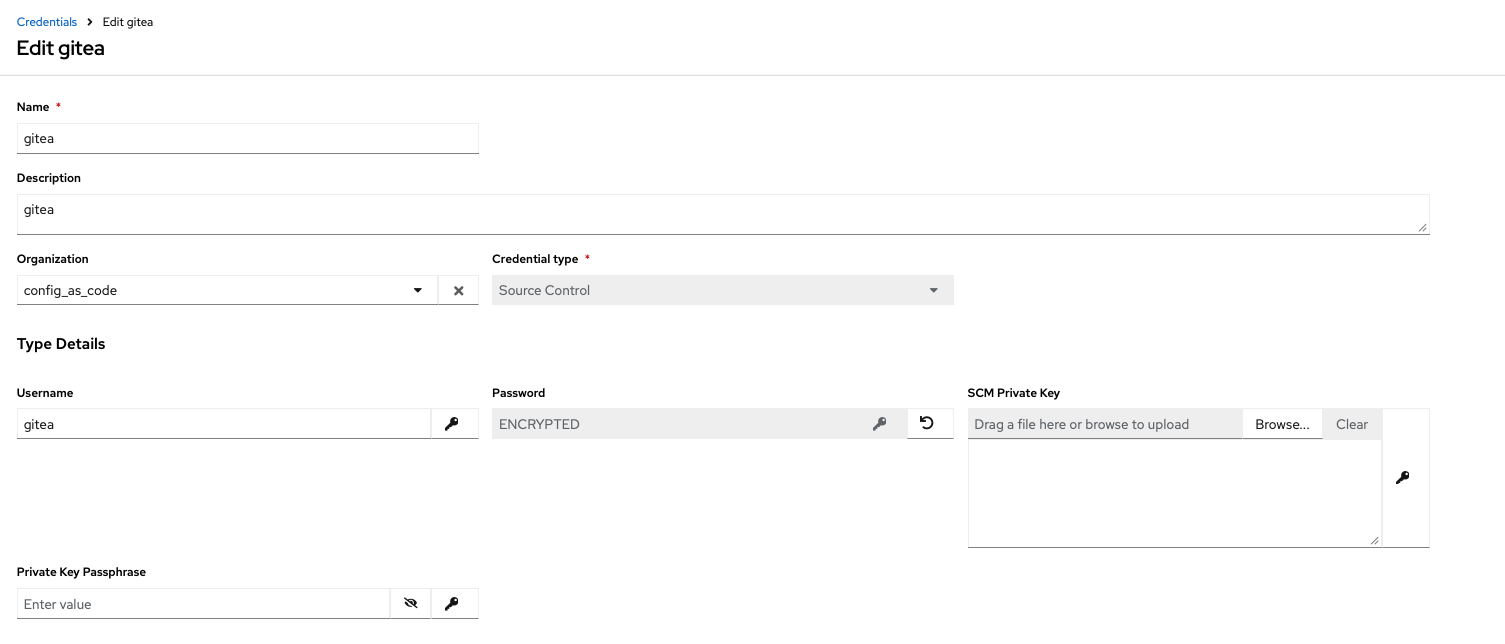
5.4: Create credentials
Create a config/all/credentials.yml file and add the required information to the list within the controller_credentials property to configure the AAP User Interface to appear similar to the screenshot below. Make it to review the screenshot, but ensure that parameters are used for the values.
| DO NOT PASTE YOUR PASSWORD IN CLEARTEXT FOR CREDENTIALS! |
---
controller_credentials_all:
  - name: aap_admin
    credential_type: Red Hat Ansible Automation Platform
    organization: config_as_code
    description: aap admin account
    inputs:
      host: "{{ aap_hostname }}"
      username: "{{ aap_username }}"
      password: "{{ aap_password }}"
      verify_ssl: false

  - name: hub_service_account
    credential_type: automation_hub
    organization: config_as_code
    description: automation hub api account
    inputs:
      hostname: "{{ aap_hostname }}"
      username: "{{ aap_service_account_username }}"
      token: "{{ hub_token }}"
      verify_ssl: false

  - name: hub_certified
    credential_type: "Ansible Galaxy/Automation Hub API Token"
    organization: config_as_code
    inputs:
      url: "https://{{ aap_hostname }}/pulp_ansible/galaxy/rh-certified/"
      token: "{{ hub_token }}"

  - name: hub_published
    credential_type: "Ansible Galaxy/Automation Hub API Token"
    organization: config_as_code
    inputs:
      url: "https://{{ aap_hostname }}/pulp_ansible/galaxy/published/"
      token: "{{ hub_token }}"

  - name: hub_validated
    credential_type: "Ansible Galaxy/Automation Hub API Token"
    organization: config_as_code
    inputs:
      url: "https://{{ aap_hostname }}/pulp_ansible/galaxy/validated/"
      token: "{{ hub_token }}"

  - name: hub_community
    credential_type: "Ansible Galaxy/Automation Hub API Token"
    organization: config_as_code
    inputs:
      url: "https://{{ aap_hostname }}/pulp_ansible/galaxy/community/"
      token: "{{ hub_token }}"

  - name: cr_ah
    credential_type: Container Registry
    organization: config_as_code
    inputs:
      host: "{{ aap_hostname }}"
      username: "{{ aap_username }}"
      password: "{{ aap_password }}"
      verify_ssl: false

  - name: vault
    credential_type: Vault
    organization: config_as_code
    description: vault password
    inputs:
      vault_password: "{{ vault_pass }}"

  - name: gitea
    credential_type: Source Control
    organization: config_as_code
    description: gitea
    inputs:
      username: ### Insert gitea username here
      password: ### Insert gitea pass variable here

...
Documentation related to this component can be found below:
5.5: Create organizations
Update the config/all/organizations.yml file and add the required information to the list aap_organizations property to configure the AAP User Interface to appear similar to the screenshot below.
In particular, we are adding the following properties:
. galaxy_credentials are associated with the credentials defined previously to retrieve collections from Automation Hub within the Organization
. default_environment specifies the execution environment to be used as the default for the Organization
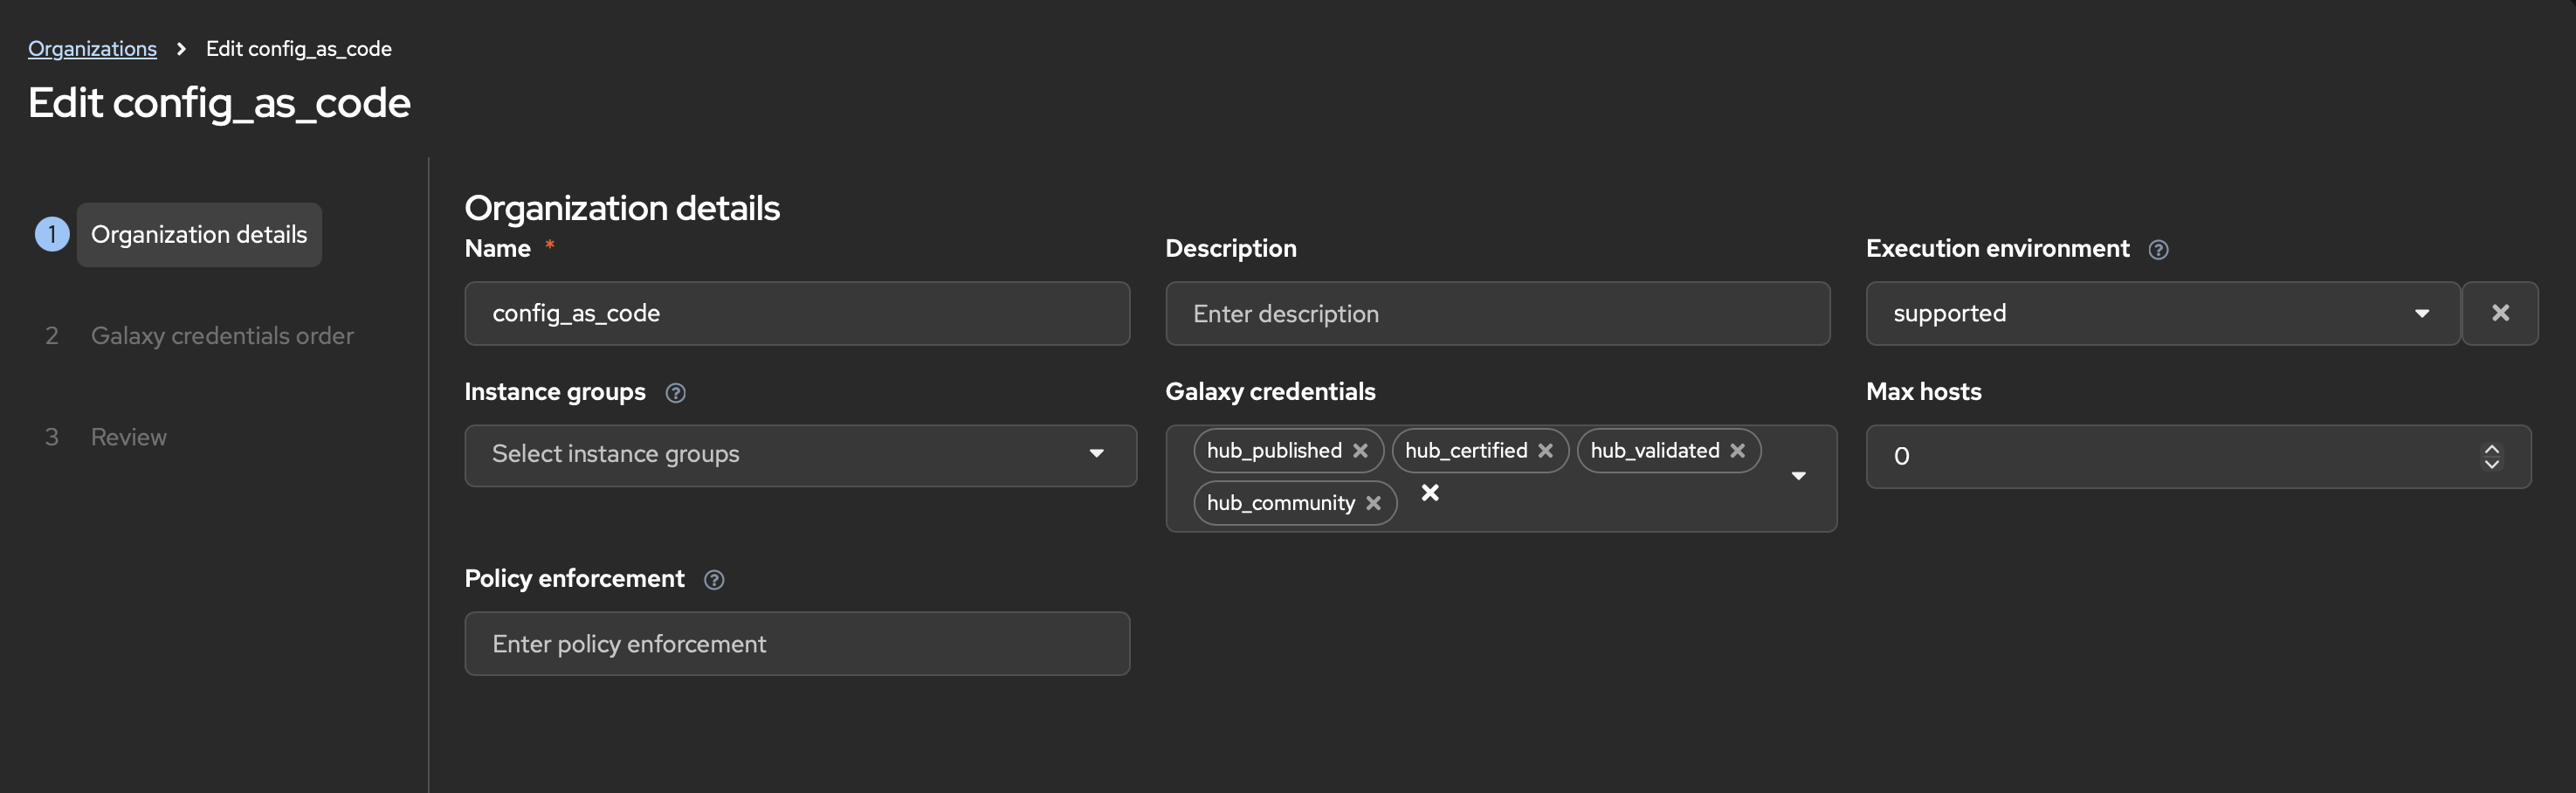
---
aap_organizations_all:
  - name: config_as_code
...
Documentation related to this component can be found below:
5.6: Create projects
Create a config/all/projects.yml file and add the required
details to the list within the controller_projects_all property to configure the AAP UI to appear similar to the screenshot below. The Source control URL you want to use is the Gitea repository you created earlier in the lab.
There are several values, such as project base path, playbook directory, and source control version, that are generated by AAP and are not options supported by Config as Code.
|
| You will want to refer to the role documentation to determine which options need to be set |
---
controller_configuration_projects_async_delay: 5
controller_projects_all:

...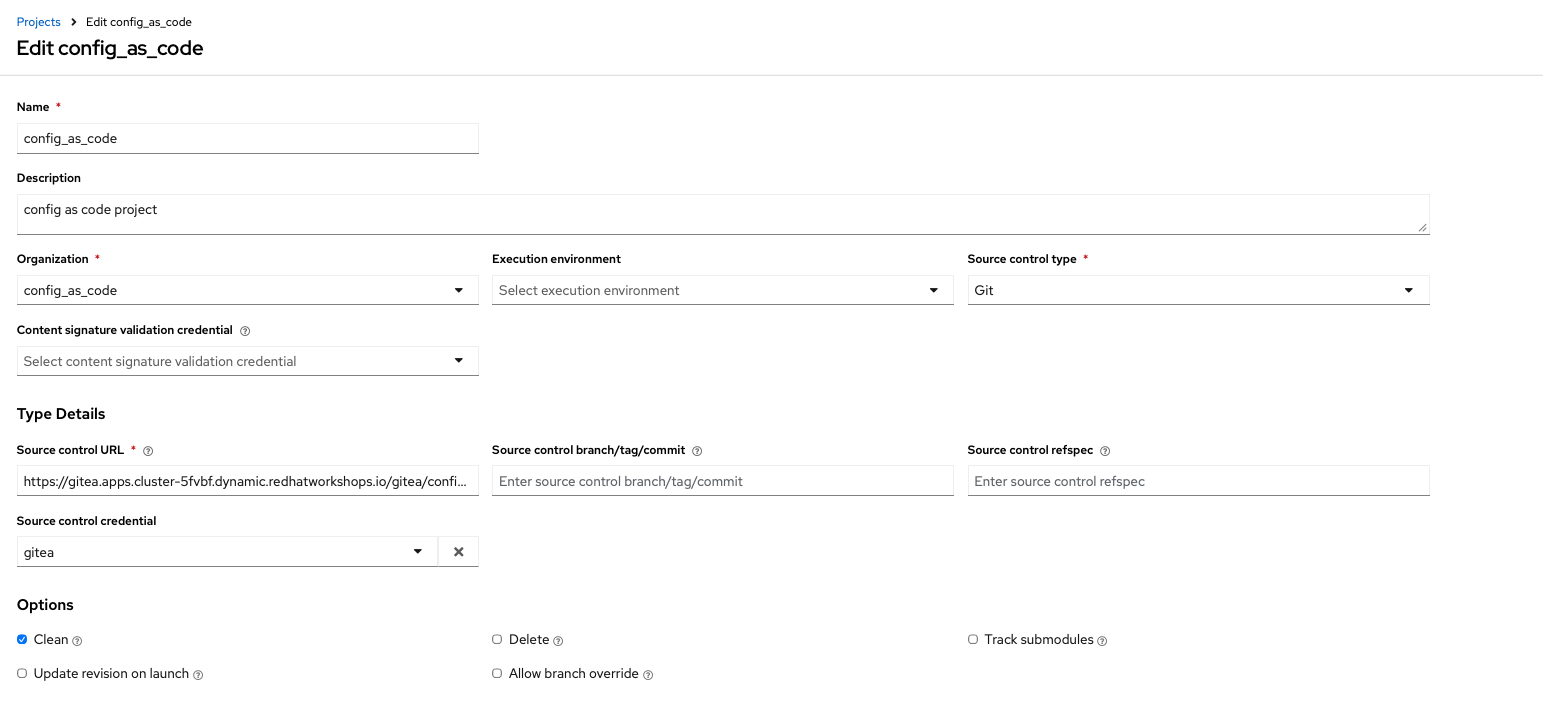
Documentation related to this component can be found below:
5.7: Create inventories
Create a config/all/inventories.yml file and add the required
properties to the controller_inventories_all list to configure the AAP UI
to appear similar to the screenshot below:
---
controller_inventories_all:
...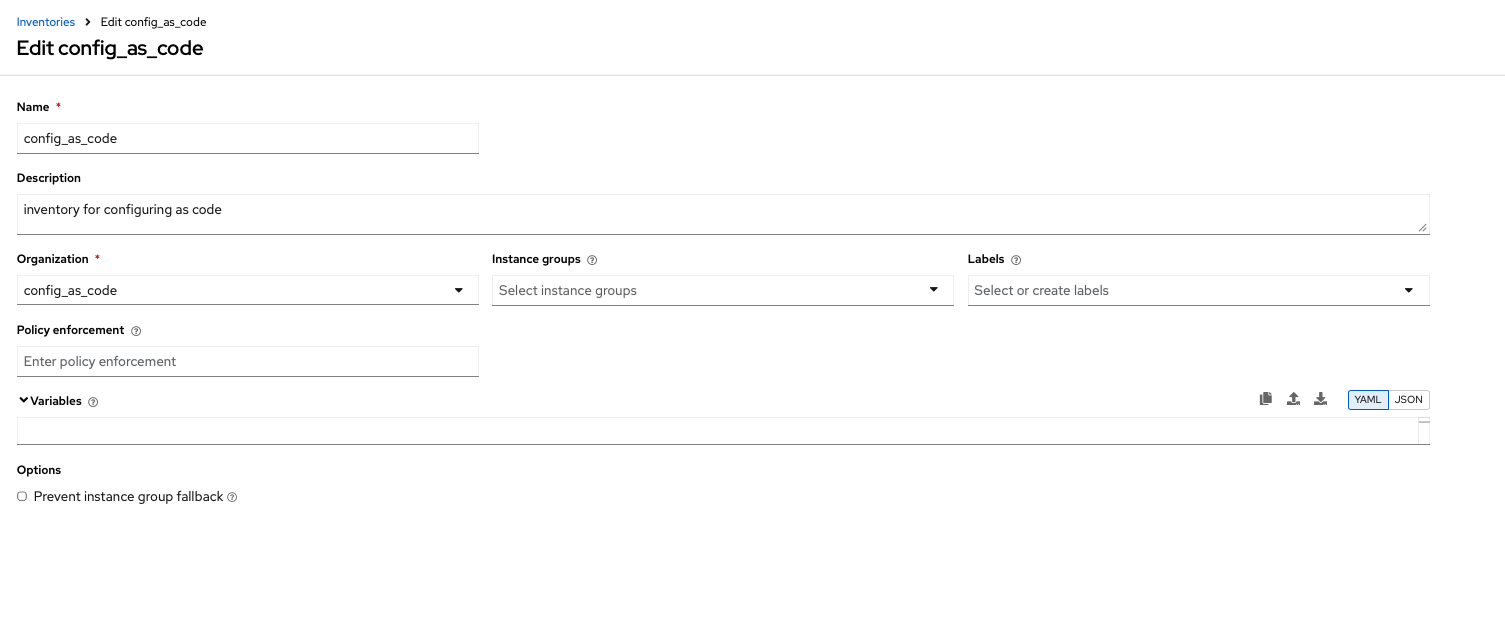
Documentation related to this component can be found below:
5.8: Create inventory sources
Create a config/all/inventory_sources.yml file containing the controller_inventory_sources_all variable which includes the list of Inventory Sources. Update the placeholder values to match the screenshot below.
---
controller_inventory_sources_all:
  - name: config_as_code_source
    organization: config_as_code
    source: scm
    source_project: ### Insert name of project
    source_path: ### Insert hosts file here
    inventory: config_as_code
    credential: ""
    verbosity: 0
    overwrite: true
    overwrite_vars: true
...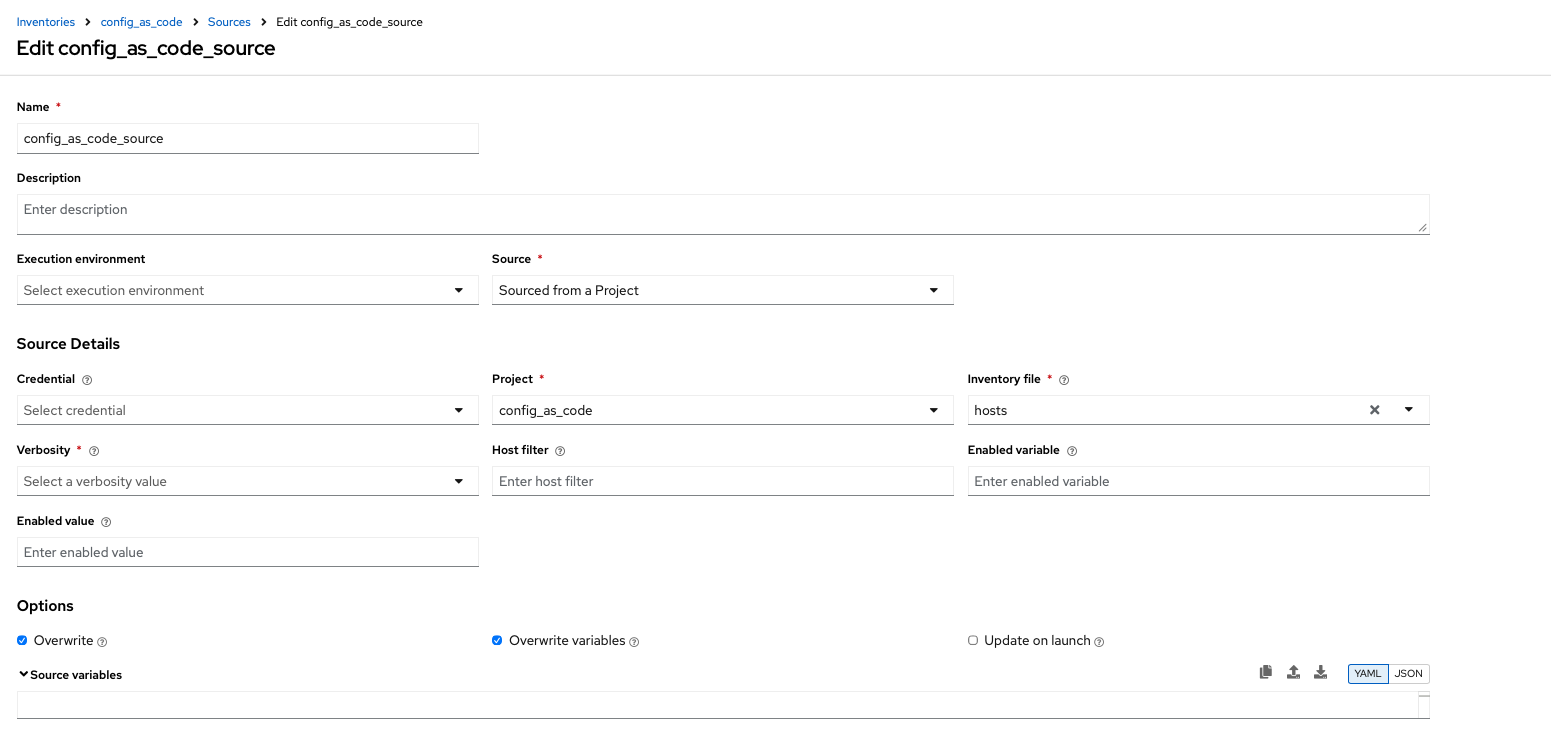
Documentation related to this component can be found below:
5.9: Create job_templates
Create the config/all/job_templates.yml file and add the required
information to the list controller_templates_all property to configure the AAP UI to appear similar to the screenshot below.
| Be sure to pay attention to the Credentials associated to each job template. |
---
controller_templates_all:

...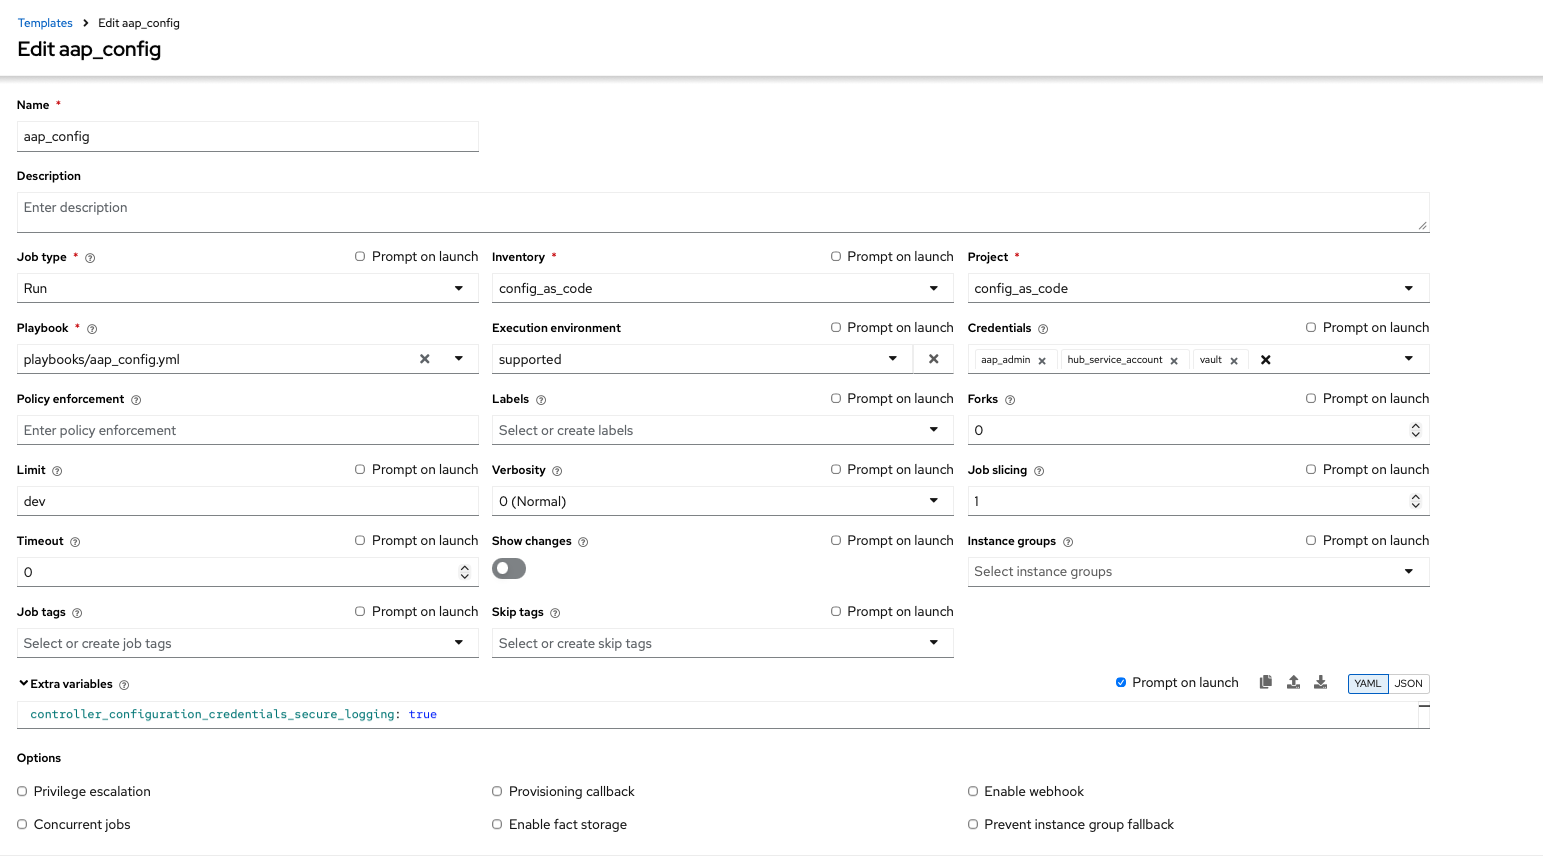
Documentation related to this component can be found below:
5.10: Update the Playbook
As part of the Config as Code execution and based on the AAP components that we have defined ths far, we need a token from Automation Hub to be configured within Automation Controller so that it can interact with Private Automation Hub. The playbook will first obtain an Automation Hub token using the ansible.hub.ah_token and set a variable that has been defined in our Config as Code configurations earlier.
Create a playbooks/aap_config.yml file that will call the dispatch role of the infra.aap_configuration collection to apply all provided configurations in the order that AAP expects them to be created.
---
- name: Playbook to configure ansible controller
  hosts: localhost
  connection: local
  gather_facts: false
  vars:
    dispatch_include_wildcard_vars: true
  tasks:
    - name: Include common vars
      ansible.builtin.include_vars:
        dir: ../config/all
        extensions:
          - 'yml'

    - name: Include env vars
      ansible.builtin.include_vars:
        dir: "../config/{{ env }}"
        extensions:
          - 'yml'

    - name: Tasks to run if hub_token not defined
      when: hub_token is not defined
      block:
        - name: Authenticate and get an API token from Automation Hub
          ansible.hub.ah_token:
            ah_host: "{{ aap_hostname }}"
            ah_username: "{{ aap_username }}"
            ah_password: "{{ aap_password }}"
            ah_path_prefix: 'galaxy'  # this is for private automation hub
            ah_verify_ssl: false

        - name: Fixing format
          ansible.builtin.set_fact:
            hub_token: "{{ ah_token['token'] }}"

    - name: Call dispatch role
      ansible.builtin.include_role:
        name: infra.aap_configuration.dispatch

...
5.11: Run the playbook
Execute the playbooks/aap_config playbook created in the prior section to set up AAP using the Configuration as Code resources created within this section.
ansible-navigator run --pp=missing --eei=aap-aap.{openshift_cluster_ingress_domain}/config_as_code_ee:1.0 -m stdout playbooks/aap_config.yml -e env=devIf issues occur during the execution, the following are several steps that you can take to resolve the challenges:
-
Review the error message provided in the output of the playbook execution to identify the specific issue.
-
Refer to the configuration that was being applied including the Config as Code role. Review the documentation including the supported properties for that role.
-
If the output was hidden, look for "Secure logging variables" on the controller_credentials role documentation.
| If an errors occurs during the execution with a message similar to "Failed to get token: HTTP Error 401: Unauthorized" while other tasks pass, please rerun the playbook. this is a known issue within the collection. |
5.12: Review the Results
Once the playbook has completed successfully, navigate to AAP to review the configurations that have been applied.
Conclusion
Within this lab, you have successfully implemented Configuration as Code using Validated Content provided for Ansible Automation Platform. In particular, you have completed the following tasks:
-
Built custom Execution Environments with all required collections for AAP configuration
-
Created structured variable files and encrypted secrets using Ansible Vault
-
Configured organizations, teams, users, and service accounts
-
Set up collection repositories, remotes, and automation credentials
-
Deployed and configured Ansible projects, inventories, job templates, and workflows
-
Performed all of the above configurations using the
infra.aap_configurationcollection
This approach enables you to manage your entire AAP infrastructure as code, ensuring consistency, version control, and repeatability across environments. The skills learned here form the foundation for managing complex enterprise automation platforms.