Lab: Creating a CI/CD Pipeline
We will create a complete CI/CD pipeline for Ansible collection development using Tekton on OpenShift. This includes building a pipeline that automatically lints, tests, builds, publishes, and approves Ansible collections to Private Automation Hub, with webhook integration for automated triggering on git commits.
Learning Objectives
After completing this module, you will be able to:
-
Understand CI/CD concepts and their application to Ansible automation
-
Create and configure Tekton pipelines in OpenShift
-
Set up automated testing and linting for Ansible collections
-
Implement automated publishing workflows to Private Automation Hub
-
Configure webhook integrations for git-triggered deployments
-
Monitor and troubleshoot CI/CD pipeline execution
1: Prerequisites
Before starting this lab, ensure you have completed the following:
-
Ansible Bootcamp Lab: Managing Ansible Content with Private Automation Hub
2: Introduction
One of the core goals of automation is automating a process end-to-end. In this case, it’s creating a CI/CD pipeline for Ansible collection builds and updates. This lab will further the development of one of the previous labs, by automating the build and publishing of the development lifecycle of an Ansible collection using Tekton and the supported OpenShift Pipelines feature of OpenShift.
Upon completion of this lab you will have
-
A Tekton pipeline running in OpenShift
-
The pipeline can be triggered from a push to the collection repo
-
The pipeline will lint, build, publish and approve the collection into Private Automation Hub
3: Lab Setup: Configuring Your Environment
Prior to starting the lab, ensure the following tools and services are set up:
-
Repository for the
ansible_bootcamp_my_collectionhas been created on Gitea -
You have access to your Dev Spaces workspace for your environment
-
Make sure the Gitea repository is public
| Lab setup should have been previously completed in Managing Ansible Content with Private Automation Hub |
4: Implementing the CI/CD Pipeline
In this section, we’ll share how to apply the collection-pipeline.yml Pipeline in your OpenShift environment. Also, we will then set up a Cluster Trigger Binding. Finally, we will set up a webhook in the Gitea repository associated with the Ansible Collection to automatically trigger the pipeline when changes are made.
4.1: Create CI/CD Pipeline Repository
Create another Gitea repository, separate from the ansible_bootcamp_my_collection repository that was created previously in Managing Ansible Content with Private Automation Hub, which will serve as a working CI/CD pipeline development repository.
-
Navigate to your Gitea instance and click the Sign In button on the upper right hand corner. Enter the username and password using the credentials provided from the Environment Details page and click the Sign In button
-
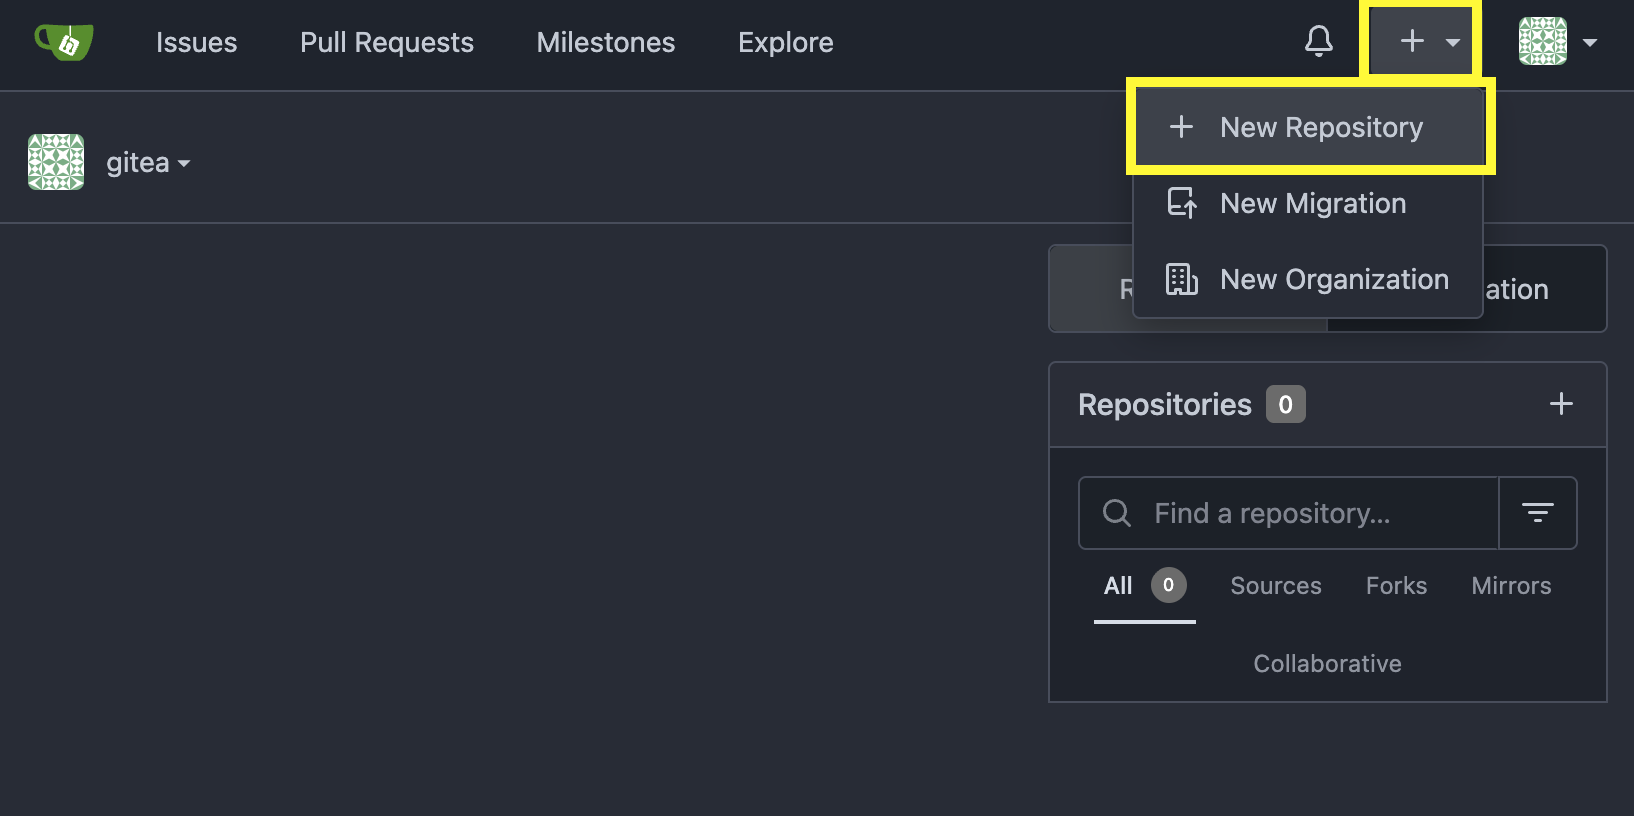
In the top left of the web interface, click on the + symbol and select New Repository.
-
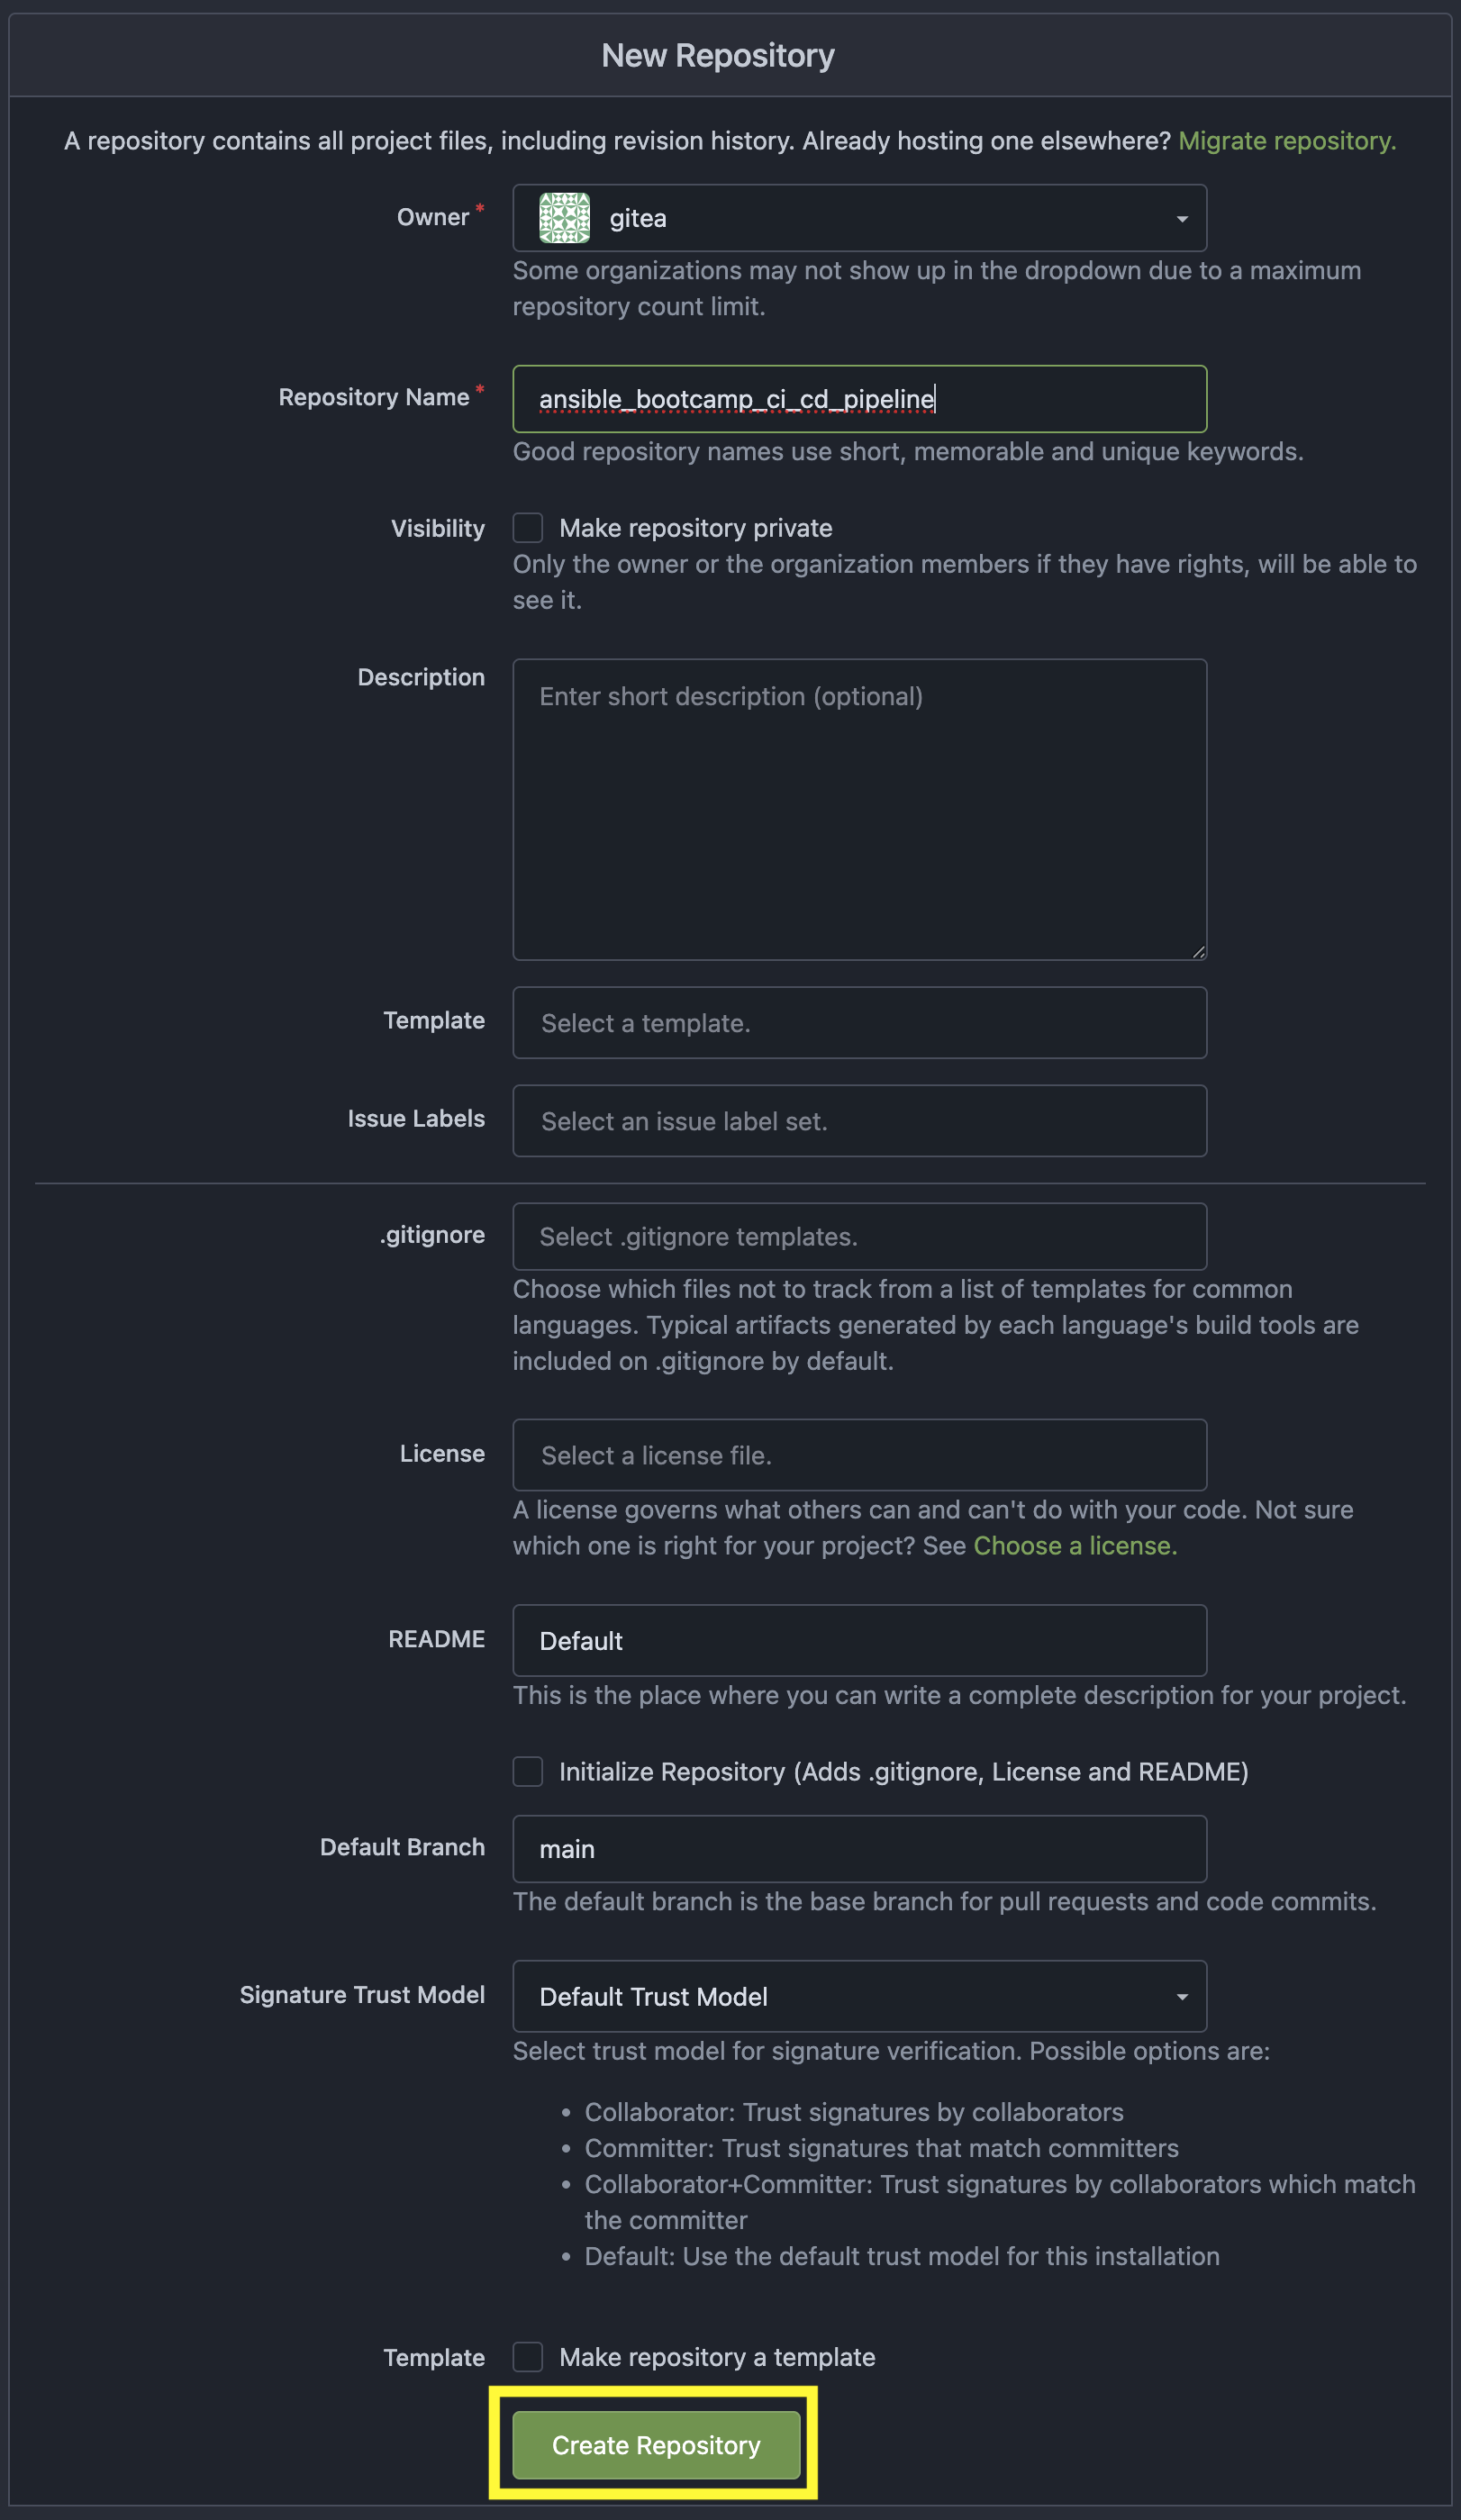
On the New Repository page, enter ansible_bootcamp_ci_cd_pipeline in the Repository Name field.
-
Leave everything else as their default values and click on the button at the bottom, Create Repository.
4.1.1: Clone CI/CD Pipeline Repository into Dev Spaces Workspace
After an empty repository is created on your Gitea, we need to clone the repository into the workspace to begin creating lab files.
-
Clone the ansible_bootcamp_ci_cd_pipeline repository you just created into your workspace
git clone {gitea_console_url}/{gitea_user}/ansible_bootcamp_ci_cd_pipeline.git
With the repository cloned locally, proceed to the next section where you will begin to populate the repository with Tekton resources.
4.2: Build Tekton pipeline on OpenShift Container Platform
4.2.1: Create the Pipeline Definition
In the ansible_bootcamp_ci_cd_pipeline directory, create a new file called collection-pipeline.yml with the following content.
apiVersion: tekton.dev/v1
kind: Pipeline
metadata:
  name: ansible-collection-ci
  namespace: aap
spec:
  params:
    - description: The URL of the Git repository to clone.
      name: collection-url
      type: string
    - description: The URL of the Git repository to clone.
      name: playbook-repo
      type: string
    - description: Collection Branch name
      name: collection-repo-version
      type: string
  tasks:
    - name: clone-playbook
      taskSpec:
        metadata: {}
        spec: null
        steps:
          - computeResources: {}
            image: 'registry.redhat.io/ansible-automation-platform-25/ee-supported-rhel9:latest'
            name: playbook-install
            script: |
              git clone -vvv $(params.playbook-repo)
              echo "change into playbook dir"
              cd ansible_bootcamp_ci_cd_pipeline
              echo "create vars file"
              cat <<EOF > params.yml
              ---
              aap_hostname:  "https://`oc get route aap -n aap -o=jsonpath='{.spec.host}'`"
              aap_username: "admin"
              aap_password: "`oc get secret aap-admin-password -n aap -o=jsonpath='{.data.password}' |base64 -d`"
              collection_url: "$(params.collection-url)"
              branch: "$(params.collection-repo-version)"
              EOF
            workingDir: $(workspaces.source.path)
        workspaces:
          - name: source
      workspaces:
        - name: source
          workspace: shared-workspace
    - name: clone-collection
      runAfter:
        - clone-playbook
      taskSpec:
        metadata: {}
        spec: null
        steps:
          - computeResources: {}
            image: 'registry.redhat.io/ansible-automation-platform-25/ee-supported-rhel9:latest'
            name: collection-clone
            script: |
              cd ansible_bootcamp_ci_cd_pipeline
              ansible-playbook collection-publish.yml --tags git-checkout
            workingDir: $(workspaces.source.path)
        workspaces:
          - name: source
      workspaces:
        - name: source
          workspace: shared-workspace
    - name: build-collection
      runAfter:
        - clone-collection
      taskSpec:
        metadata: {}
        spec: null
        steps:
          - computeResources: {}
            image: 'registry.redhat.io/ansible-automation-platform-25/ee-supported-rhel9:latest'
            name: build-collection
            script: |
              cd ansible_bootcamp_ci_cd_pipeline
              ansible-playbook collection-publish.yml --tags collection-build
            workingDir: $(workspaces.source.path)
        workspaces:
          - name: source
      workspaces:
        - name: source
          workspace: shared-workspace
    - name: lint-collection
      runAfter:
        - clone-collection
      taskSpec:
        metadata: {}
        spec: null
        steps:
          - computeResources: {}
            image: 'ghcr.io/ansible/community-ansible-dev-tools:latest'
            name: lint-collection
            script: |
              cd collection_repo
              pip install cowsay
              ansible-galaxy collection install containers.podman
              ansible-lint -vvv
            workingDir: $(workspaces.source.path)
        workspaces:
          - name: source
      workspaces:
        - name: source
          workspace: shared-workspace
    - name: molecule-test
      runAfter:
        - build-collection
        - lint-collection
      taskSpec:
        metadata: {}
        spec: null
        steps:
          - computeResources: {}
            image: 'ghcr.io/ansible/ansible-devspaces:latest'
            name: molecule-test
            script: |
              cd collection_repo/extensions
              export ANSIBLE_COLLECTIONS_PATH=/workspace/source/collection_repo
              echo $ANSIBLE_COLLECTIONS_PATH
              ansible-galaxy collection install git+$(params.collection-url)
              molecule test -s dad_joke
            workingDir: $(workspaces.source.path)
        workspaces:
          - name: source
      workspaces:
        - name: source
          workspace: shared-workspace
    - name: create-namespace
      runAfter:
        - molecule-test
      taskSpec:
        metadata: {}
        spec: null
        steps:
          - computeResources: {}
            image: 'registry.redhat.io/ansible-automation-platform-25/ee-supported-rhel9:latest'
            name: create-namespace
            script: |
              cd ansible_bootcamp_ci_cd_pipeline
              ansible-playbook collection-publish.yml --tags pah-namespace
            workingDir: $(workspaces.source.path)
        workspaces:
          - name: source
      workspaces:
        - name: source
          workspace: shared-workspace
    - name: publish-collection
      runAfter:
        - create-namespace
      taskSpec:
        metadata: {}
        spec: null
        steps:
          - computeResources: {}
            image: 'registry.redhat.io/ansible-automation-platform-25/ee-supported-rhel9:latest'
            name: publish-collection
            script: |
              cd ansible_bootcamp_ci_cd_pipeline
              ansible-playbook collection-publish.yml --tags collection-publish
            workingDir: $(workspaces.source.path)
        workspaces:
          - name: source
      workspaces:
        - name: source
          workspace: shared-workspace
    - name: approve-collection
      runAfter:
        - publish-collection
      taskSpec:
        metadata: {}
        spec: null
        steps:
          - computeResources: {}
            image: 'registry.redhat.io/ansible-automation-platform-25/ee-supported-rhel9:latest'
            name: approve-collection
            script: |
              cd ansible_bootcamp_ci_cd_pipeline
              ansible-playbook collection-publish.yml --tags collection-approve
            workingDir: $(workspaces.source.path)
        workspaces:
          - name: source
      workspaces:
        - name: source
          workspace: shared-workspace
  workspaces:
    - name: shared-workspace
4.2.2: Create the Trigger Binding
Next create a Trigger Binding that is used to extract information from the webhook payload and make it available to the Tekton Pipeline as parameters.
Within the ansible_bootcamp_ci_cd_pipeline directory, create a new file called collection-cluster-trigger-binding.yml with the following content.
apiVersion: triggers.tekton.dev/v1beta1
kind: ClusterTriggerBinding
metadata:
  labels:
    operator.tekton.dev/operand-name: openshift-pipelines-addons
  name: gitea-push
spec:
  params:
    - name: git-revision
      value: $(body.head_commit.id)
    - name: git-commit-message
      value: $(body.head_commit.message)
    - name: git-repo-url
      value: $(body.repository.clone_url)
    - name: git-repo-name
      value: $(body.repository.name)
    - name: content-type
      value: $(header.Content-Type)
4.2.3: Apply Pipeline Configurations
Now that we have created the necessary configuration files for the Tekton Pipeline and Trigger Binding, we will apply them to the OpenShift Container Platform.
Your Dev Spaces environment is automatically authenticated to the OpenShift cluster, so you can use oc commands without needing to login.
|
In the Dev Spaces terminal, change into the ansible_bootcamp_ci_cd_pipeline directory and use the OpenShift CLI to apply the configurations to the OpenShift cluster.
cd ansible_bootcamp_ci_cd_pipeline
oc apply -f collection-pipeline.yml
oc apply -f collection-cluster-trigger-binding.yml
4.2.4: Validate Tekton Resources in OpenShift Container Platform
Validate the Tekton resources created previously have been successfully created in OpenShift using the Web Console.
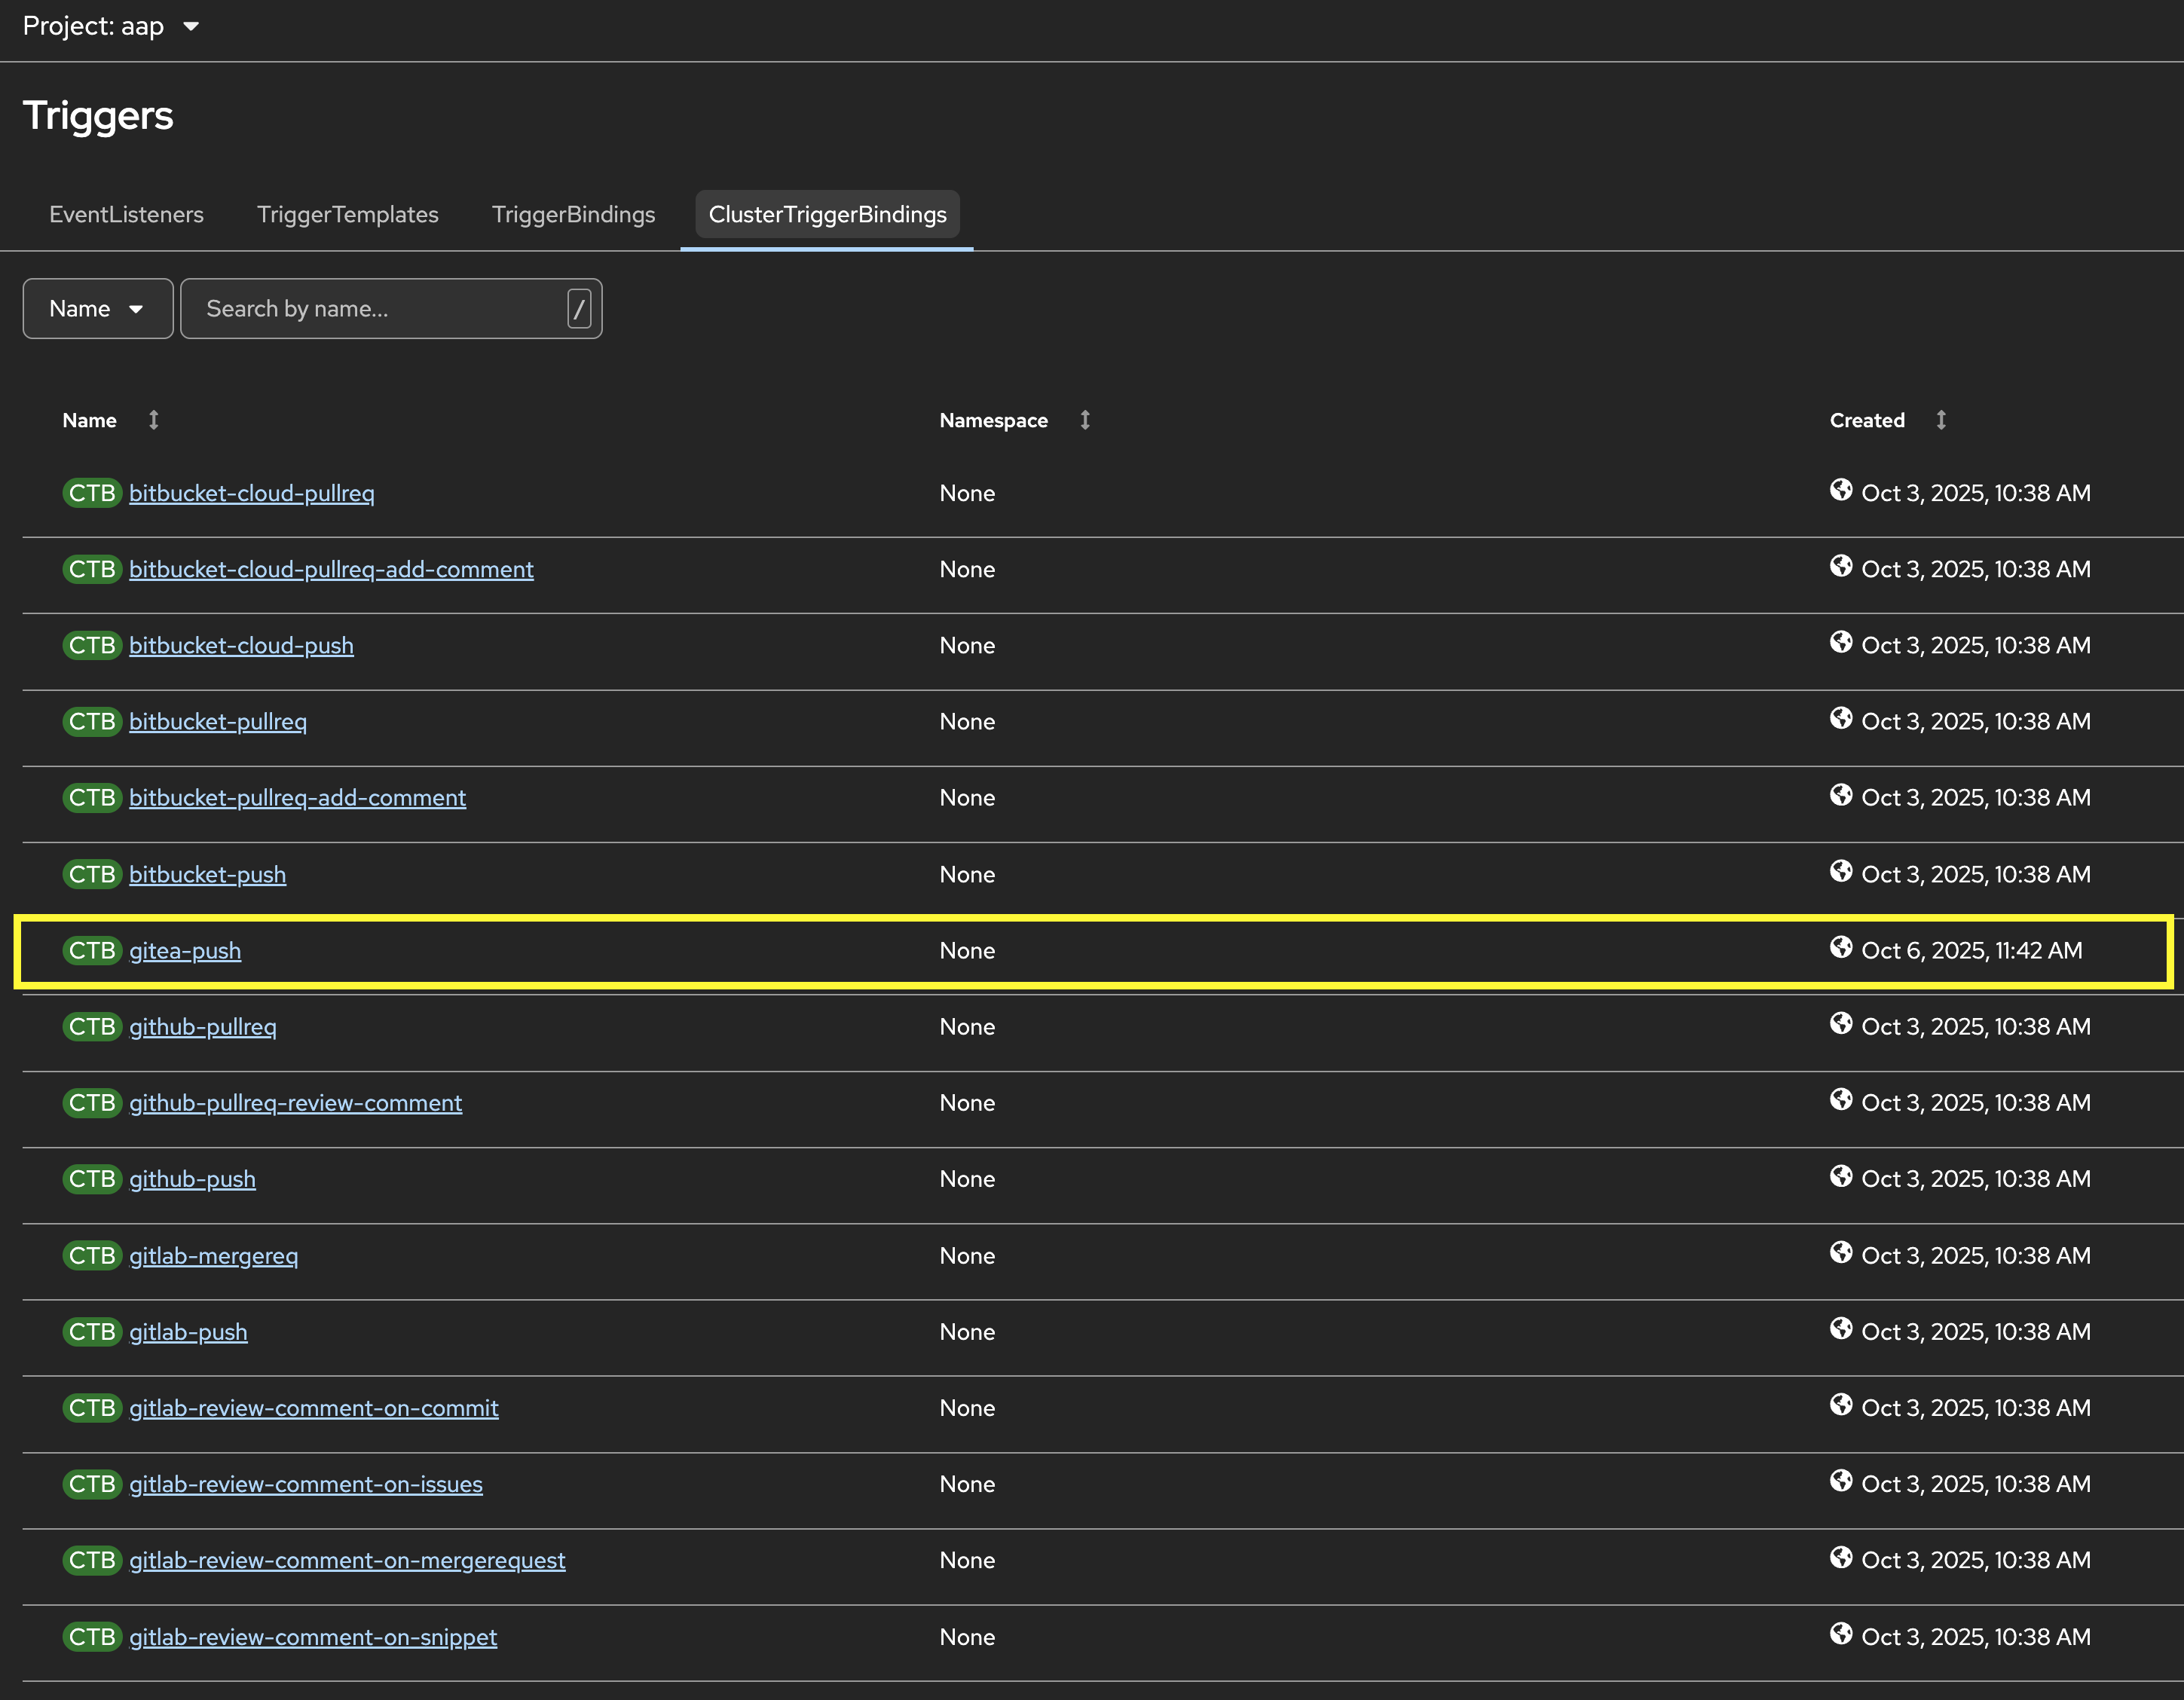
First, check that the ClusterTriggerBinding was created successfully and is available within OpenShift.
-
Launch the OpenShift Web Console
-
Select the htpasswd_provider button and use the credentials provided in the Environment Details page to login to the OpenShift console if prompted to authenticate.
-
In the left hand menu, expand the Pipelines section and select Triggers
-
Select the ClusterTriggerBindings tab on the Triggers page
-
Verify that
gitea-pushtrigger is present
Next, check that the Pipeline was created successfully and is available within OpenShift.
-
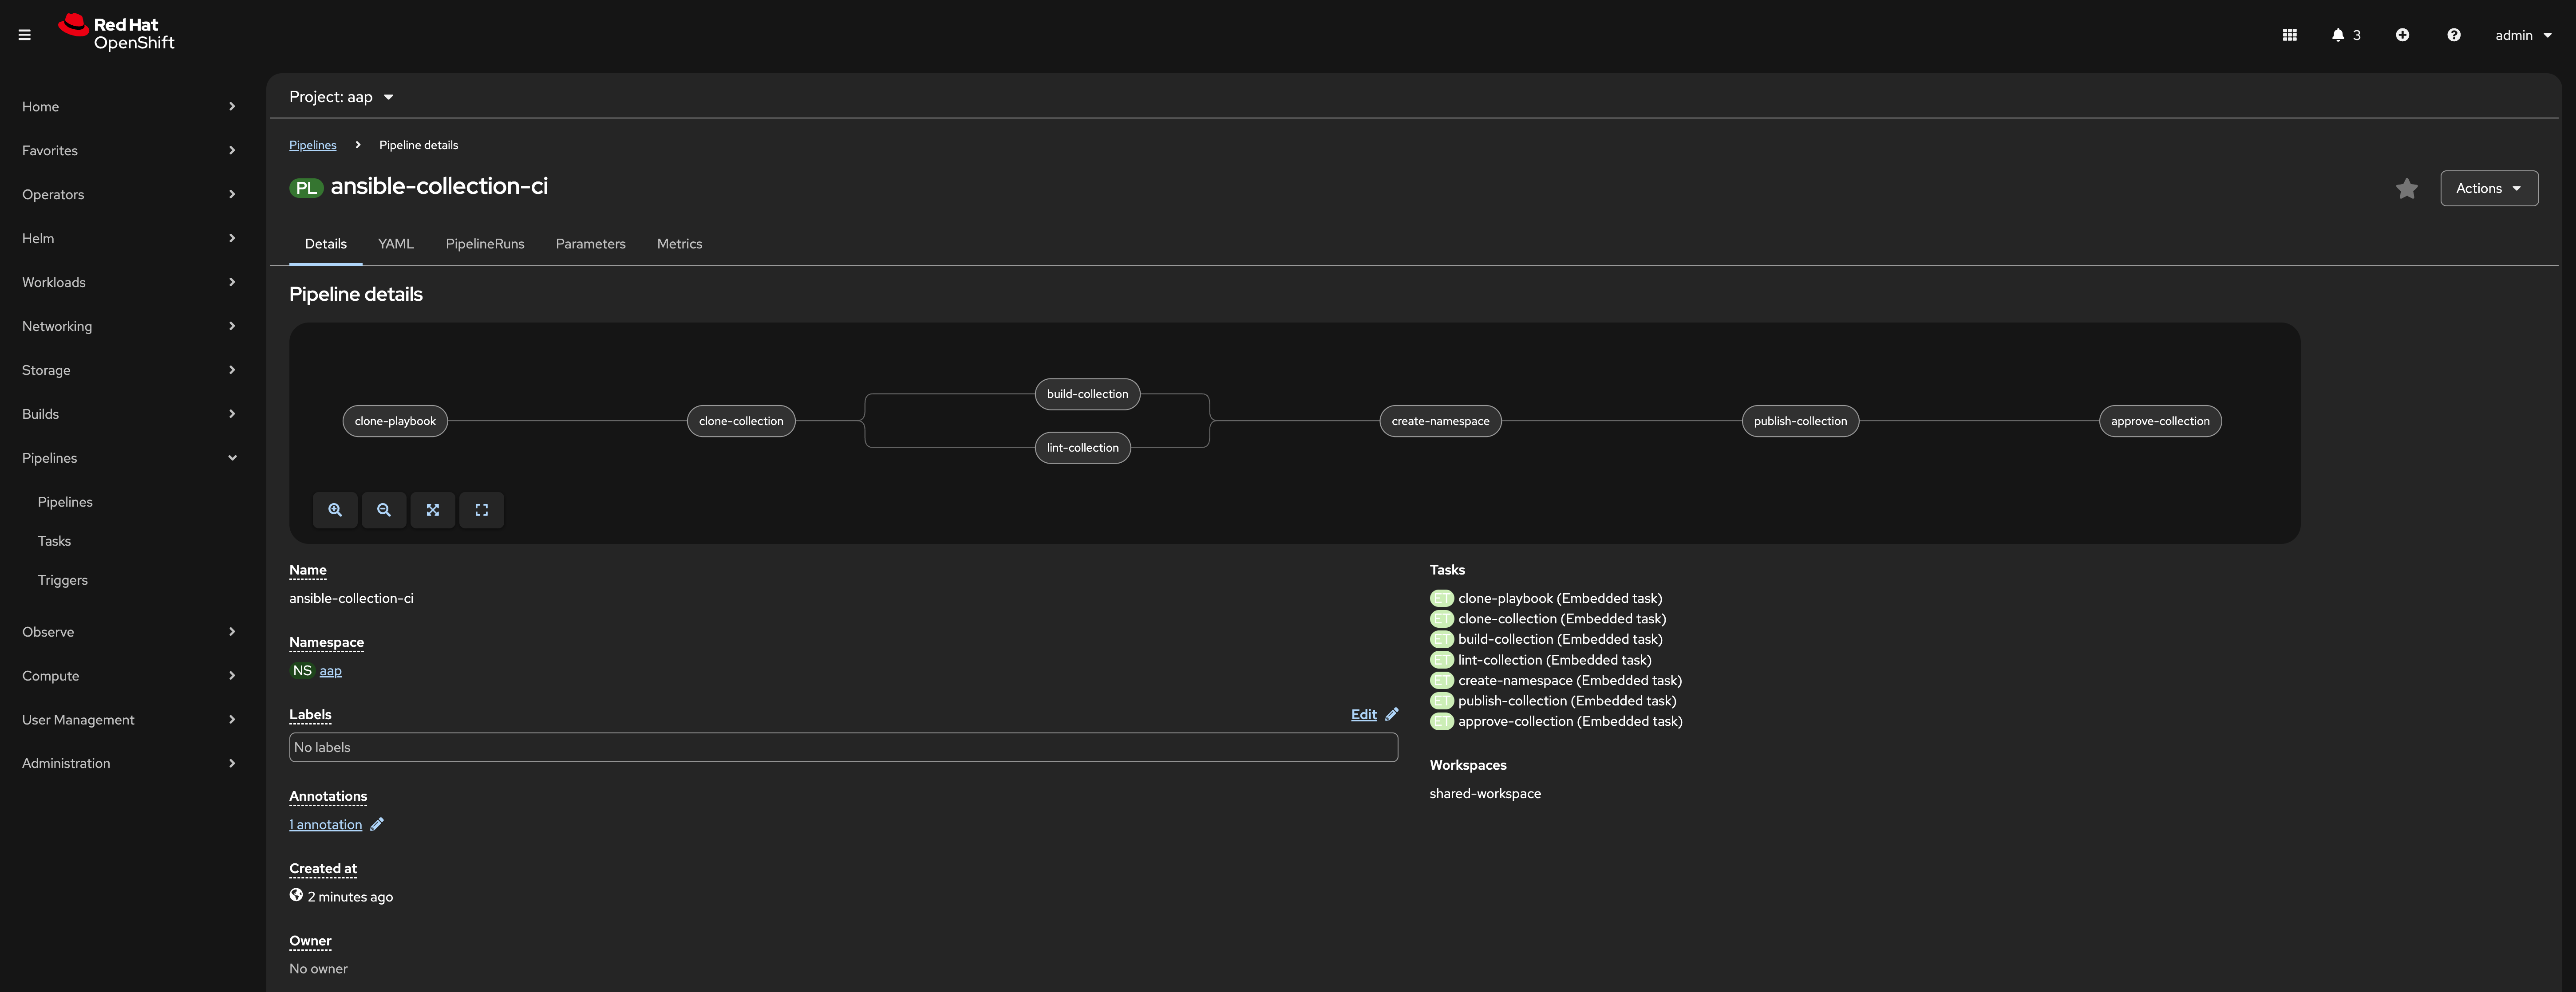
In the left hand menu, expand the Pipelines section and select Pipelines
-
Locate the ansible-collection-ci pipeline in the list of pipelines
-
Review the details of the pipeline within the Pipeline details page.
4.3: Create collection-publish.yml Ansible Playbook
The ansible-collection-ci Pipeline references an Ansible Pipeline within the file collection-publish.yml multiple times during its execution.
Within the ansible_bootcamp_ci_cd_pipeline directory, create an Ansible playbook in the file collection-publish.yml with the following content.
---
- name: Publish collections to Hub
  hosts: localhost
  gather_facts: false
  vars_files:
    - params.yml
  vars:
    aap_configuration_working_dir: "/workspace/source"
    aap_request_timeout: 300
    aap_validate_certs: false
    ah_overwrite_existing: true
  no_log: "{{ hub_configuration_publish_secure_logging | default('false') }}"
  tasks:

    - name: Git checkout
      ansible.builtin.git:
        repo: "{{ collection_url }}"
        dest: "{{ aap_configuration_working_dir }}/collection_repo"
        version: "{{ branch }}"
      tags:
        - git-checkout

    - name: Read in galaxy file
      ansible.builtin.slurp:
        src: "{{ aap_configuration_working_dir }}/collection_repo/galaxy.yml"
      register: file_content
      tags:
        - collection-publish
        - collection-approve
        - collection-build
        - pah-namespace

    - name: Get collection Version
      ansible.builtin.set_fact:
        collection_version: "{{ file_content['content'] | b64decode |split('\n') |select('match', 'version') | first |split() | last }}"
        namespace: "{{ file_content['content'] | b64decode |split('\n') |select('match', 'namespace') | first |split() | last | replace('\"', '')  }}"
        collection_name: "{{ file_content['content'] | b64decode |split('\n') |select('match', 'name:') | first |split() | last | replace('\"', '')  }}"
      tags:
        - collection-publish
        - collection-approve
        - collection-build
        - pah-namespace

    - name: Build Collections
      ansible.hub.ah_build:
        path: "{{ aap_configuration_working_dir }}/collection_repo"
        output_path: "{{ aap_configuration_working_dir }}/collection_repo"
        force: true
      register: ah_build_results
      tags:
        - collection-build

    - name: Create PAH namespace
      ansible.hub.ah_namespace:
        name: "{{ namespace }}"
        state: present
        ah_host: "{{ aap_hostname | default(omit) }}"
        ah_username: "{{ aap_username | default(omit) }}"
        ah_password: "{{ aap_password | default(omit) }}"
        validate_certs: "{{ aap_validate_certs | default(omit) }}"
      tags:
        - pah-namespace

    - name: Publish Collections
      ansible.hub.ah_collection:
        namespace: "{{ namespace }}"
        name: "{{ collection_name }}"
        version: "{{ collection_version }}"
        path: "{{ aap_configuration_working_dir }}/collection_repo/{{ namespace }}-{{ collection_name }}-{{ collection_version }}.tar.gz"
        overwrite_existing: "{{ ah_overwrite_existing }}"
        ah_host: "{{ aap_hostname | default(omit) }}"
        ah_username: "{{ aap_username | default(omit) }}"
        ah_password: "{{ aap_password | default(omit) }}"
        ah_token: "{{ hub_token | default(omit) }}"
        validate_certs: "{{ aap_validate_certs | default(omit) }}"
        request_timeout: "{{ aap_request_timeout | default(omit) }}"
      tags:
        - collection-publish

    - name: Approve Collections
      ansible.hub.ah_approval:
        namespace: "{{ namespace }}"
        name: "{{ collection_name }}"
        version: "{{ collection_version }}"
        ah_username: "{{ aap_username | default(omit) }}"
        ah_password: "{{ aap_password | default(omit) }}"
        ah_token: "{{ hub_token | default(omit) }}"
        ah_host: "{{ aap_hostname | default(omit) }}"
        validate_certs: "{{ aap_validate_certs | default(omit) }}"
        request_timeout: "{{ aap_request_timeout | default(omit) }}"
      tags:
        - collection-approve
...
Commit all files you have created in the ansible_bootcamp_ci_cd_pipeline directory and push the contents to the Gitea repository
  git add --all
  git commit -m "Adding Tekton and Ansible resources"
  git push origin main
Enter your Gitea credentials when prompted to complete the push. Once the process completes, you should see your changes contained within the Gitea repository.
4.4: Create and configure Webhook
4.4.1: Add Pipeline Trigger
Add a Trigger to the ansible-collection-ci Pipeline created earlier to enable triggering the pipeline from a webhook.
-
Launch the OpenShift Web Console
-
In the left hand menu, expand the Pipelines section and select Pipelines
-
In the Project dropdown at the top of the page, ensure you are in the aap project.
-
Click on the link of the ansible-collection-ci pipeline that is contained within the aap project.
-
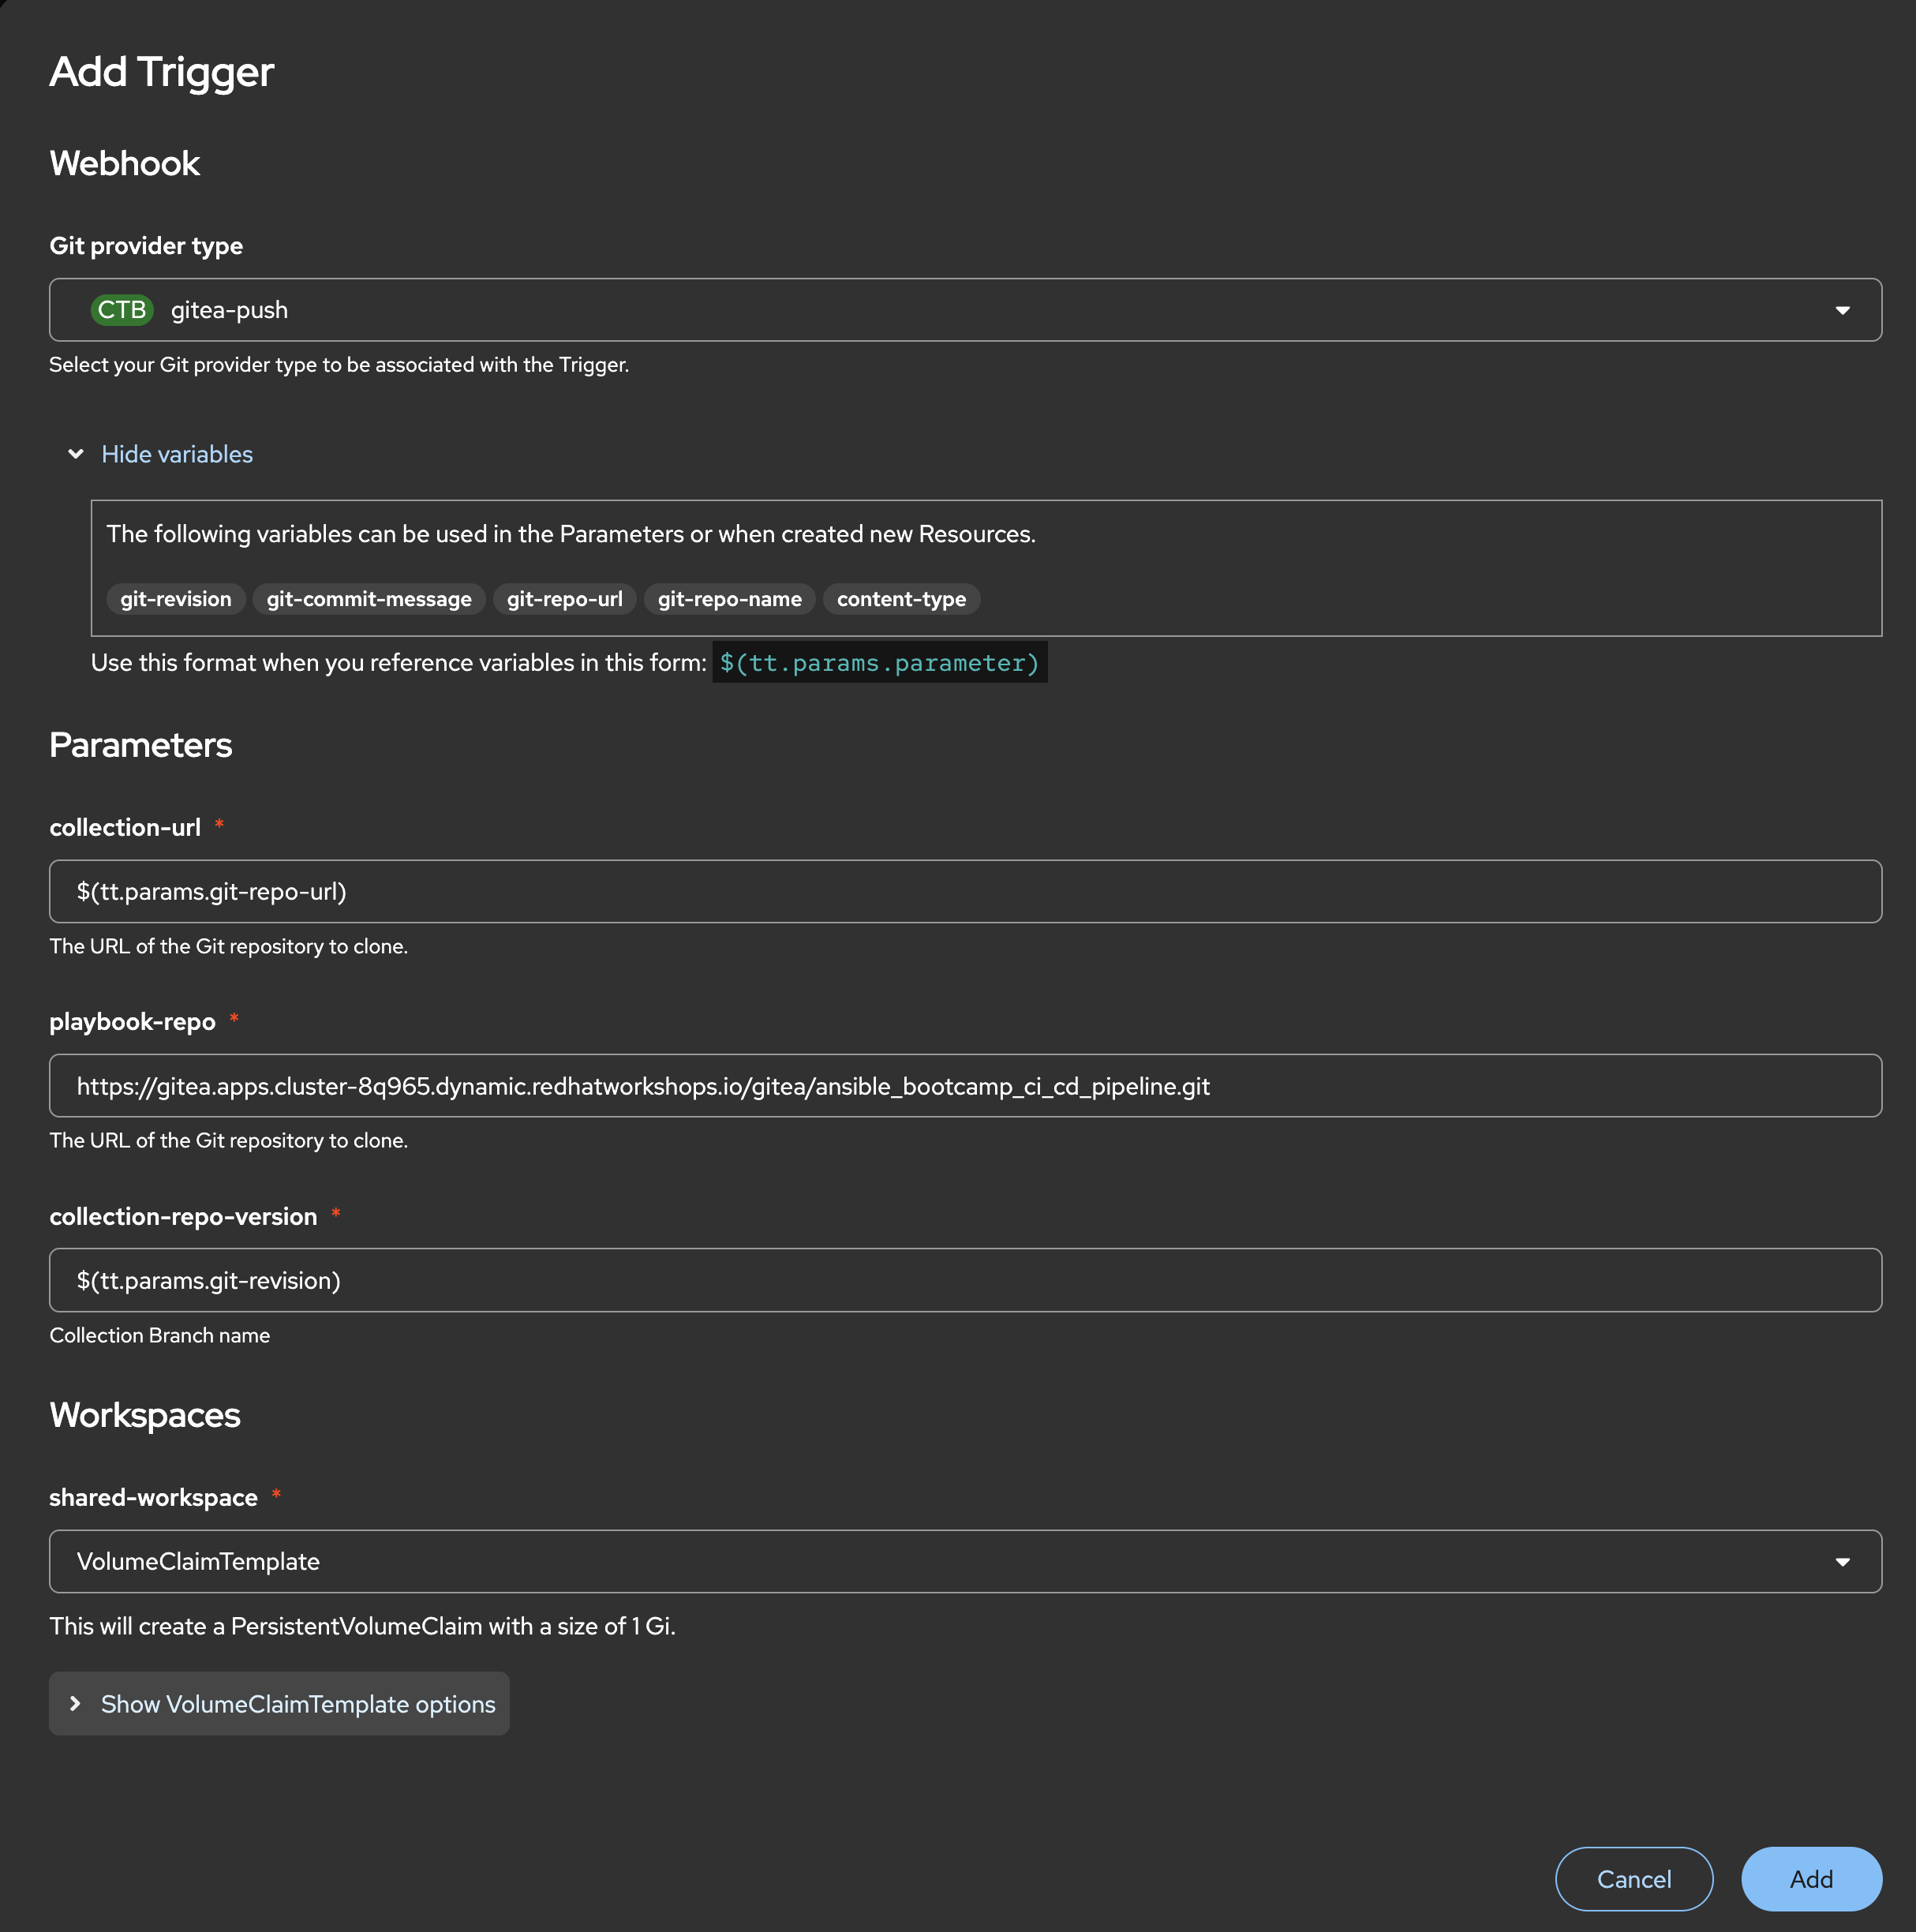
Select the Actions drop-down button on the right side of the window and select Add Trigger Enter the following parameters to create the Event Listener.
-
Git provider type:
gitea-push -
collection-url:
$(tt.params.git-repo-url) -
playbook-repo:
{gitea_console_url}/{gitea_user}/ansible_bootcamp_ci_cd_pipeline.git -
collection-repo-version:
$(tt.params.git-revision) -
shared-workspace:
VolumeClaimTemplate
-
-
Click Add to create the Trigger.
4.4.2: Copy Event Listener URL
With the Trigger created, copy the Event Listener URL to be used when creating the webhook in Gitea.
-
In the left hand menu, expand the Pipelines section and select Pipelines
-
Open your OpenShift Container Platform GUI, in the left menu, goto the Pipelines section of the menu and select Pipelines
-
Click on the link of the ansible-collection-ci pipeline that is contained within the aap project.
-
Click on the link of the ansible-collection-ci pipeline that is now created
-
Under the TriggerTemplates section, copy the Event Listener URL
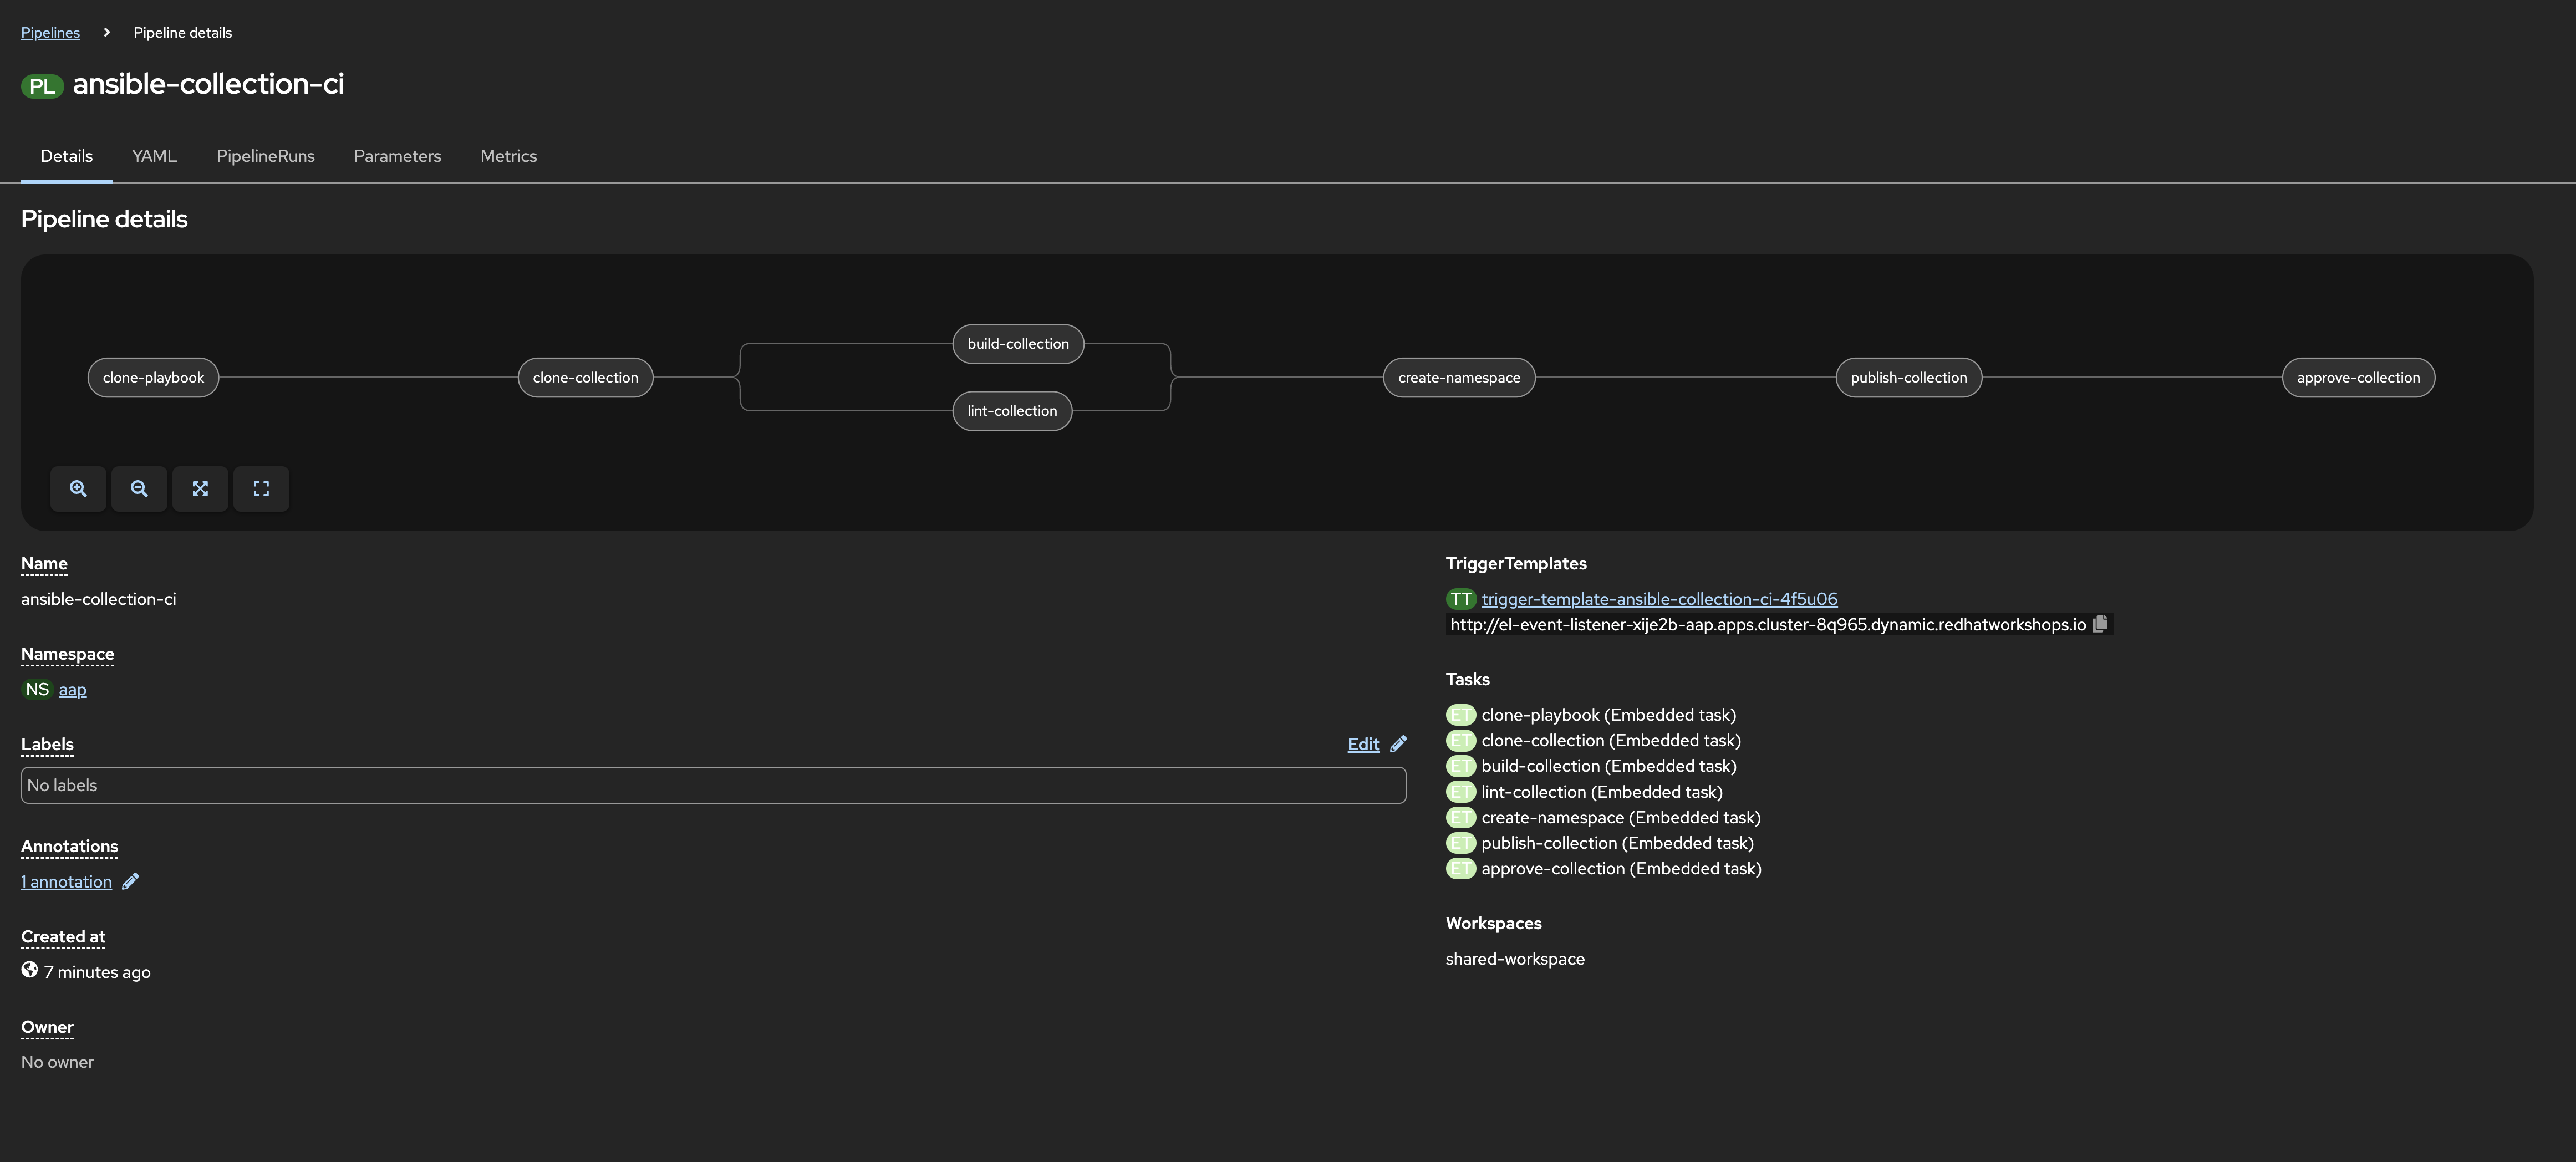
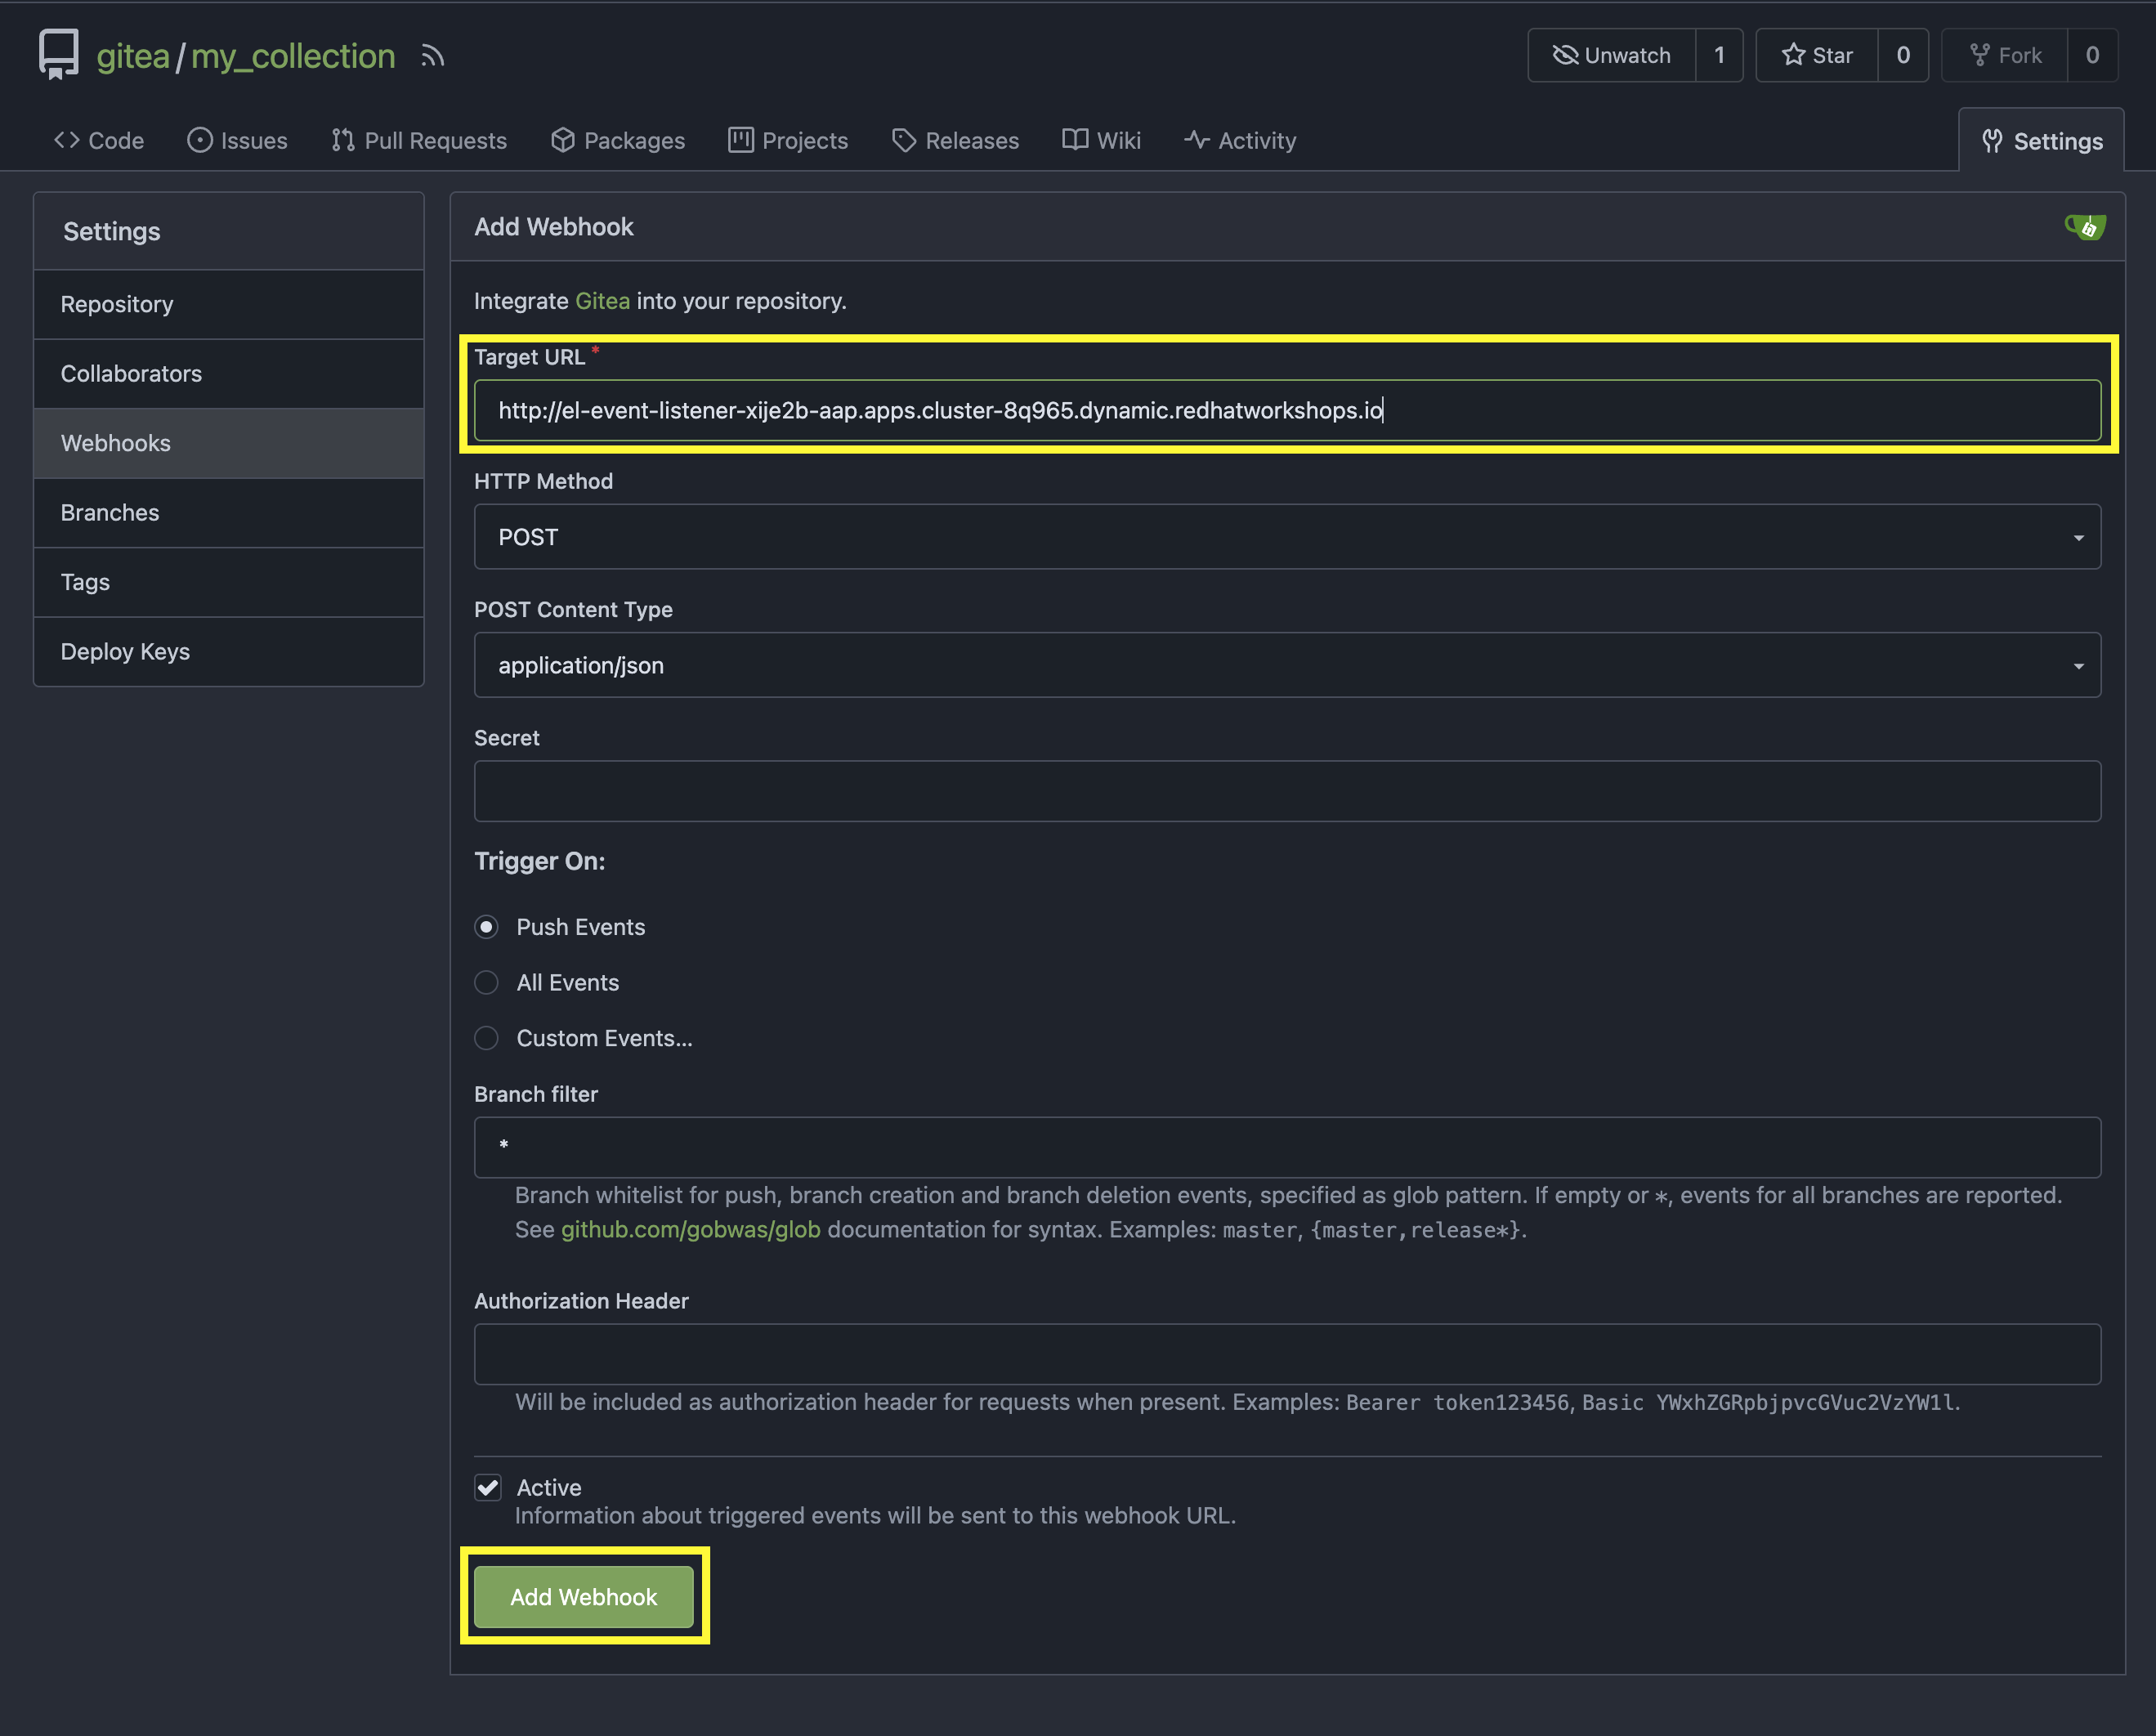
4.4.3: Create the Webhook within the Gitea Collection Repository
Once the trigger has been created, the URL will be displayed underneath the TriggerTemplates section. The URL will start with http://el-event-listener-.
Copy the URL using the copy button next to the URL as it will be used when creating the webhook in Gitea.
Navigate to the Gitea repository containing the collection and create the webhook
-
Navigate to the Gitea ansible_bootcamp_my_collection Repository
-
Select the Settings tab on the right side of the window
-
Click on the Webhooks section under the Settings box on the left side of the window
-
Click the green Add Webhook button on the right side of the window ad select Gitea from the dropdown selections
-
Paste the Event Listener URL that was copied previously in the Target URL field
-
Leave the remaining fields at their default values
-
Click on the green Add Webhook button at the bottom of the page to create the webhook
4.4.4: Test Webhook
With the webhook created, let’s send a test payload to confirm that it is working properly.
-
From the Webhooks page of the _ansible_bootcamp_my_collection repository in Gitea, click on the link for the webhook you just created
-
At the bottom of the page, click the Test Delivery button to trigger the pipeline
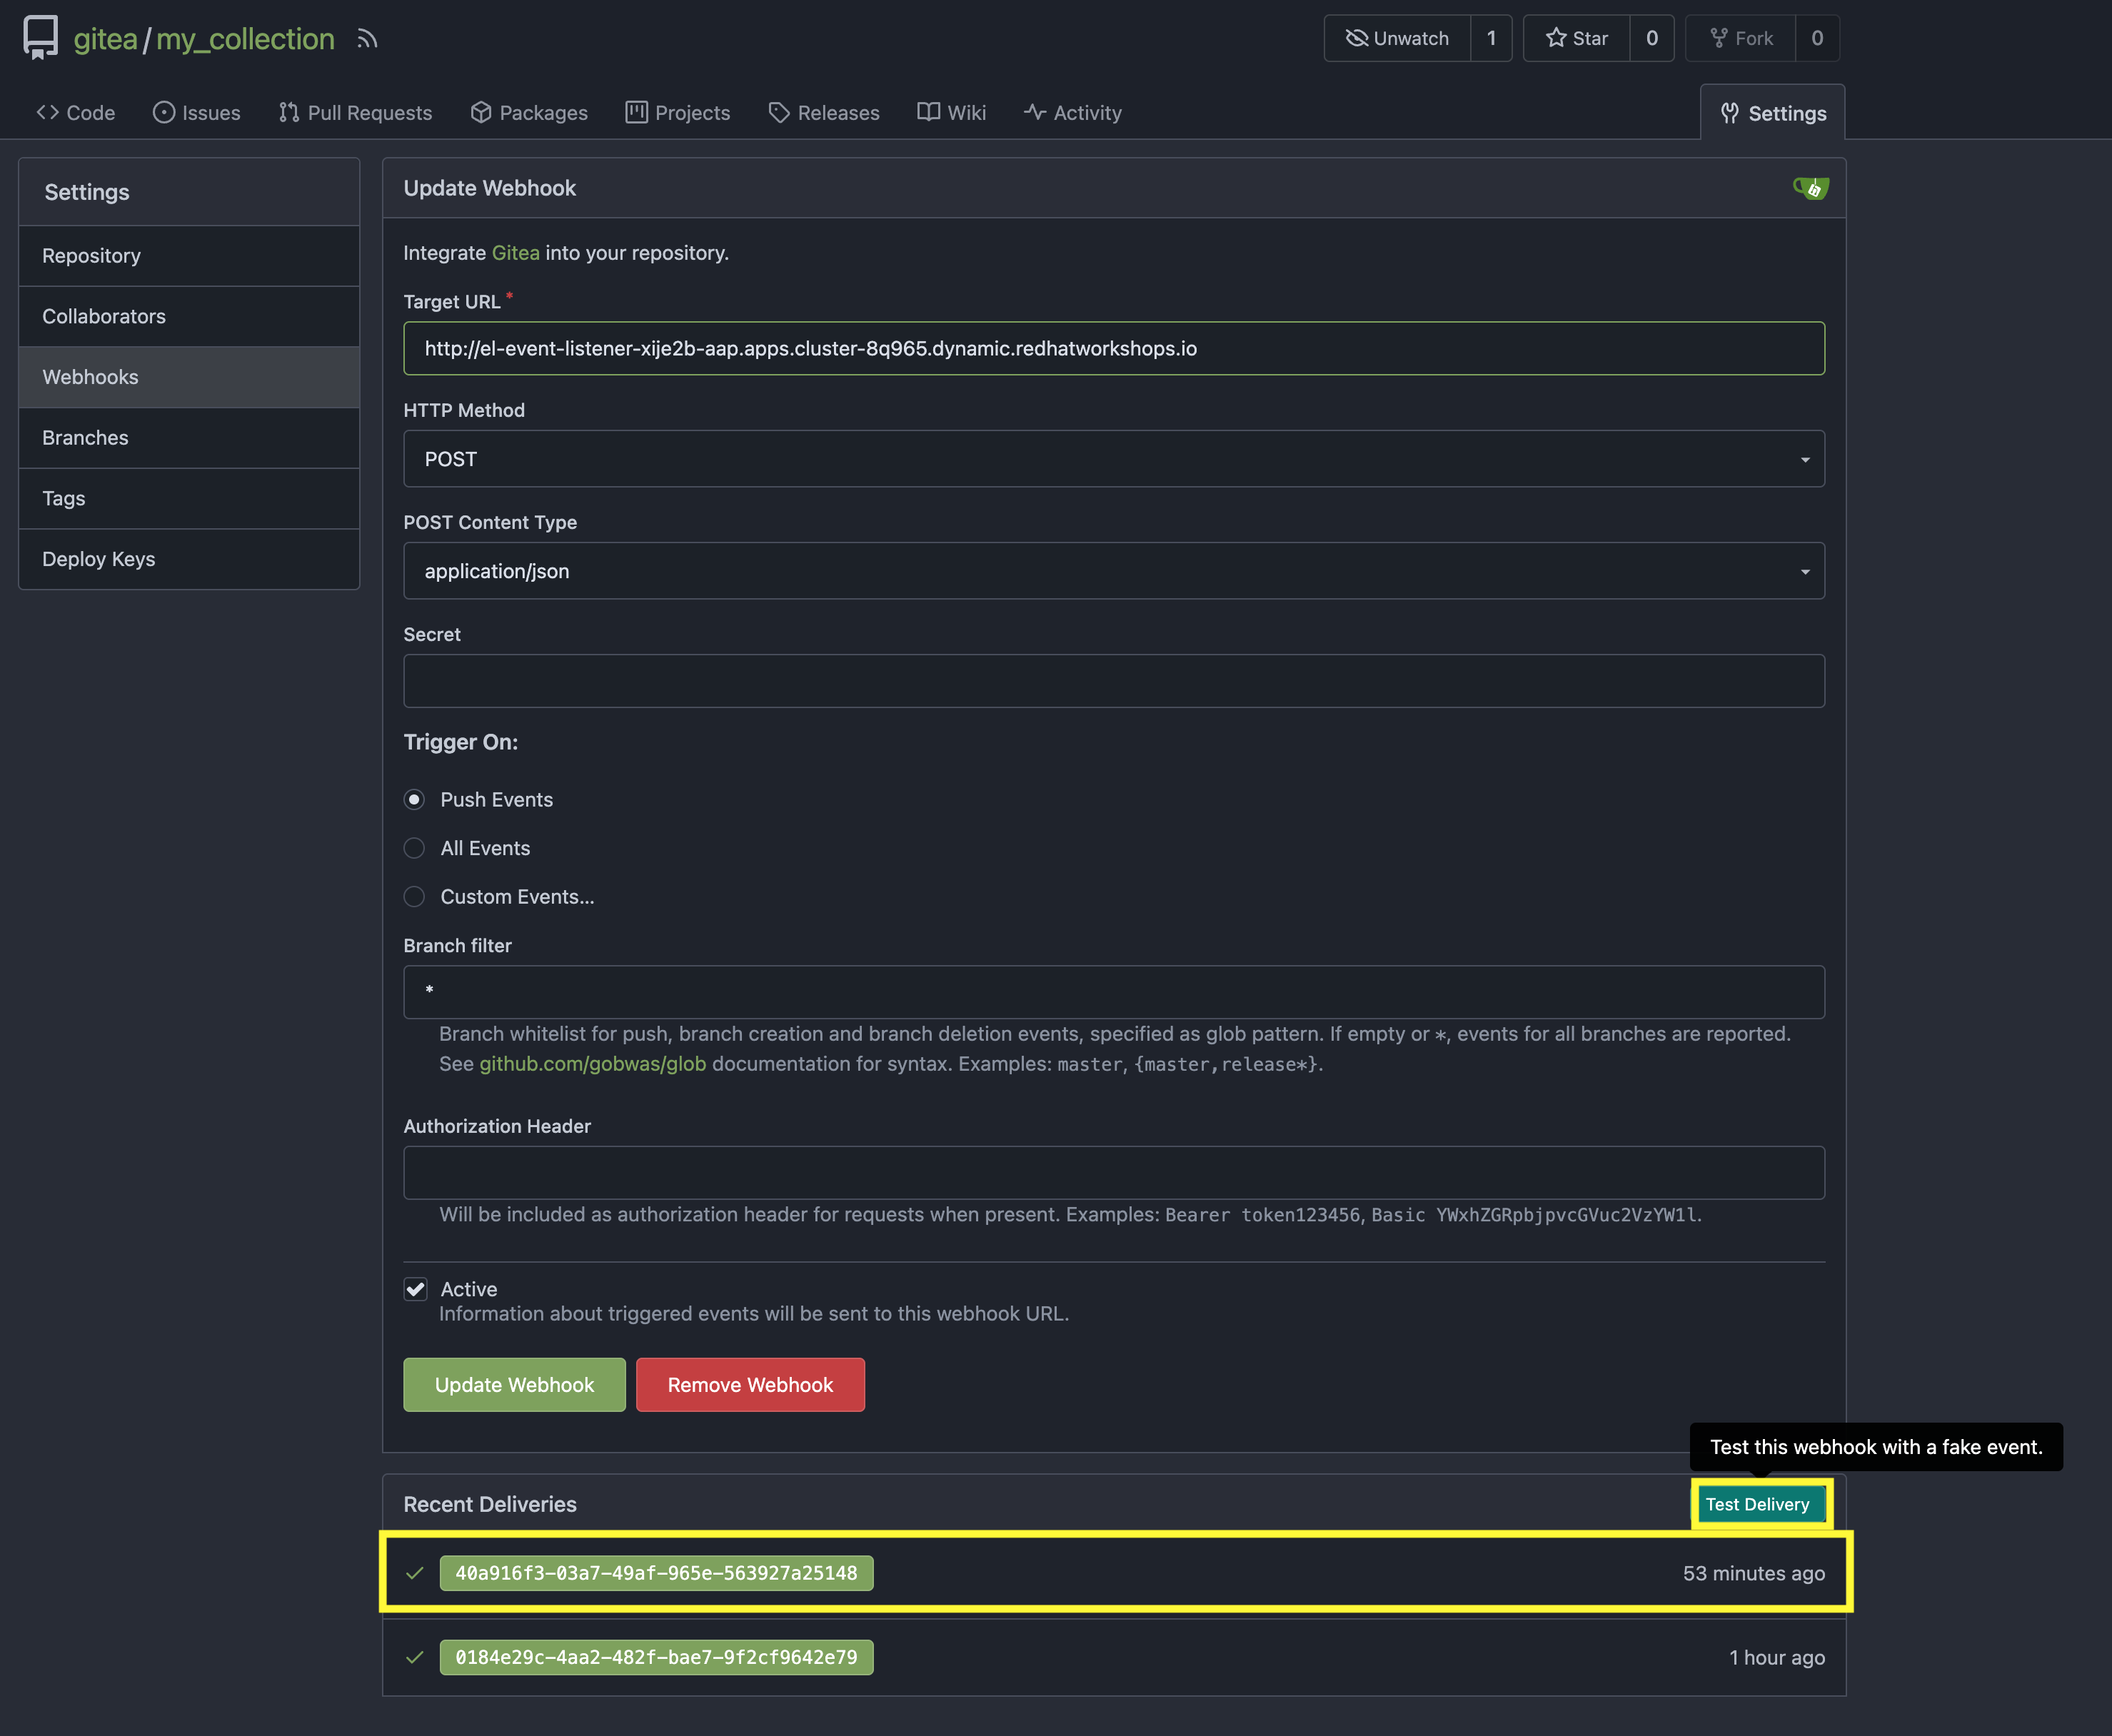
A Green check mark next to the delivery indicates that the webhook was successfully sent to OpenShift.
| You can see the status of the pipeline by going back into your OpenShift console and navigating to the pipeline you created and clicking on PipelineRuns. |
4.5: Update and Push New Version of Ansible Collection to Gitea
Update the Ansible collection created in Managing Ansible Content with Private Automation Hub by adding a new role called dad_joke that fetches and displays a random dad joke from the icanhazdadjoke API. In addition, we will add a Molecule test scenario based on our learning TDD for Ansible section to validate the functionality of the new role.
Add the dad_joke role to your collection
-
Click on the Ansible extension in the left hand menu of your Dev Spaces workspace
-
Click on
Role -
Provide the path for your collection root directory (
/projects/devspaces-example/my_pah_project) -
Name the role
dad_joke -
Click Create to create the role
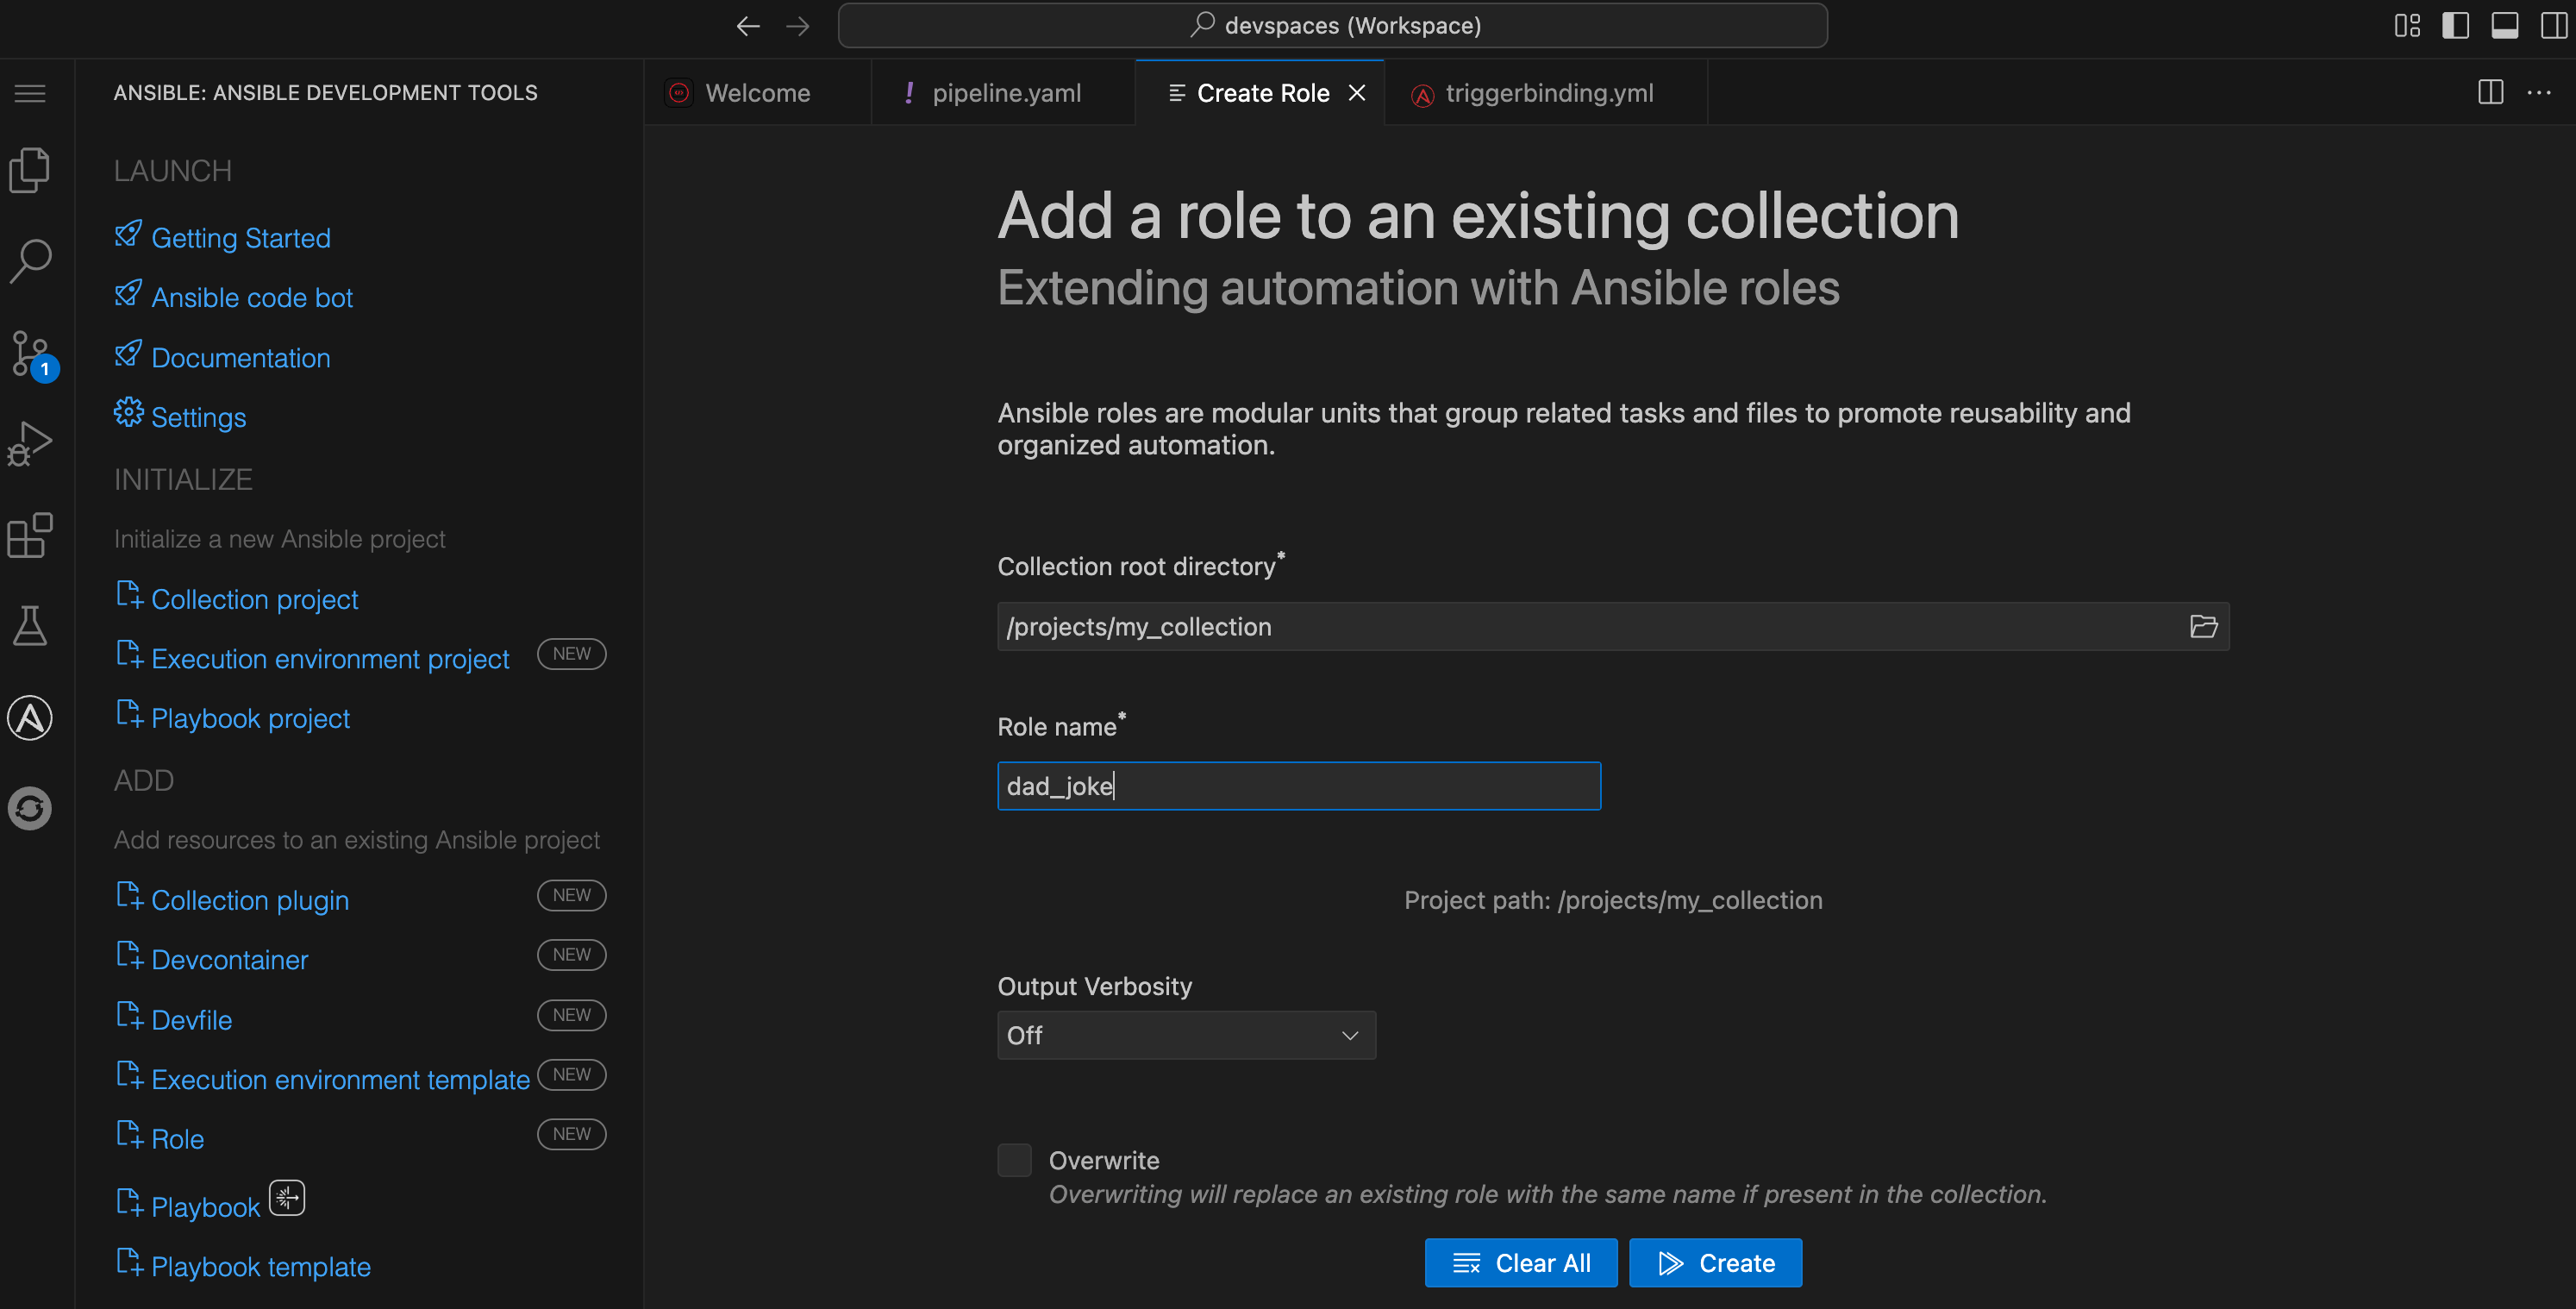
A message indicating the role was created successfully should appear in the Logs output.
4.5.1: Update the dad_joke role
Update the contents of the generated main.yml within the dad_joke role to include steps that fetch a random dad joke from the API and display it.
Click on the file explorer and expand the roles/dad_joke/tasks directory within the collection. Place the following content within the roles/dad_joke/tasks/main.yml file
---

- name: Fetch a Random Joke from the API
  ansible.builtin.uri:
    url: https://icanhazdadjoke.com/
    method: GET
    headers:
      Accept: application/json
  register: dad_joke_joke_api_response


- name: Display the Setup and Punchline
  ansible.builtin.debug:
    msg: "{{ dad_joke_joke_api_response.json.joke }}"
...
4.5.2: Add a molecule test scenario
Add a Molecule test scenario to validate the functionality of the dad_joke role.
-
Within the Dev Spaces terminal, navigate to the extensions directory of your collection. This should be a folder in the root of the collection
cd /projects/devspaces-example/my_pah_project/extensions -
Initialize the
dad_jokeMolecule test scenariomolecule init scenario dad_joke -
Replace the contents of the
extensions/molecule/dad_joke/converge.ymlfile with the contents belowconverge.yml--- - name: Converge hosts: localhost connection: local tasks: - name: "Include the dad_joke role" ansible.builtin.include_role: name: ansible_bootcamp.my_collection.dad_joke ... -
Replace the contents of the
extensions/molecule/dad_joke/molecule.ymlfile with the contents belowmolecule.yml--- driver: name: default platforms: - name: instance provisioner: name: ansible config_options: defaults: collections_path: ${ANSIBLE_COLLECTIONS_PATH} ... -
Open the
galaxy.ymlfile at the root of the collection repository and increment the version number to be2.0.0 -
Commit and push your code you should now see your pipeline start to run
cd /projects/devspaces-example/my_pah_project
git add --all
git commit -m "Adding dad_joke role and molecule test"
git push origin main| You may be prompted to enter your Gitea credentials to complete the push. Enter the credentials provided in the Environment Details page. |
A PipelineRun should be triggered in OpenShift automatically via the webhook you created earlier. You can monitor the progress of the pipeline from the OpenShift Web Console by navigating to the Pipelines section and selecting PipelineRuns.
4.6: Verify that your updated collection is available in Private Automation Hub
This step should be started only after you verify that the Tekton PipelineRun has completed successfully.
|
-
Launch the Automation Controller web interface and login using the credentials from the Environment Details page.
-
From the navigation menu on the left, expand Automation Content and expand Collections
-
Verify version
2.0.0of your collection is present

4.7: Install and Use the update collection from PAH
With the collection published and approved in Private Automation Hub, you can now install and use the updated collection in your local Dev Spaces workspace.
In your terminal, run the following commands. These variables will configure ansible-galaxy and ansible-builder to use your PAH instance for the current terminal session.
| If you have these environment variables set from the previous lab you do not need to set them again. |
-
First, set your Private Automation Hub API token as an environment variable
# Set your Private Automation Hub API token export PAH_API_TOKEN='YOUR_API_TOKEN_HERE' -
Now, set the remaining environment variables
# Set the list of servers Ansible should know about export ANSIBLE_GALAXY_SERVER_LIST='published,certified,validated,community' # Configure the 'published' repository export ANSIBLE_GALAXY_SERVER_PUBLISHED_URL={aap_controller_web_url}/pulp_ansible/galaxy/published/ export ANSIBLE_GALAXY_SERVER_PUBLISHED_TOKEN=$PAH_API_TOKEN # Configure the 'certified' repository export ANSIBLE_GALAXY_SERVER_CERTIFIED_URL={aap_controller_web_url}/pulp_ansible/galaxy/rh-certified/ export ANSIBLE_GALAXY_SERVER_CERTIFIED_TOKEN=$PAH_API_TOKEN # Configure the 'validated' repository export ANSIBLE_GALAXY_SERVER_VALIDATED_URL={aap_controller_web_url}/pulp_ansible/galaxy/validated/ export ANSIBLE_GALAXY_SERVER_VALIDATED_TOKEN=$PAH_API_TOKEN # Configure the 'community' repository export ANSIBLE_GALAXY_SERVER_COMMUNITY_URL={aap_controller_web_url}/pulp_ansible/galaxy/community/ export ANSIBLE_GALAXY_SERVER_COMMUNITY_TOKEN=$PAH_API_TOKEN -
Use
ansible-galaxyto install the new version of your collection from Private Automation hubansible-galaxy collection install ansible_bootcamp.my_collection -
Create the following ansible playbook in a file named
test_dad_joke.ymlto test the new collection in theplaybooksdirectory of the collection.playbooks/test_dad_joke.yml--- - name: Random Dad Joke Generator hosts: localhost connection: local gather_facts: false roles: - ansible_bootcamp.my_collection.dad_joke -
From the root of the collection, execute the playbook and if successful, it should return a Dad Joke
ansible-playbook playbooks/test_dad_joke.yml
Verify the playbooks runs successfully and returns a dad joke in the output.
Conclusion
Congratulations! You have successfully implemented a complete CI/CD pipeline for Ansible automation:
-
Created a Tekton pipeline on OpenShift that automates the full Ansible collection development lifecycle
-
Configured webhook integration between Gitea and OpenShift Pipelines for automatic triggering
-
Implemented automated testing with Molecule scenarios
-
Set up collection publishing and approval workflows to Private Automation Hub
-
Verified the end-to-end pipeline functionality with a working collection update
This automated workflow ensures consistent, reliable, and secure deployment of Ansible content across your organization, reducing manual errors and improving development velocity.