Lab: Automation Developer Experience
We will explore essential software development practices applied to automation development, including git workflows, secret scanning with pre-commit hooks, and comprehensive testing. This lab covers treating automation as code with proper linting, testing, and CI/CD practices, culminating in an overview of the Ansible Development Tools suite.
This lab walks through some of the basic software development practices as they apply to automation development. Finally, it concludes with an overview of the Ansible Development Tools. All automation files should be treated as code. This means scanning for code syntax and quality, checking that sensitive assets have not been exposed, and testing your code as much as possible before committing it. Once committed to git and published, consider it public and without effort will be there forever.
Learning Objectives
After completing this module, you will be able to:
-
Apply software development best practices to automation code
-
Use git effectively for version control in automation projects
-
Implement pre-commit hooks for code quality and security
-
Set up comprehensive testing frameworks for automation
-
Navigate the Ansible Development Tools ecosystem
1: Git
While a local directory can be used to manage resources related to automation development, it is generally considered best practice that version control tools be utilized. These days, when speaking of version control, we are referring to Git. Furthermore, to properly scale automation across an enterprise, git _proficiency is required.
This lab covers the extreme basics of git. For many of you, this may be second nature, so feel free to skip basic concepts you are already familiar with.
|
1.1: CLI Completion
While not required, sourcing these two files will greatly improve your CLI interactions. Note that this can also be added to the devfile for Dev Spaces customization or a local .bashrc file.
source /usr/share/bash-completion/completions/git
source /usr/share/git-core/contrib/completion/git-prompt.sh
PS1='[\u \W$(__git_ps1 " (%s)")]\$ '
Notice your prompt will now display which branch you are currently operating against. Also, git sub commands now auto-complete with the TAB key. Feel free to customize this prompt as desired.
1.2: Set Global Settings
Before working with Git in your Ansible Workspace, you will need to set your global username and email. This metadata is used when committing code so that it can be associated with the user who made the change:
$ git config --global user.name "First Last"
$git config --global user.email "email@example.com"
1.3: Branches
link;Branches should be used liberally. They can be used to test ideas and have no fear trashing a branch that didn’t quite work out. It’s better to leave a branch as is and start a new one based on your current working branch rather than testing a few things and reverting the commits or comment/uncomment things. Using the new git prompt configured previously, your prompt should update when your branch changes similar to the following:
[user devspaces-example (main)]$ git branch
* main

[user devspaces-example (main)]$ git checkout -b test
Switched to a new branch 'test'

[user devspaces-example (test)]$ git branch
  main
* test
Since a git repository is used to manage an OpenShift Dev Spaces workspace, the current directory that you are operating within is already an initialized as a git repository.
|
main is the name of the branch that is typically used as the default branch. master is also another name that was used in the past. however, most newer repositories make use of main as the default branch. The git config --global init.defaultBranch command can be used to configure your git client with the name of the default branch for new repositories.
Switch back to the main branch:
[user devspaces-example (test)]$ git checkout main
Switched to branch 'main'
Now, delete the test branch:
[user devspaces-example (main)]$ git branch -d test
Deleted branch test (was 1234567).
See how easy it was to create and delete branches in git!
1.4:Pull/Merge Requests
Pull/Merge (PR/MR) requests are used when contributing code in a shared git server with collaboration capabilities (GitHub, GitLab, Gitea etc) and you want to merge a branch into another branch. Typically, this is a feature branch with your work that you want to merge into the main branch. However, it could be any other branch target. PR/MR’s are an essential way to review code and allow others to comment and provide feedback or changes. PR/MRs can also be used to kick off pipelines to run further automation activities based on this branch of code.
Merge conflicts
When a change is detected on the same line and git is unable to automatically apply the changes, human intervention is needed. Several strategies and tools are available to assist you with resolving the conflict.
1.5: Branch update strategies
When working in a branch, it is often necessary to ensure your branch has the latest commits that are in main. If it has been a while since you created or updated your branch, it could be several commits behind.
Merge will take two divergent branches and preserve their history, adding a commit to tie them together
Rebase will rewind and play commits back in order resulting in a cleaner, more linear history, but can make merge conflicts more difficult to manage.
1.6: Cleaning up git history
While you generally should not be editing git history, there are times where this is necessary. Perhaps commits were made with a default or incorrect user.name or user.email and needed to be corrected. Maybe you want to combine several commits that you made locally before publishing (also known as squashing). Or, perhaps secrets were leaked and though cleaned up in HEAD (the current active commit), they are still in git history. In these cases, it is possible to edit specific commits or a series of commits.
2: Secrets Scanning
It is absolutely vital that you never EVER commit any secrets to git. Even if you revert the commit or delete the file, it is still in history. Even if it is "just a lab server" or "only internal", a secret will trigger many security scans requiring additional work to explain if it is valid and needs rotating or not. Just don’t do it. This lab will walk through using a tool like Gitleaks to help keep your secrets out of git.
First, create a fake API-like key. The default regex and patterns will determine a UUID-like value to be similar to an API key:
$ cd /projects/devspaces-example/
$ echo key=$(uuidgen) > secret
$ cat secret
key=3863b2c6-cc7b-4832-92b6-5b82d6b1a987
Gitleaks is available as a container image, so no installation is necessary.
Pull the image into your Dev Spaces workspace:
$ podman pull docker.io/zricethezav/gitleaks:latest
Trying to pull docker.io/zricethezav/gitleaks:latest...
Getting image source signatures
Copying blob 91da3791a8e8 done   |
Copying blob daed8b4062ea done   |
Copying blob e590f02e913a done   |
Copying blob 1747dece9491 done   |
Copying config 49c41c2292 done   |
Writing manifest to image destination
49c41c2292e05b683dd2dbbe7f7677ca397722f1f0364adf615a3a6913f71ade
Run gitleaks to scan the directory containing the generated fake secret by mounting the current working directory into the gitleaks container:
$ podman run -v /projects/devspaces-example/:/scan:Z zricethezav/gitleaks:latest dir -v /scan/

    ○
    │╲
    │ ○
    ○ ░
    ░    gitleaks

Finding:     key=3863b2c6-cc7b-4832-92b6-5b82d6b1a987
Secret:      3863b2c6-cc7b-4832-92b6-5b82d6b1a987
RuleID:      generic-api-key
Entropy:     3.583275
File:        /scan/secret
Line:        1
Fingerprint: /scan/secret:generic-api-key:1

1:43AM INF scanned ~15523 bytes (15.52 KB) in 10.9ms
1:43AM WRN leaks found: 1
The default rules should detect the UUID as an API key.
While this was only a brief introduction, we hope that you can see just how vital a tool such as gitleaks can be to keep you and the content of your git repository free of sensitive assets.
3: Pre-Commit
pre-commit is a tool that essentially hooks into the git lifecycle and runs additional tooling before the commit writes changes to git history. This is a perfect way to automatically invoke actions, like ansible-lint and gitleaks, before having to go back and squash or clean up git history.
Install pre-commit using pip:
$ pip install --user pre-commitCollecting pre-commit
Downloading pre_commit-4.3.0-py2.py3-none-any.whl (220 kB)
━━━━━━━━━━━━━━━━━━━━━━━━━━━━━━━━━━━━━━━━ 221.0/221.0 kB 26.4 MB/s eta 0:00:00
Collecting cfgv>=2.0.0
Downloading cfgv-3.4.0-py2.py3-none-any.whl (7.2 kB)
Collecting identify>=1.0.0
Downloading identify-2.6.15-py2.py3-none-any.whl (99 kB)
━━━━━━━━━━━━━━━━━━━━━━━━━━━━━━━━━━━━━━━━ 99.2/99.2 kB 63.9 MB/s eta 0:00:00
Collecting nodeenv>=0.11.1
Downloading nodeenv-1.9.1-py2.py3-none-any.whl (22 kB)
Requirement already satisfied: pyyaml>=5.1 in /usr/local/lib64/python3.11/site-packages (from pre-commit) (6.0.3)
Requirement already satisfied: virtualenv>=20.10.0 in /usr/local/lib/python3.11/site-packages (from pre-commit) (20.25.1)
Requirement already satisfied: distlib<1,>=0.3.7 in /usr/local/lib/python3.11/site-packages (from virtualenv>=20.10.0->pre-commit) (0.3.8)
Requirement already satisfied: filelock<4,>=3.12.2 in /usr/local/lib/python3.11/site-packages (from virtualenv>=20.10.0->pre-commit) (3.13.1)
Requirement already satisfied: platformdirs<5,>=3.9.1 in /usr/local/lib/python3.11/site-packages (from virtualenv>=20.10.0->pre-commit) (4.2.0)
Installing collected packages: nodeenv, identify, cfgv, pre-commit
WARNING: The script nodeenv is installed in '/home/user/.local/bin' which is not on PATH.
Consider adding this directory to PATH or, if you prefer to suppress this warning, use --no-warn-script-location.
WARNING: The script identify-cli is installed in '/home/user/.local/bin' which is not on PATH.
Consider adding this directory to PATH or, if you prefer to suppress this warning, use --no-warn-script-location.
WARNING: The script pre-commit is installed in '/home/user/.local/bin' which is not on PATH.
Consider adding this directory to PATH or, if you prefer to suppress this warning, use --no-warn-script-location.
Successfully installed cfgv-3.4.0 identify-2.6.15 nodeenv-1.9.1 pre-commit-4.3.0Notice the WARNING: this tells you the path the binary was installed to.
Create a pre-commit configuration file by creating a new file called .pre-commit-config.yaml with the following content:
repos:
  - repo: https://github.com/gitleaks/gitleaks
    rev: v8.28.0
    hooks:
      - id: gitleaks
        name: gitleaks
        entry: podman run -v /projects/devspaces-example:/scan:Z zricethezav/gitleaks:latest dir -v /scan/
        language: system
        stages: [pre-commit]
Install the pre-commit hook:
$ /home/user/.local/bin/pre-commit install

 pre-commit installed at .git/hooks/pre-commit
Attempt a git commit which should fail:
$ git add secret
$ git commit

gitleaks.................................................................Failed
- hook id: gitleaks
- exit code: 1

○
    │╲
    │ ○
    ○ ░
    ░    gitleaks

Finding:     key=3863b2c6-cc7b-4832-92b6-5b82d6b1a987
Secret:      3863b2c6-cc7b-4832-92b6-5b82d6b1a987
RuleID:      generic-api-key
Entropy:     3.583275
File:        /gitleaks/secret
Line:        1
Fingerprint: /gitleaks/secret:generic-api-key:1

1:22AM INF scanned ~15523 bytes (15.52 KB) in 7.62ms
1:22AM WRN leaks found: 1
Run git status and confirm the file is still staged for commit:
bash-5.1$ git status
On branch main
Your branch is up to date with 'origin/main'.

Changes to be committed:
  (use "git restore --staged <file>..." to unstage)
        new file:   secret

Untracked files:
  (use "git add <file>..." to include in what will be committed)
        .pre-commit-config.yaml
In this way, a developer never needs to remember to run a tool before a commit. pre-commit will do the work for you, keeping mistakes out of git history. For a more comprehensive exploration of pre-commit and the pre-commit-config, see https://github.com/redhat-cop/infra.aap_configuration/blob/devel/.pre-commit-config.yaml
4: Ansible Development Tools (ADT)
Ansible Development Tools is a curated suite of tools to help Ansible automation developers be more productive. These tools cover a wide range of activities from scaffolding new projects, building execution environments, linting code, testing code, and signing content.
In your terminal, view the installed Ansible Development Tools:
$ adt --version
ansible-builder                          3.1.0
ansible-core                             2.19.3
ansible-creator                          25.9.0
ansible-dev-environment                  25.8.0
ansible-dev-tools                        25.8.3
ansible-lint                             25.9.2
ansible-navigator                        25.9.0
ansible-sign                             0.1.2
molecule                                 25.9.0
pytest-ansible                           25.8.0
tox-ansible                              25.8.0
The curated list of tools installed as part of the Ansible automation developer tools package includes:
ansible-builder: a utility for building Ansible execution environments.
ansible-core: Ansible is a radically simple IT automation platform that makes your applications and systems easier to deploy and maintain. Automate everything from code deployment to network configuration to cloud management, in a language that approaches plain English, using SSH, with no agents to install on remote systems.
ansible-creator: a utility for scaffolding Ansible projects and content with leading practices.
ansible-lint: a utility to identify and correct stylistic errors and anti-patterns in Ansible playbooks and roles.
ansible-navigator: a text-based user interface (TUI) for developing and troubleshooting Ansible content with execution environments.
ansible-sign: a utility for signing and verifying Ansible content.
molecule: Molecule aids in the development and testing of Ansible content: collections, playbooks and roles
pytest-ansible: a pytest testing framework extension that provides additional functionality for testing Ansible module and plugin Python code.
tox-ansible: an extension to the tox testing utility that provides additional functionality to check Ansible module and plugin Python code under different Python interpreters and Ansible core versions.
ansible-dev-environment: a utility for building and managing a virtual environment for Ansible content development.
4.1: Visual Studio Code (VS Code) Extension
Ansible includes a Visual Studio Code (VS Code) extension to enhance the development experience. You can learn more about the features that are available in the extension at https://ansible.readthedocs.io/projects/vscode-ansible/
-
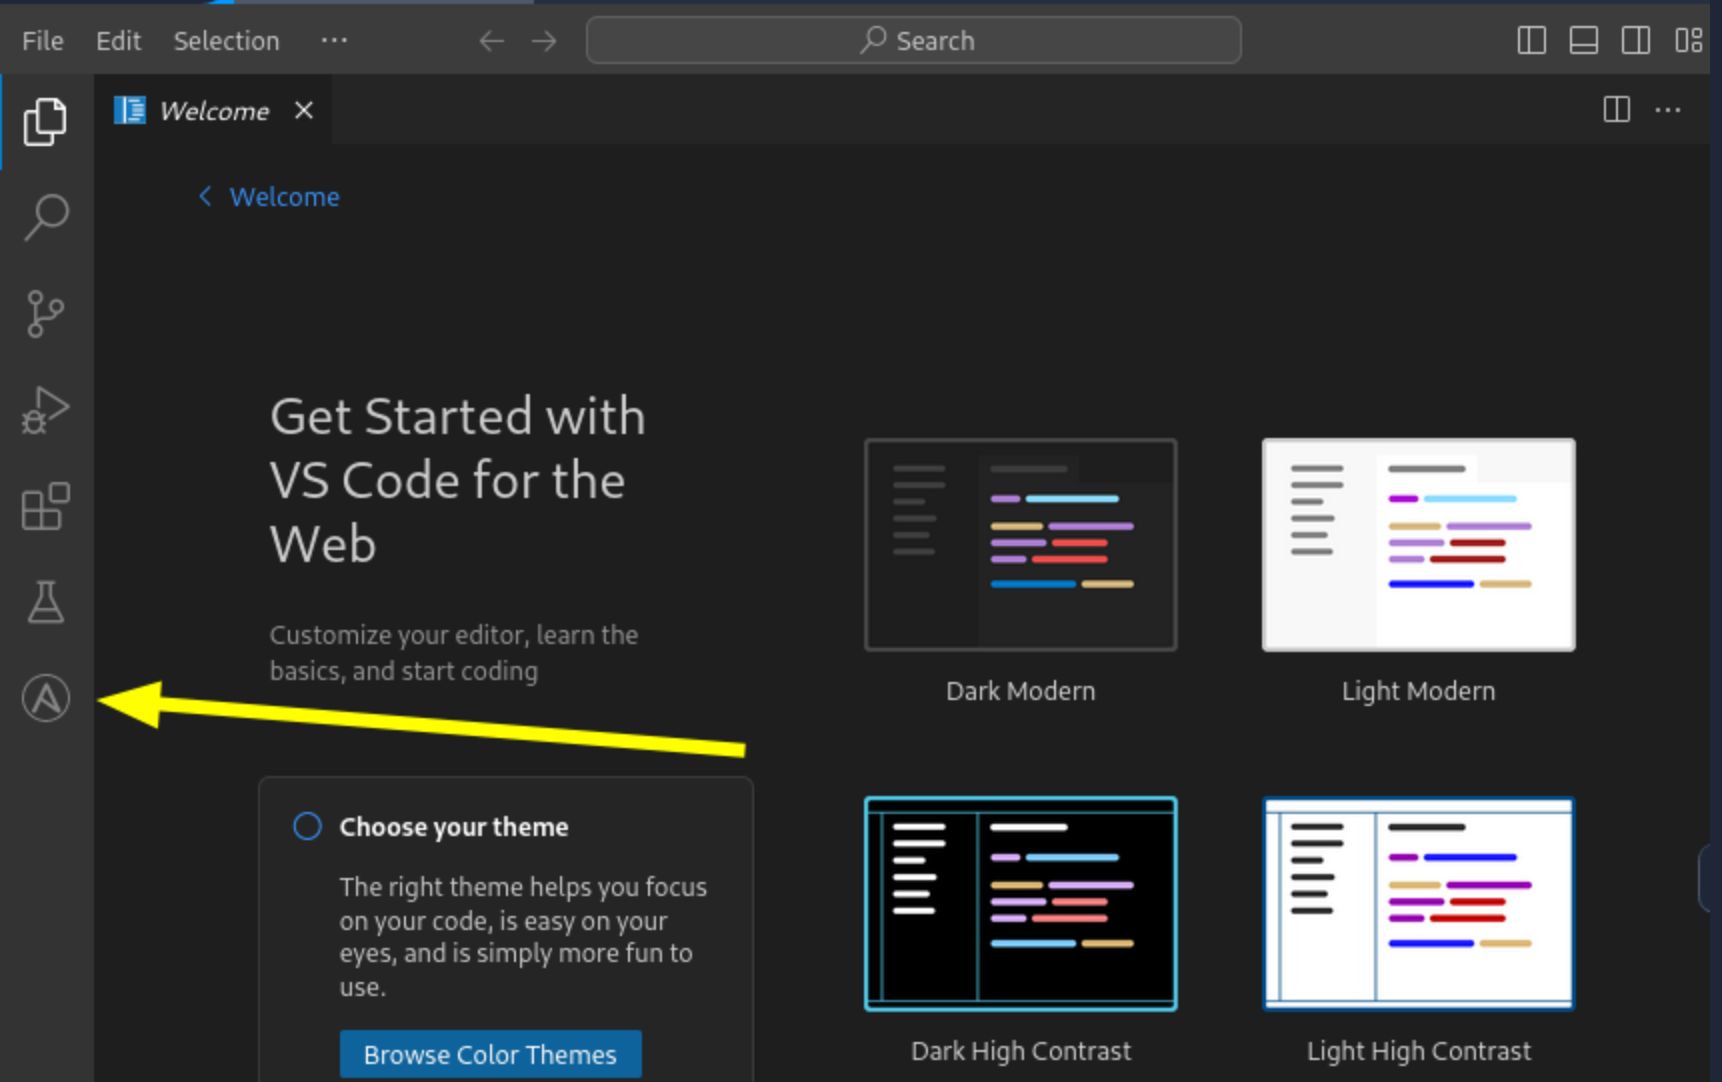
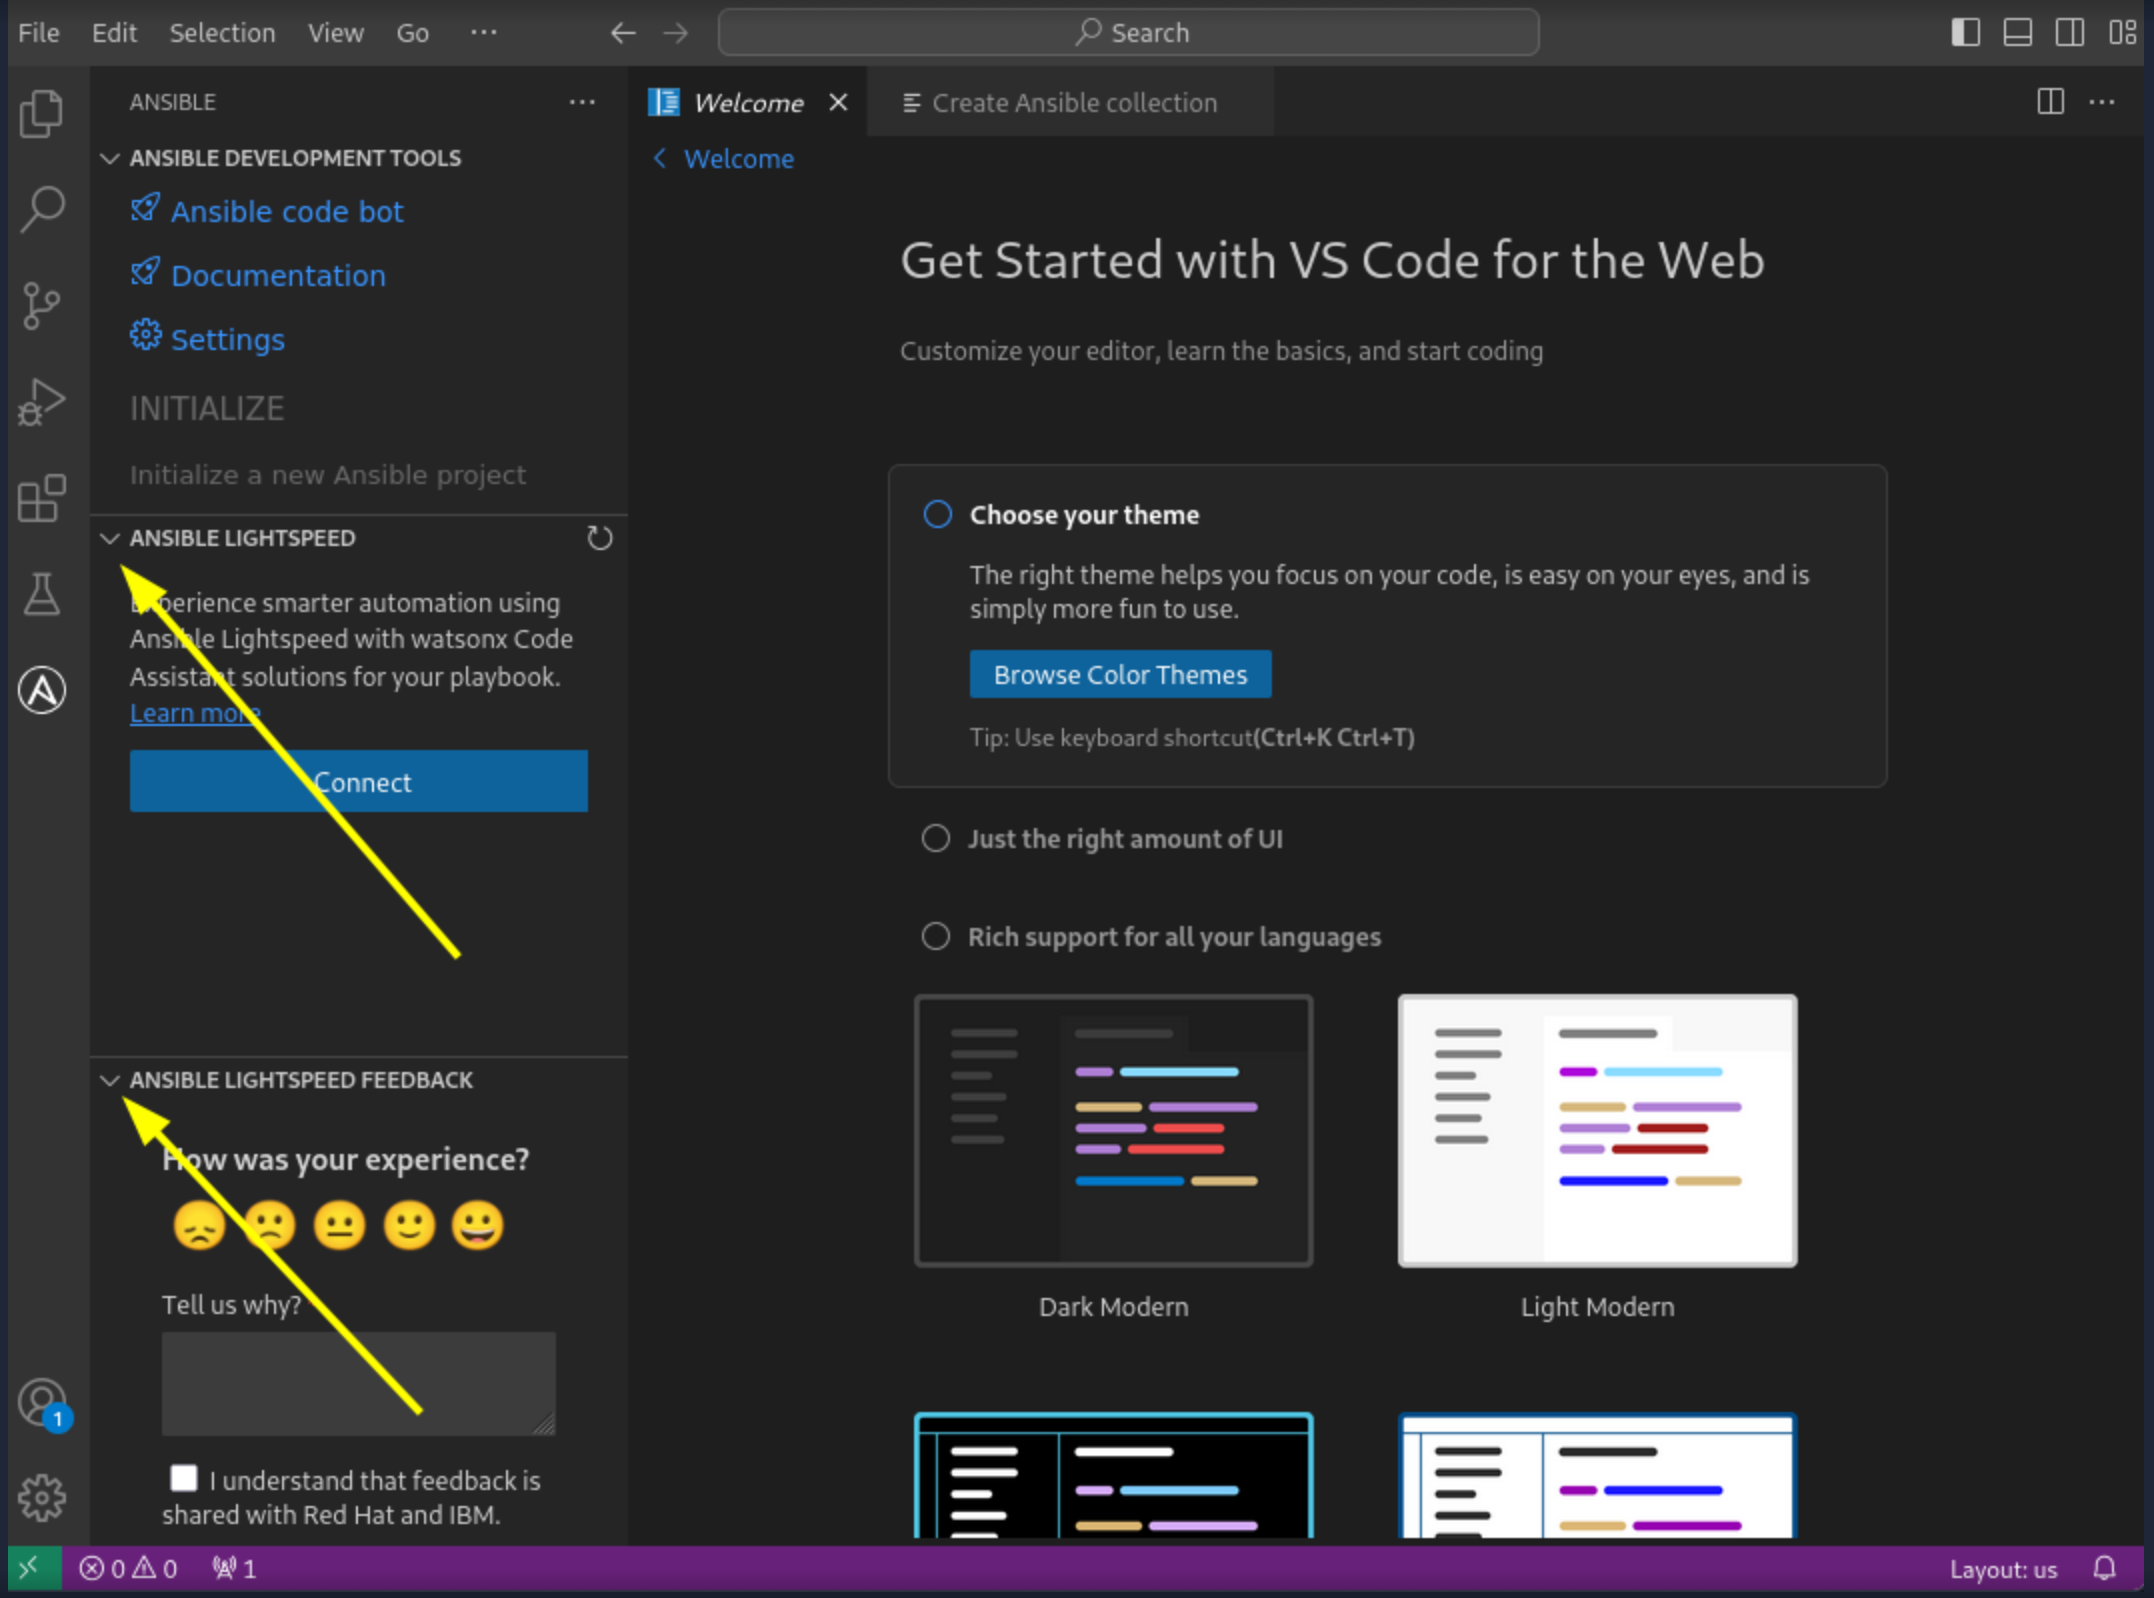
Open the Ansible extension on the left hand side of the Dev Spaces window
-
For this lab, we will not be using Lightspeed, so feel free to close these panes
4.2: Creating a Playbook Project
Now that we have covered the basics of tools available as an automation developer, let’s walk through bringing it all together. While not a command-line tool, the VS Code extension ties together functionality of Dev Spaces and Ansible Development Tools into the development Workspace you are currently using. This portion of the lab will walk through several aspects of automation development activities in this Workspace.
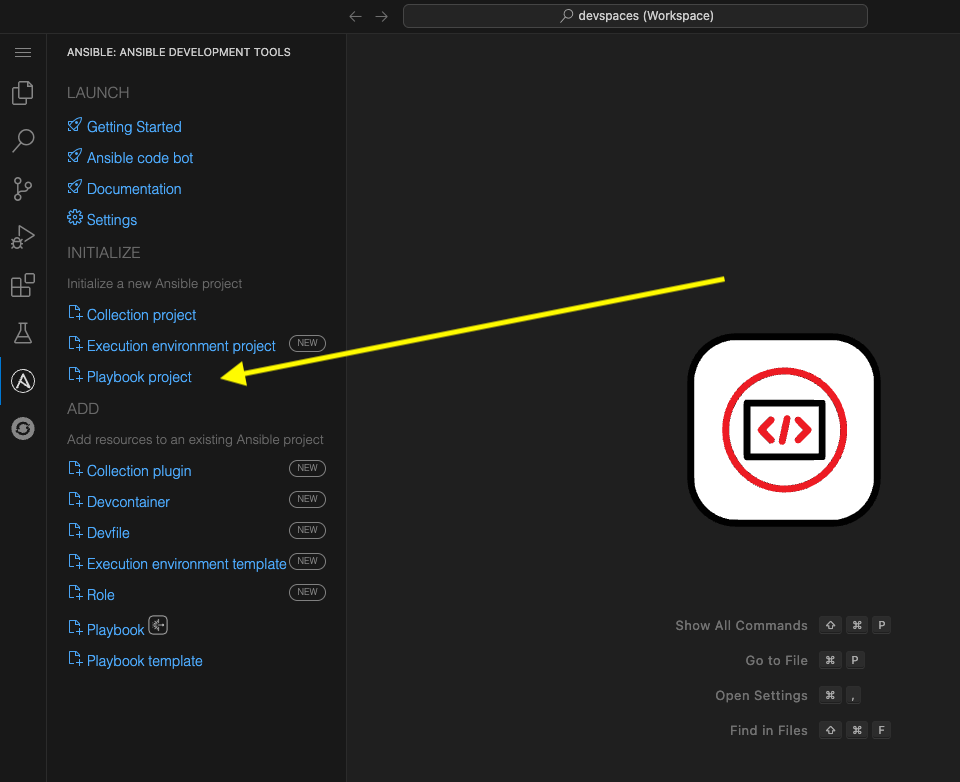
-
Within the Initialize section of the Ansible Development Tools, click on
Playbook projectto open a dialog to create a new project.Specify the following values within the playbook project creation dialog:
-
Destination directory:
/projects/myproject -
Namespace:
mynamespace -
Collection:
mycollection
-
-
Click Create
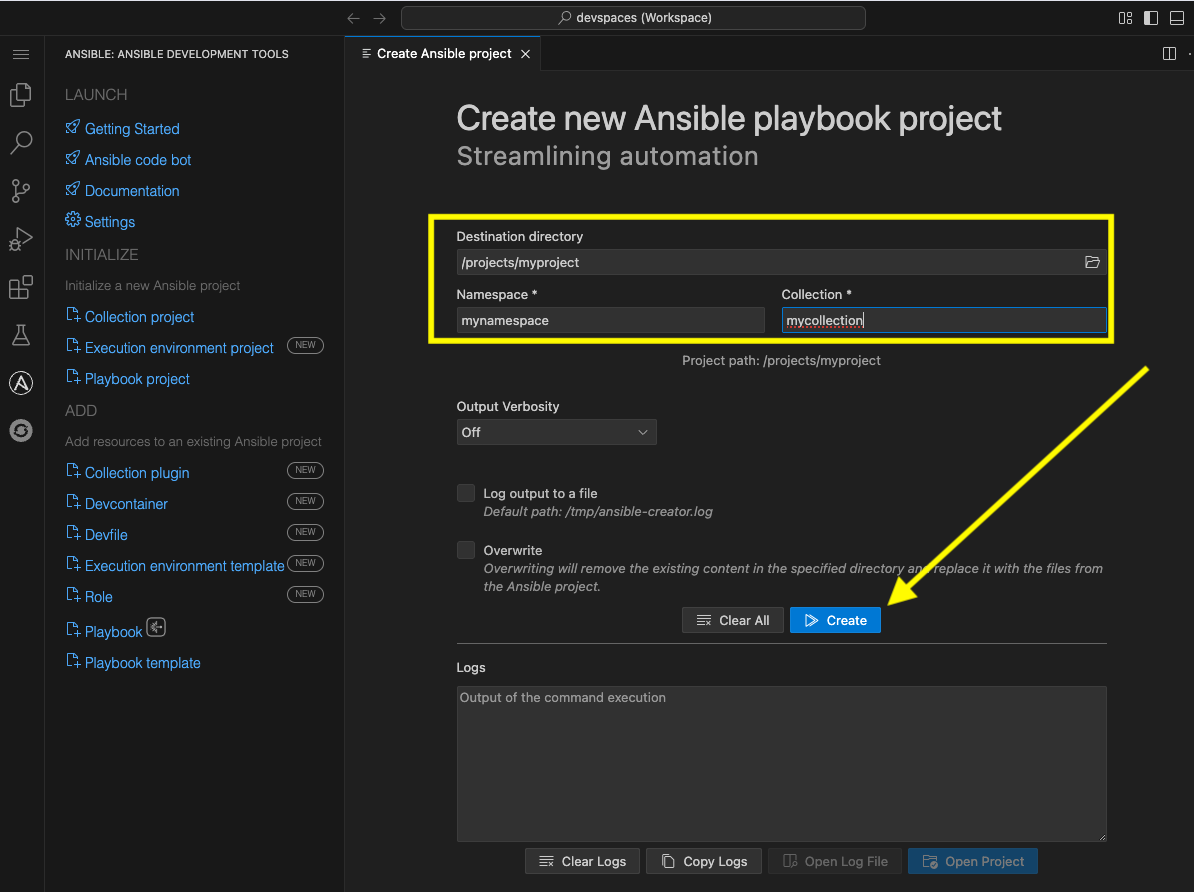
-
The logs will display in the box below that
-
Click
Open Projectto open a new VS Code window with this new project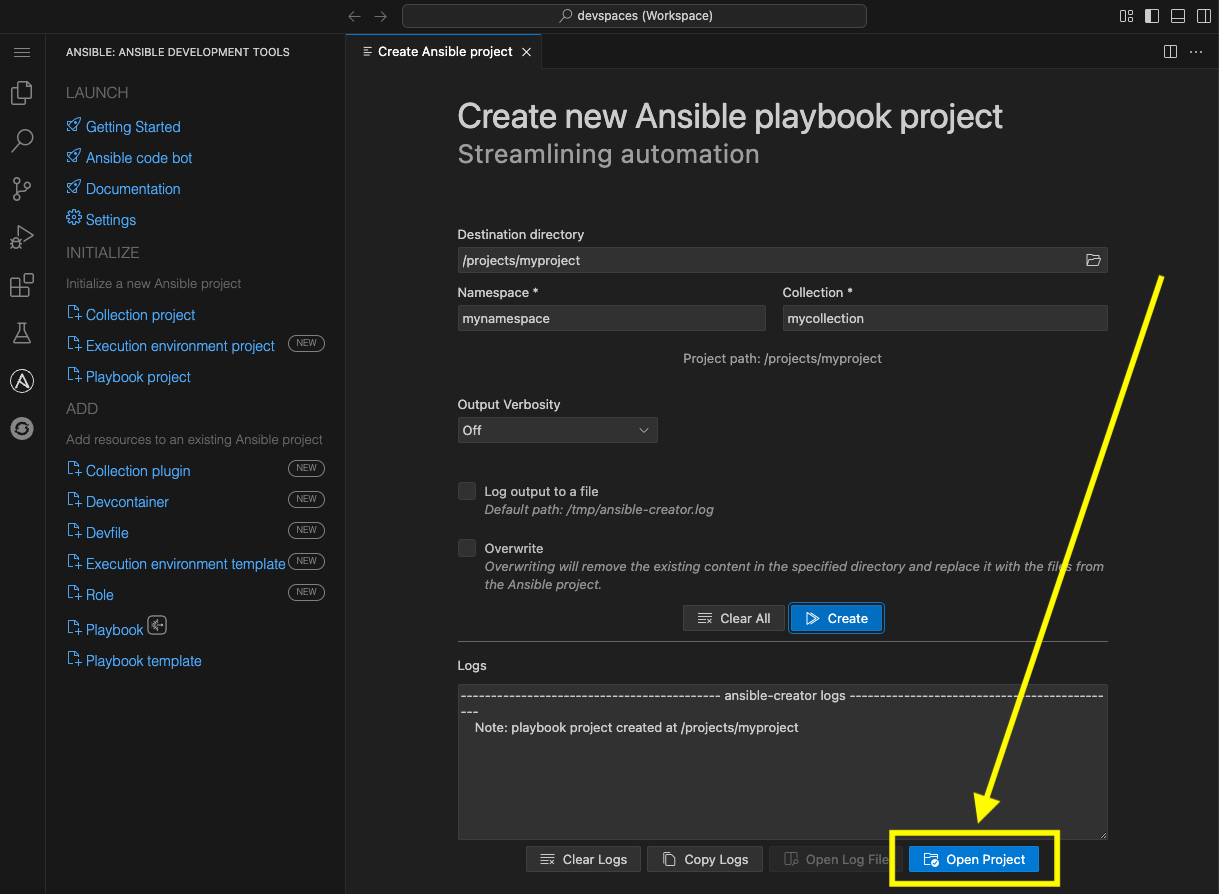
-
Once the Dev Spaces Workspace loads with the new folder structure, select the Yes, I trust the Authors button again and begin to explore the directories and files created by
ansible-creator, which was generated using industry standard good practices:
-
The
inventorydirector contains a ready to use directory structure: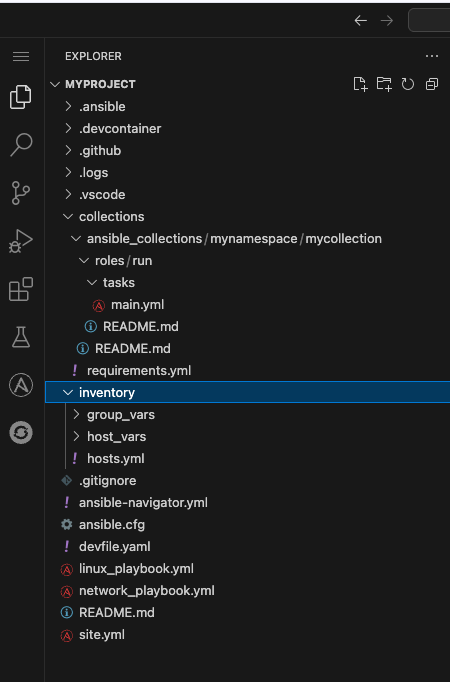
-
The
collectionsdirectory contains the tree structure representing how a collection is organized, a collection calledmycollectionand a simple role calledrunwith a few tasks.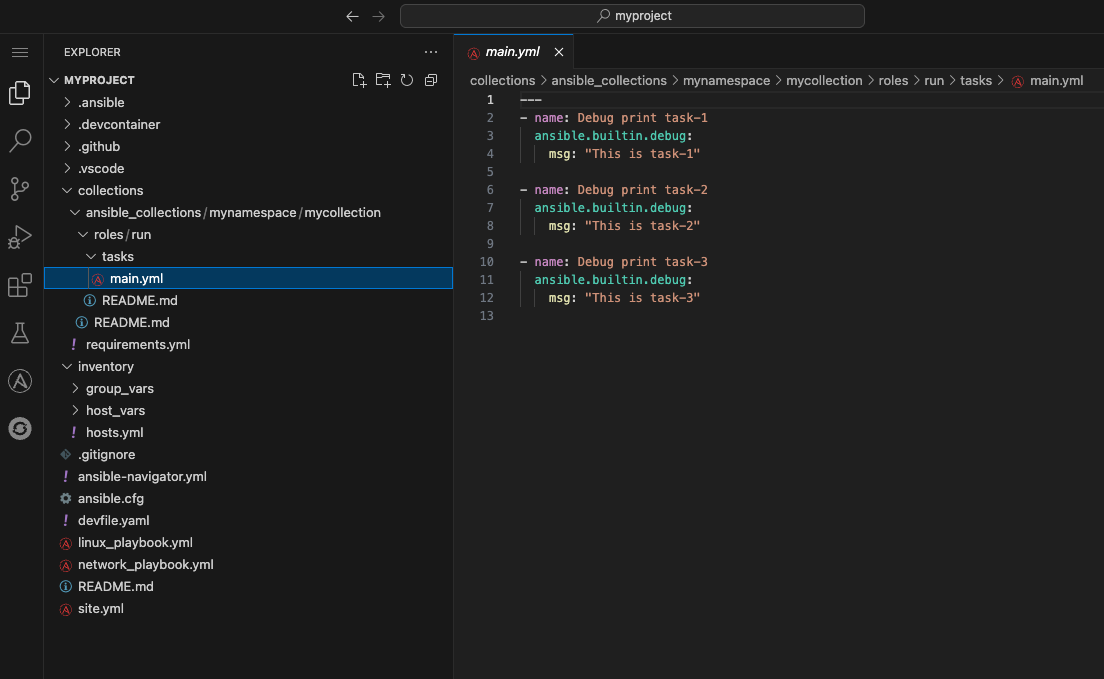
4.3: Running playbooks in VS Code
While you may be familiar with ansible-playbook or even ansible-navigator on the CLI, VS Code provides a way to execute them via ClickOps if so desired.
4.3.1: Running playbooks via ansible-playbook in VS Code
-
Right-click on the file at the base of the directory called
site.ymland chooseRun Ansible Playbook Via … -
Choose
Run playbook via 'ansible-playbook'.
-
A terminal opens up with the results of the
ansible-playbookexecution: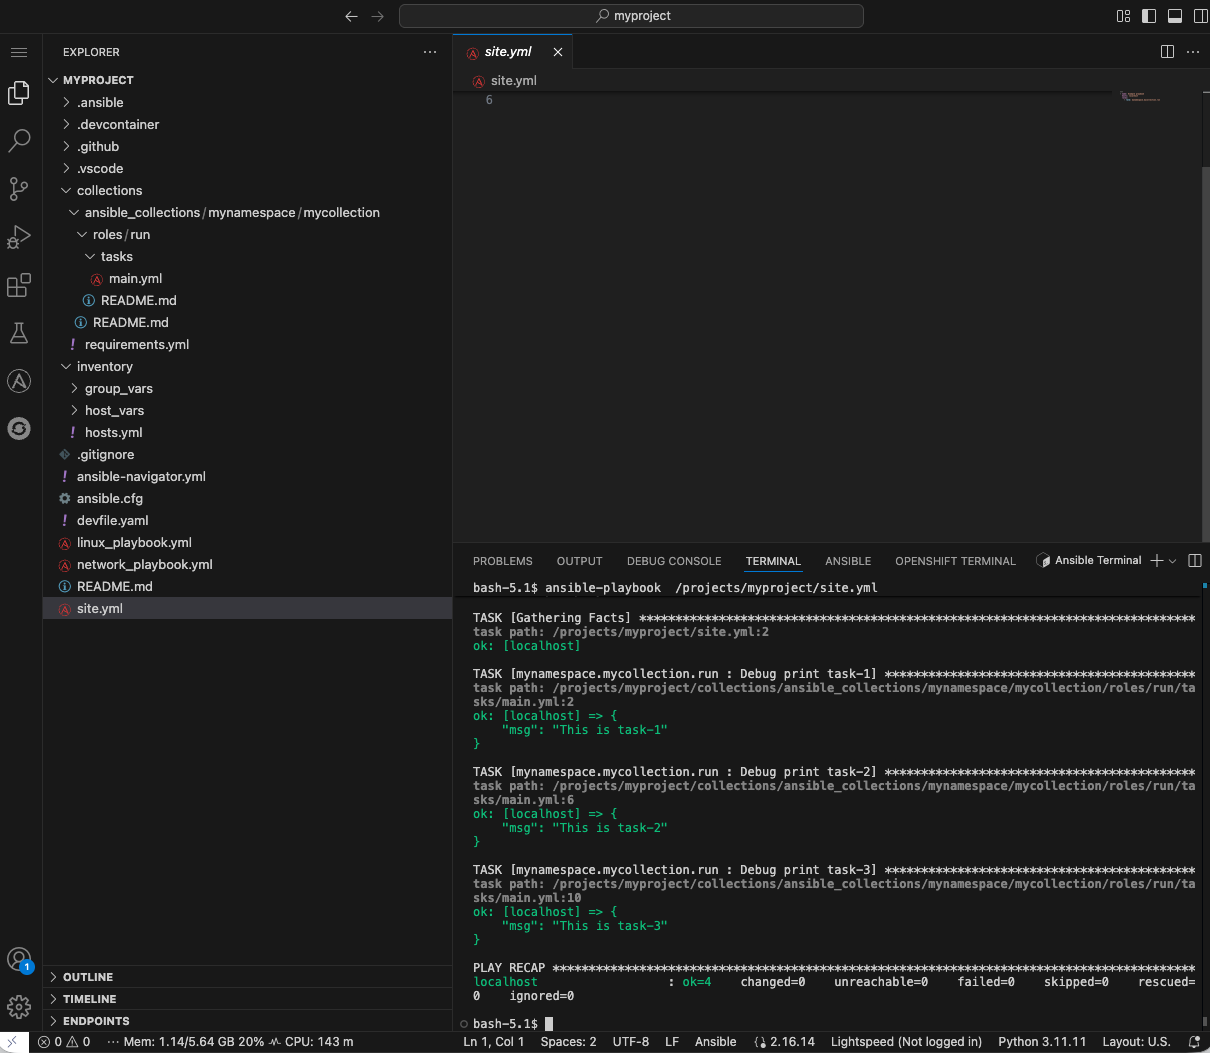
4.3.2:Running playbooks via ansible-navigator in VS Code
Alternatively, ansible-navigator can be used to execute the site.yml playbook.
-
Right-click on the file at the base of the directory
site.ymland chooseRun Ansible Playbook Via … -
Choose
Run playbook via 'ansible-navigator run'.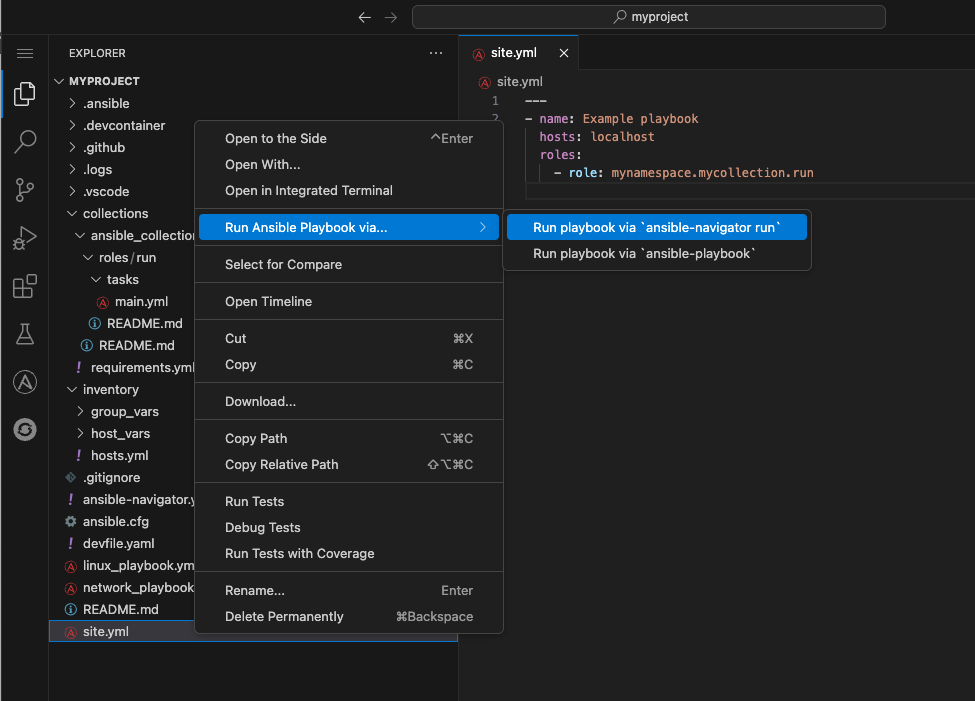
-
This will open a terminal and run
ansible-navigator run site.yml --ee false. When the run is finished you will see aCompletemessage inansible-navigator: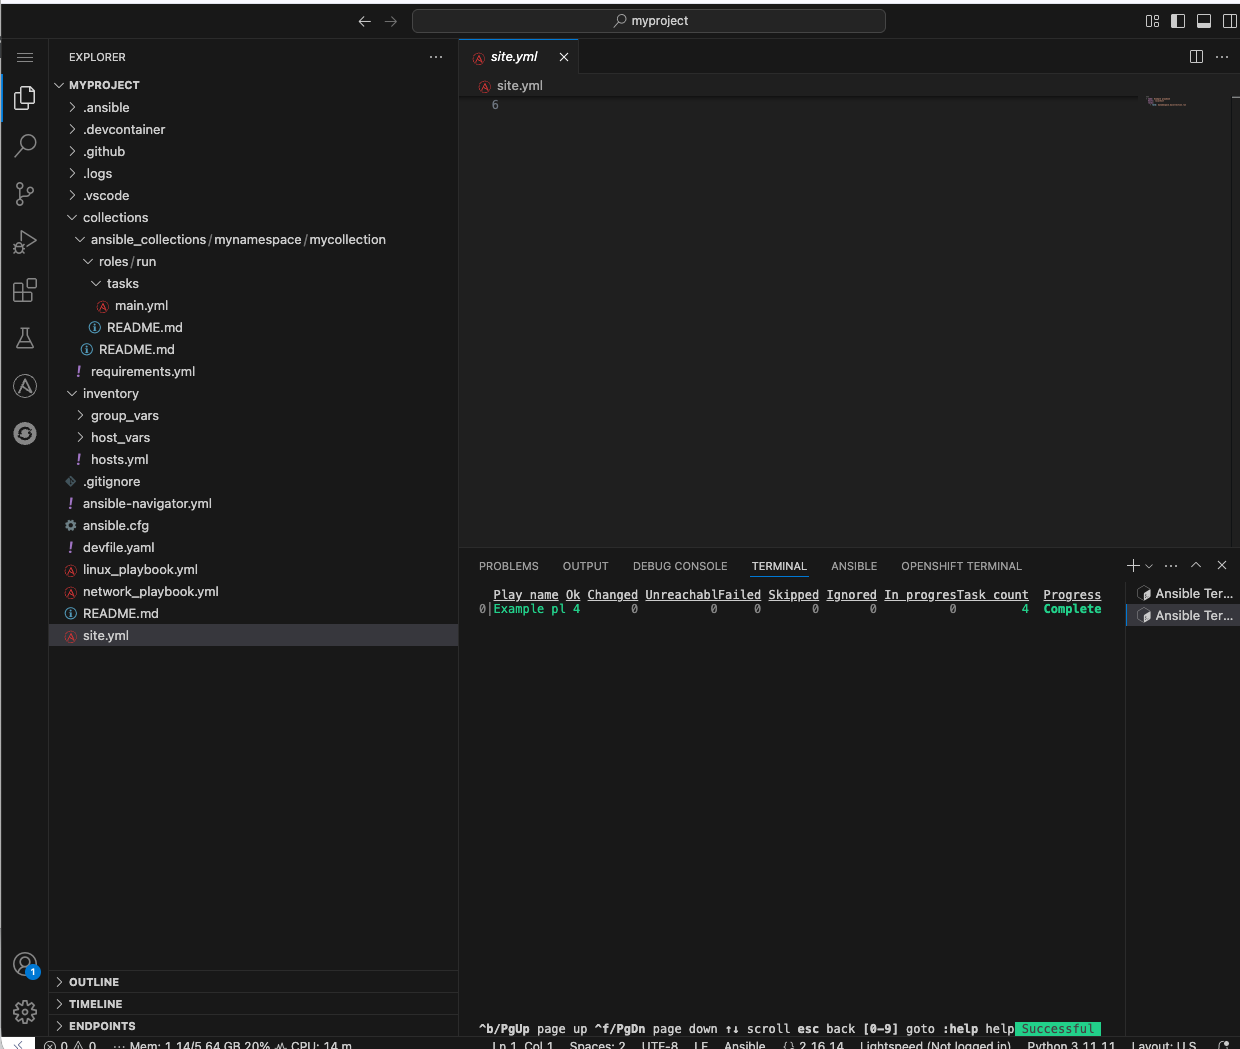
-
Click inside the terminal and enter
0to inspect the execution of the play. You can inspect the output of any of the tasks included within this play. e.g.3:
-
Once reviewed, hit
ESCseveral times until you exitansible-navigatorand return back to the terminal.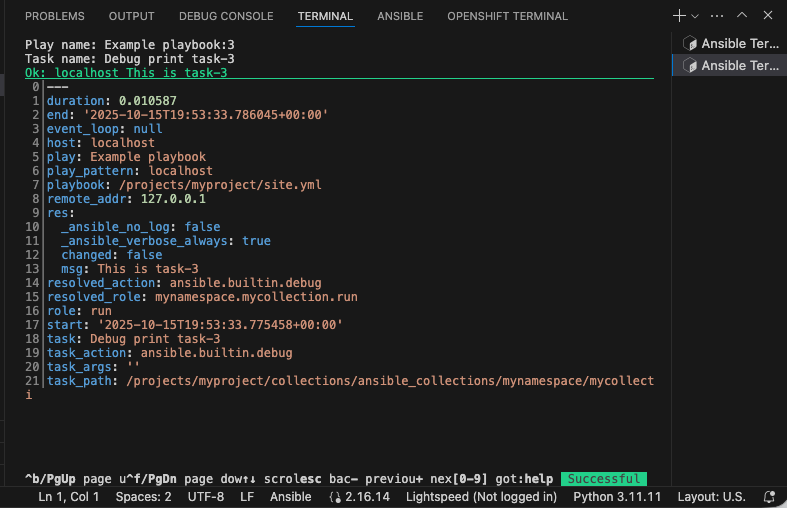
4.3.3: Using ansible-lint in VS Code
The VS Code Ansible extension proactively runs ansible-lint on any playbook you are editing. Experiment with this tool to understand how the feature works.
-
Append the existing
site.ymlplaybook with the following poorly written tasktasks: - debug: msg: "Hello" -
As soon as you finish editing, the autosave feature will kick in and run
ansible-lint. Notice the message and the bottom of the screen: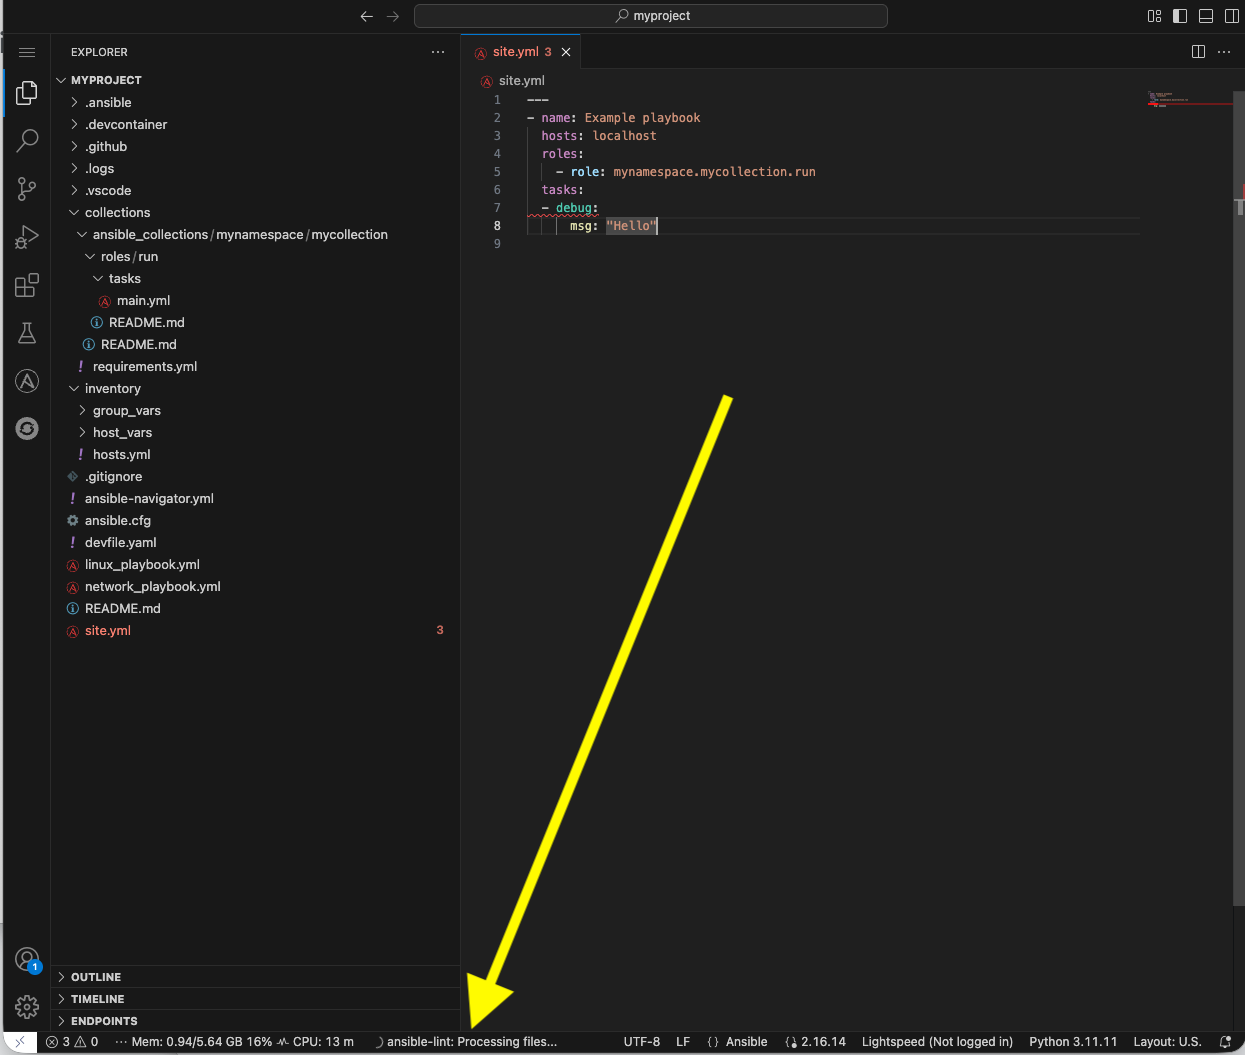
-
The extension should have added red squiggly lines underneath
debug. Hover over the red squiggly lines to see the violations: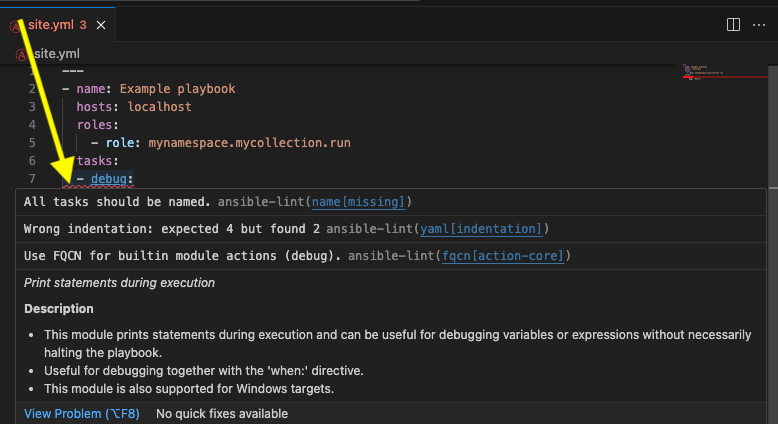
-
You can fix these manually. However, why not let automation and
ansible-lintdo the work for you? Open the extension settings: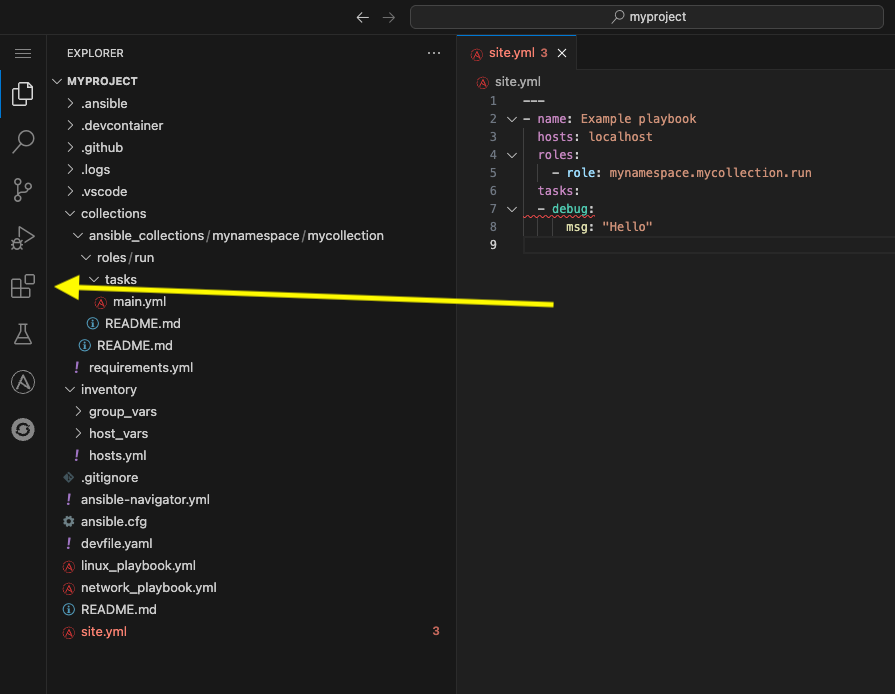
-
Open Settings for the Ansible extension:

-
Under the Ansible extension settings, click on the Validation subsection and enter
--fixas an extra argument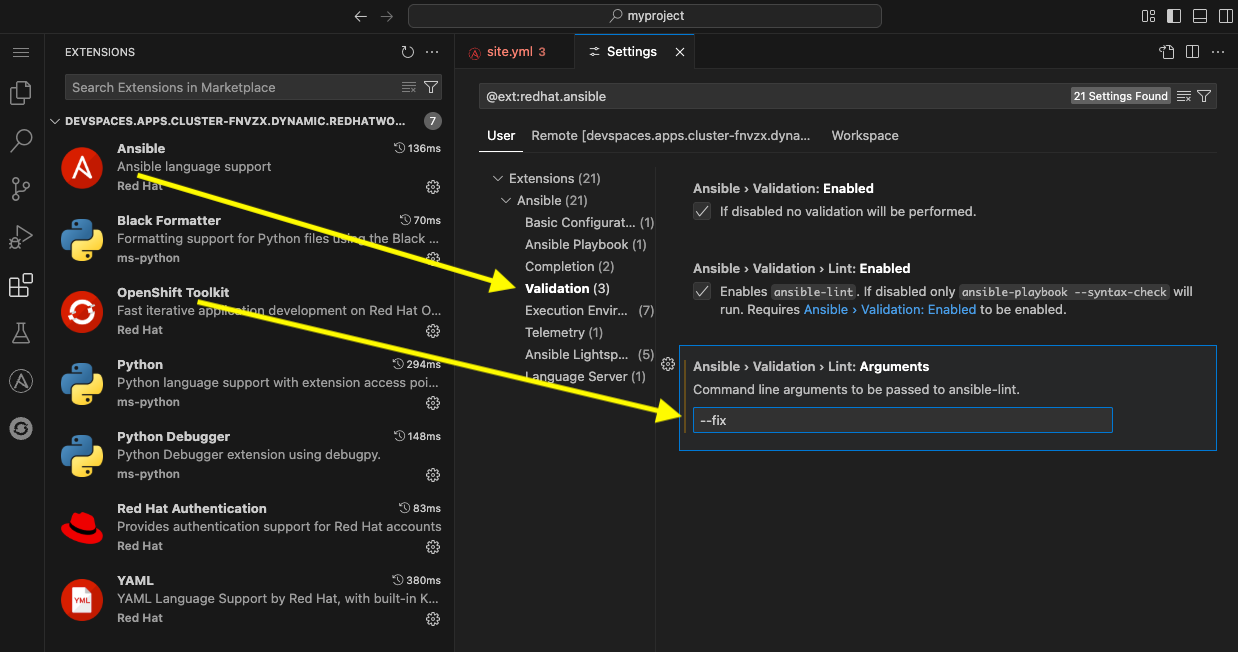
-
Close the settings page and save the file with either the main menu
File→SaveorCTRL/CMD + s -
ansible-lint --fixwill automatically correct errors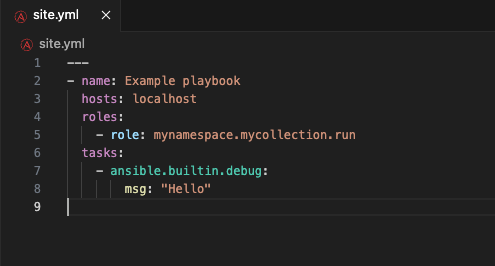
-
Notice it did not fix every violation, such as adding a
name:key for the debug task. Feel free to fix this manually if you choose. Not every rule is enforced automatically. Seeman ansible-lintfor more information.
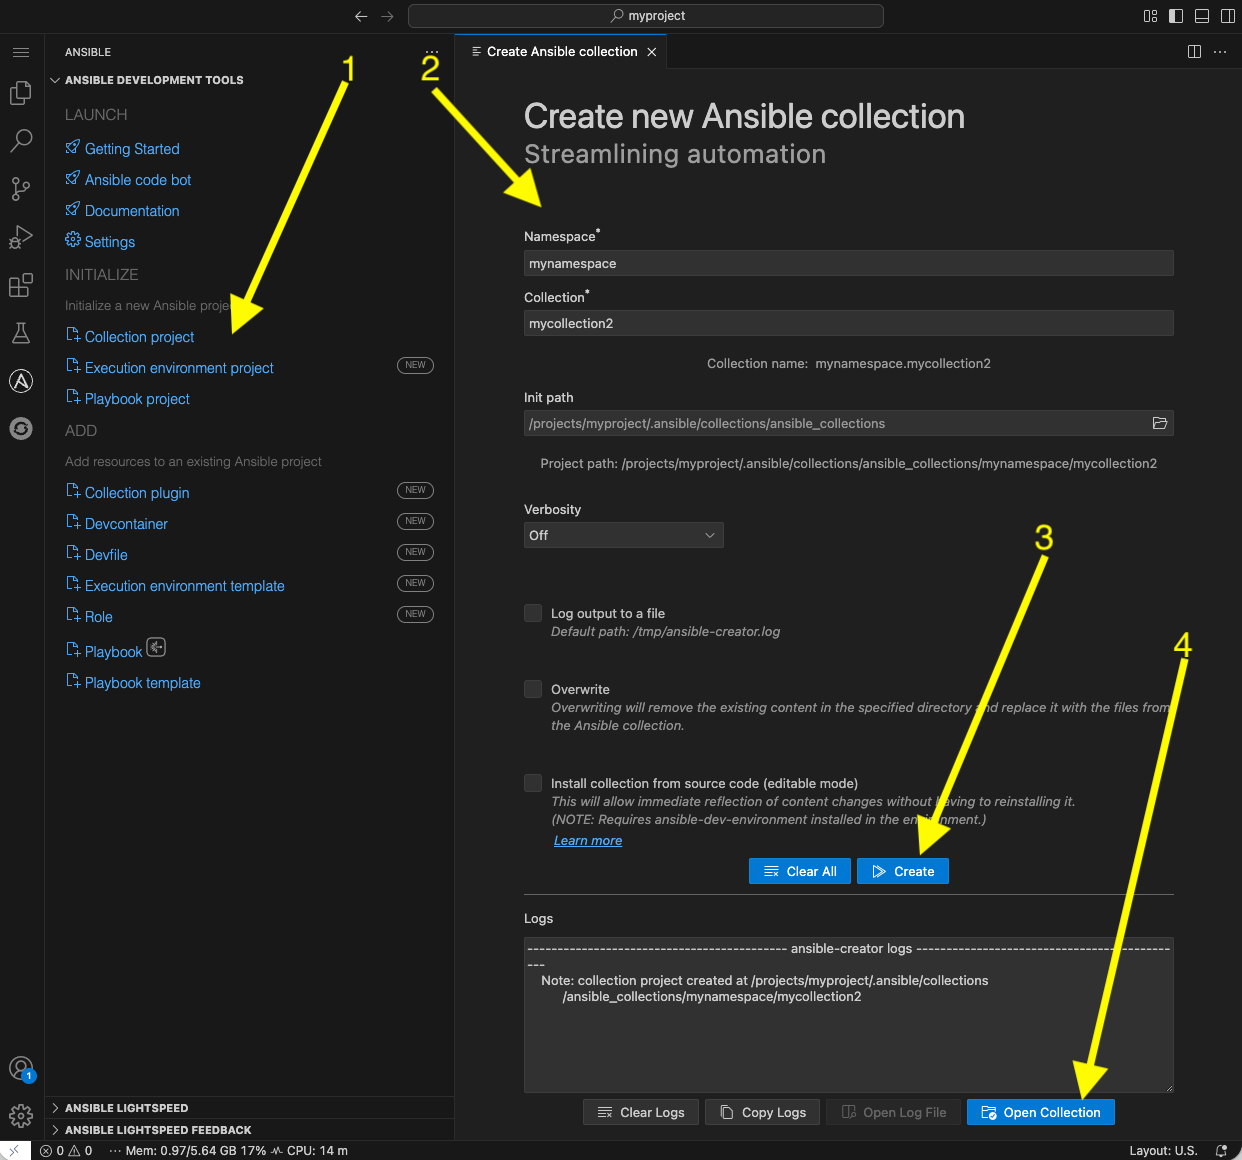
4.4:Creating a Collection project
You can close the previous project window and return to the original Workspace. Once in the original Workspace, create a new Ansible Collection project using the Ansible extension.
-
Click the Ansible extension icon on the left side of the VS Code window
-
Under the Initialize section of the Ansible Development Tools panel, click on the
Collection projectlink. -
Enter the following details:
-
Namespace:
mynamespace -
Collection:
mycollection2 -
Init path: this value should be autodetected for you as
/projects/myproject/.ansible/collections/ansible_collections
-
-
Click
Create -
When complete, click Open Collection to open the new collection project in a new VS Code window.
-
Explore the scaffolded files to see their content
-
.gitignore: pre-loaded with settings to ignore files in our git repository and make and avoid including unnecessary or undesired files. -
test-requirements.txt: Already includes the Ansible Python dependencies required for running tests. -
.github/workflows: Sample workflow for your collection to run CI capabilities on GitHub Actions -
.pre-commit-config: Includes many useful pre-commit utilities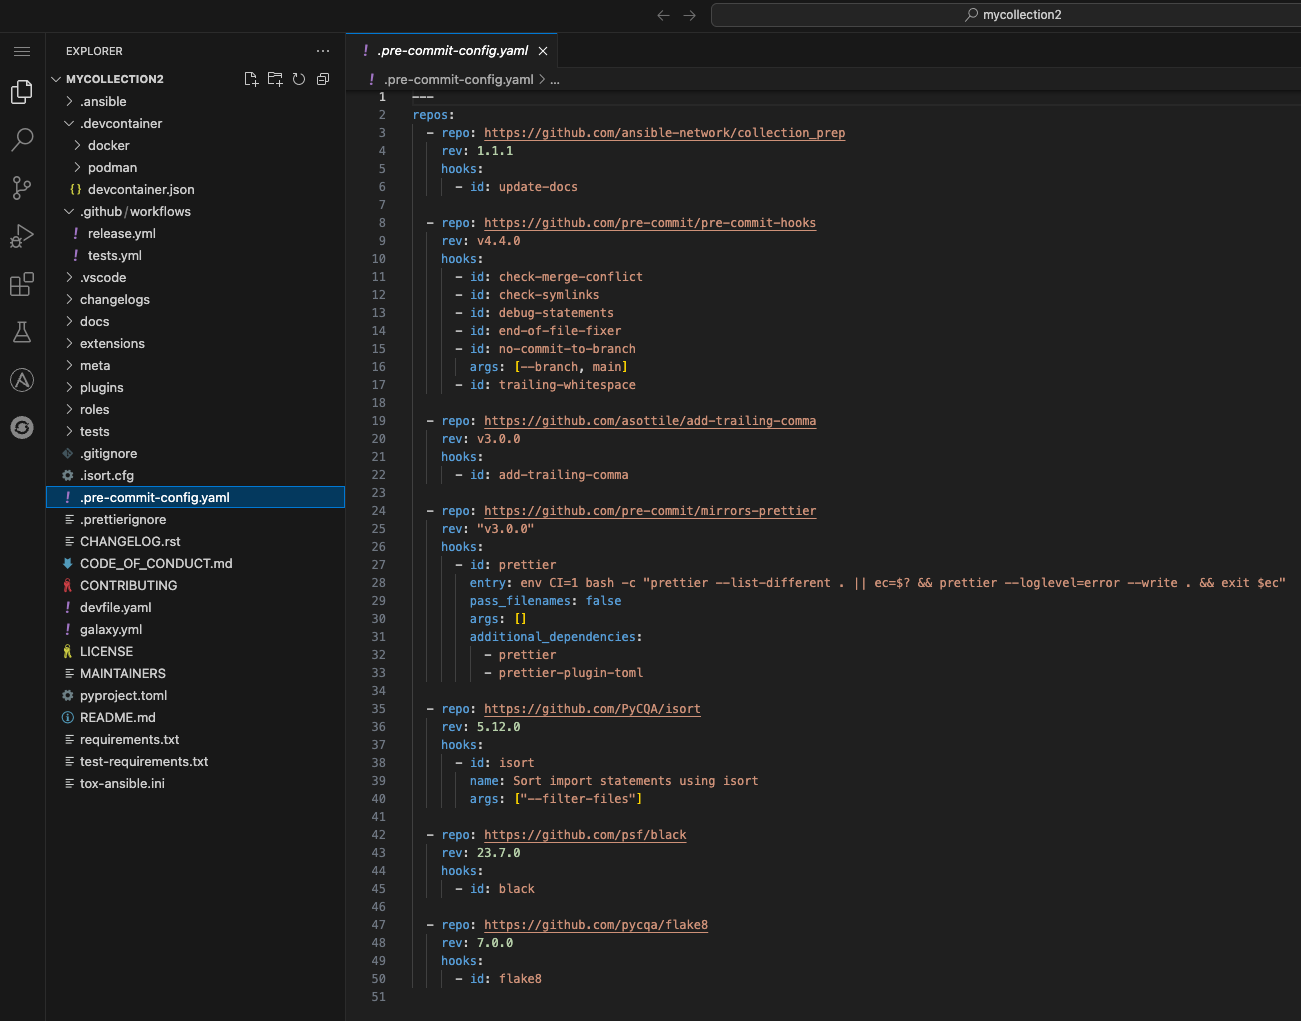
-
-
Review the included sample role
runand its tasks. Feel free to create a playbook that invokes the collection using the tools that you learned in this lab.

Conclusion
In this lab, you have successfully learned essential software development practices and tools that can be applied to automation development:
-
Git version control fundamentals, including branching strategies and merge conflicts
-
Secret scanning using
gitleaksandpre-commithooks for automated code quality checks -
Ansible Development Tools suite including
ansible-lint,ansible-navigator, and VS Code extensions -
Creating and managing Ansible projects and collections through the VS Code interface
This foundation prepares you to develop automation content that follows industry best practices for code quality, security, and maintainability.